A recent comment on my Mindtouch intro page asked how I built the discussion board.
I originally got the code from the Mindtouch Developer site here, however I can’t seem to find the complete source code anymore. Either way, I’m pretty sure neilw, a valuable contributor to the Mindtouch community is the author of this code and full credit goes to him.

The actual implementation is very simple. You just need to make a couple of templates.
First, create the discussion board page template, or topic list:
Template:/ForumTopicList
<div block="var homepath=(args.path ?? '/Forum_Topics');
if (homepath[0] == '/') {
let homepath = page.path .. homepath;
}">
<p>{{wiki.create("Create New Topic",homepath,(args.template ?? "ForumTopic"),true,"Put Your Title Here")}}</p>
<table block="var homepage = wiki.getpage(homepath);
var empty = true;
if (homepage != nil) {
let empty = (#homepage.subpages == 0);
}
var topics = [];
if (!empty) {
foreach (var p in homepage.subpages) {
var entry = wiki.page(p.path);
var originator = entry['//*[@id=\'ForumEntryOriginator\']'];
if (xml.text(originator) == nil) { let originator = web.link(p.author.uri, p.author.name); }
var lastAuthor = p.author;
var lastDate = p.date;
var lastChange = string.contains(p.editsummary, 'page created') ? '(new)' : '(E)';
if (#p.comments != 0) {
var lastComment = list.reverse(p.comments)[0];
if (date.isafter(lastComment.date, p.date)) {
let lastAuthor = lastComment.author;
let lastDate = lastComment.date;
let lastChange = '(C)';
}
}
let lastAuthor = web.link(lastAuthor.uri, lastAuthor.name);
let lastDate = date.format(lastDate, 's');
var sticky = (p.tags.sticky != nil ? 'STICKY!' : '');
let lastDate = (sticky != '' ? 'z' : 'a') .. lastDate;
let topics ..= [ { page:p, originator:originator, author:lastAuthor, date:lastDate, change:lastChange, sticky:sticky } ];
}
let topics = list.sort(topics, 'date', true);
}" border="1" cellpadding="4" cellspacing="0" class="table">
<tbody>
<tr>
<th style="width: 55%" valign="top">Topic</th>
<th style="text-align: center; width: 10%" valign="top">Starter</th>
<th style="text-align: center; width: 5%" valign="top">Replies</th>
<th style="text-align: center; width: 25%" valign="top">Last Comment(C) or Edit(E)</th>
<th style="width: 5%" valign="top">Views</th>
</tr>
<tr class="{{__count % 2 == 0 ? 'bg1' : 'bg2'}}" foreach="var t in topics" if="!empty">
<td valign="top"><font size="1" style="font-size: 16px"><strong><font style="color: #598527; font-size: 10px">{{t.sticky}}</font> {{web.link(t.page.uri, t.page.title)}}</strong></font><br />
</td>
<td style="text-align: center; vertical-align: top">{{ t.originator; }}</td>
<td style="text-align: center; vertical-align: top">{{#t.page.comments}}</td>
<td style="text-align: center" valign="top"><font style="font-size: 12px">{{date.format(string.substr(t.date,1),'yyyy-M-d H:mm');' '; if (t.change != '(new)') { 'by '; t.author; ' '; } t.change; }}<br />
</font></td>
<td style="text-align: center" valign="top">{{t.page.viewcount}}</td>
</tr>
<tr if="empty">
<td colspan="5"><font style="font-size: 14px"><strong>(no topics yet)</strong></font></td>
</tr>
</tbody>
</table>
<br />
</div> |
<div block="var homepath=(args.path ?? '/Forum_Topics');
if (homepath[0] == '/') {
let homepath = page.path .. homepath;
}">
<p>{{wiki.create("Create New Topic",homepath,(args.template ?? "ForumTopic"),true,"Put Your Title Here")}}</p>
<table block="var homepage = wiki.getpage(homepath);
var empty = true;
if (homepage != nil) {
let empty = (#homepage.subpages == 0);
}
var topics = [];
if (!empty) {
foreach (var p in homepage.subpages) {
var entry = wiki.page(p.path);
var originator = entry['//*[@id=\'ForumEntryOriginator\']'];
if (xml.text(originator) == nil) { let originator = web.link(p.author.uri, p.author.name); }
var lastAuthor = p.author;
var lastDate = p.date;
var lastChange = string.contains(p.editsummary, 'page created') ? '(new)' : '(E)';
if (#p.comments != 0) {
var lastComment = list.reverse(p.comments)[0];
if (date.isafter(lastComment.date, p.date)) {
let lastAuthor = lastComment.author;
let lastDate = lastComment.date;
let lastChange = '(C)';
}
}
let lastAuthor = web.link(lastAuthor.uri, lastAuthor.name);
let lastDate = date.format(lastDate, 's');
var sticky = (p.tags.sticky != nil ? 'STICKY!' : '');
let lastDate = (sticky != '' ? 'z' : 'a') .. lastDate;
let topics ..= [ { page:p, originator:originator, author:lastAuthor, date:lastDate, change:lastChange, sticky:sticky } ];
}
let topics = list.sort(topics, 'date', true);
}" border="1" cellpadding="4" cellspacing="0" class="table">
<tbody>
<tr>
<th style="width: 55%" valign="top">Topic</th>
<th style="text-align: center; width: 10%" valign="top">Starter</th>
<th style="text-align: center; width: 5%" valign="top">Replies</th>
<th style="text-align: center; width: 25%" valign="top">Last Comment(C) or Edit(E)</th>
<th style="width: 5%" valign="top">Views</th>
</tr>
<tr class="{{__count % 2 == 0 ? 'bg1' : 'bg2'}}" foreach="var t in topics" if="!empty">
<td valign="top"><font size="1" style="font-size: 16px"><strong><font style="color: #598527; font-size: 10px">{{t.sticky}}</font> {{web.link(t.page.uri, t.page.title)}}</strong></font><br />
</td>
<td style="text-align: center; vertical-align: top">{{ t.originator; }}</td>
<td style="text-align: center; vertical-align: top">{{#t.page.comments}}</td>
<td style="text-align: center" valign="top"><font style="font-size: 12px">{{date.format(string.substr(t.date,1),'yyyy-M-d H:mm');' '; if (t.change != '(new)') { 'by '; t.author; ' '; } t.change; }}<br />
</font></td>
<td style="text-align: center" valign="top">{{t.page.viewcount}}</td>
</tr>
<tr if="empty">
<td colspan="5"><font style="font-size: 14px"><strong>(no topics yet)</strong></font></td>
</tr>
</tbody>
</table>
<br />
</div>
Then call this template somewhere on your page, with this:
{{ template("ForumTopicList") }}
Now, you need to create the template for the actual new topic post:
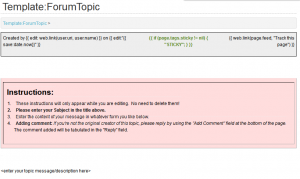
Template:/ForumTopic
<table border="0" cellpadding="5" cellspacing="0" style="border-bottom: black thin solid; border-left: black thin solid; background-color: #eeeeee; width: 100%; border-top: black thin solid; border-right: black thin solid">
<tbody style="vertical-align: top">
<tr>
<td>Created by <span id="ForumEntryOriginator">{{ edit: web.link(user.uri, user.name) }}</span> on {{ edit:"{{ save:date.now}}" }}<br />
</td>
<td style="text-align: center; vertical-align: top"><span style="color: #598527; font-weight: bold">{{ if (page.tags.sticky != nil) { "STICKY"; } }}</span></td>
<td style="background-image: none; text-align: right; vertical-align: top">{{ web.link(page.feed, "Track this page") }}<br />
</td>
</tr>
</tbody>
</table>
<p> </p>
<p> </p>
<table border="1" cellpadding="5" cellspacing="0" class="comment" style="background-color: #ffdddd; border-collapse: separate; vertical-align: top">
<tbody style="vertical-align: top">
<tr>
<td style="width: 100%">
<p><span class="comment"><font style="font-size: 21px"><strong>Instructions:</strong></font></span></p>
<ol>
<li><span class="comment">These instructions will only appear while you are editing. No need to delete them!</span></li>
<li style="font-weight: bold"><span class="comment">Please enter your Subject in the title above.</span></li>
<li><span class="comment">Enter the content of your message in whatever form you like below.</span></li>
<li><span class="comment"><span style="font-weight: bold">Adding comment: </span><em>If you're not the original creator of this topic, please reply by using the "Add Comment" field at the bottom of the page. </em>The comment added will be tabulated in the "Reply" field.<br />
</span></li>
</ol>
</td>
</tr>
</tbody>
</table>
<p> </p>
<p><enter your topic message/description here></p> |
<table border="0" cellpadding="5" cellspacing="0" style="border-bottom: black thin solid; border-left: black thin solid; background-color: #eeeeee; width: 100%; border-top: black thin solid; border-right: black thin solid">
<tbody style="vertical-align: top">
<tr>
<td>Created by <span id="ForumEntryOriginator">{{ edit: web.link(user.uri, user.name) }}</span> on {{ edit:"{{ save:date.now}}" }}<br />
</td>
<td style="text-align: center; vertical-align: top"><span style="color: #598527; font-weight: bold">{{ if (page.tags.sticky != nil) { "STICKY"; } }}</span></td>
<td style="background-image: none; text-align: right; vertical-align: top">{{ web.link(page.feed, "Track this page") }}<br />
</td>
</tr>
</tbody>
</table>
<p> </p>
<p> </p>
<table border="1" cellpadding="5" cellspacing="0" class="comment" style="background-color: #ffdddd; border-collapse: separate; vertical-align: top">
<tbody style="vertical-align: top">
<tr>
<td style="width: 100%">
<p><span class="comment"><font style="font-size: 21px"><strong>Instructions:</strong></font></span></p>
<ol>
<li><span class="comment">These instructions will only appear while you are editing. No need to delete them!</span></li>
<li style="font-weight: bold"><span class="comment">Please enter your Subject in the title above.</span></li>
<li><span class="comment">Enter the content of your message in whatever form you like below.</span></li>
<li><span class="comment"><span style="font-weight: bold">Adding comment: </span><em>If you're not the original creator of this topic, please reply by using the "Add Comment" field at the bottom of the page. </em>The comment added will be tabulated in the "Reply" field.<br />
</span></li>
</ol>
</td>
</tr>
</tbody>
</table>
<p> </p>
<p><enter your topic message/description here></p>
You can modify this template to include whatever instructions you like.

That’s it! To create a new topic, navigate to the page that you call the ForumTopicList template, and click the “Create New Topic” button:

When others comment on the page that’s created, it will count as “replies” and show in the topic list.


