Azure Managed Prometheus and Grafana with Terraform – part 3

This is part 3 in learning about monitoring solutions for an Azure Kubernetes Service (AKS), using Azure Managed Prometheus and Azure Managed Grafana.

In this post we are going to use Terraform to finish the implementation of gathering Prometheus metrics for the ingress-nginx controller, which will grant an application-centric view of metrics.

The source code for this part 3 post can be found here in my GitHub repo: aks-prometheus-grafana (part 3)

My criteria for success was to have a populated dashboard in Grafana for ingress-nginx metrics. The source code for ingress-nginx has two different dashboards that can be imported into Grafana: https://github.com/kubernetes/ingress-nginx/tree/main/deploy/grafana/dashboards

Now having access to Azure Managed Grafana, I used the web portal to create an API token that I could pass to Terraform.

Within my Terraform config, I defined a Grafana provider, and then downloaded the JSON files for the dashboards and referenced them as a dashboard resource:

## ---------------------------------------------------
# Grafana Dashboards
## ---------------------------------------------------
provider "grafana" {
  url  = azurerm_dashboard_grafana.default.endpoint
  auth = "securely pass api token"
}
resource "grafana_dashboard" "nginxmetrics" {
  depends_on = [ azurerm_dashboard_grafana.default ]
  config_json = file("nginx.json")
}
resource "grafana_dashboard" "requestHandlingPerformance" {
  depends_on = [ azurerm_dashboard_grafana.default ]
  config_json = file("requestHandlingPerformance.json")
}

I could now see these dashboards in my Grafana instance, but they were empty:

Taking the next step to solve this problem really bogged down based on my lack of understanding of Prometheus and how it is configured. The default installation of Azure Managed Prometheus and Grafana doesn’t do anything with ingress-nginx metrics out of the box, so I began trying to identify how to get it working. Following through Microsoft Docs (which are typically really great) I came across this page: https://learn.microsoft.com/en-us/azure/azure-monitor/essentials/prometheus-metrics-scrape-configuration

This was quite overwhelming to me. Many options are described, none of which I had knowledge about, or had good use cases defined in the doc page for why you would choose one or the other. There is no indication or example of using these patterns either, which doesn’t make for a good starting point.

I looked next at the pod-annotation-based-scraping setting, found within the “ama-metrics-settings-configmap.yaml” file. I set this to include the name of my workload namespace, as well as where I deployed ingress-nginx: podannotationnamespaceregex = "test|ingress-nginx"

After re-running my Terraform and waiting for the metrics pods to reload (judging by the restart count by a kubectl get pods, this didn’t do anything; the dashboards remained blank.

I looked at the Azure Prometheus troubleshooting doc to get the config interface of Prometheus port forwarded, and after reaching this interface in a web browser, I didn’t see any new targets listed beyond the existing node ones.

After some searching and reading, I came across this post: https://medium.com/microsoftazure/automating-managed-prometheus-and-grafana-with-terraform-for-scalable-observability-on-azure-4e5c5409a6b1
It had an example regarding a prometheus scrape config, which was mentioned in the Azure docs. This makes sense, in that what I originally configured above was a scoping statement for where this scrape config would be applied.

This understanding led me to the ingress-nginx docs which have a sample prometheus scrape config!
https://github.com/kubernetes/ingress-nginx/blob/main/deploy/prometheus/prometheus.yaml

Following the Azure doc for prometheus-metric-scrape-configuration, I created a new file named ama-metrics-prometheus-config-configmap.yaml and populated it with the scrape config found within the ingress-nginx repository.

kind: ConfigMap
apiVersion: v1
data:
  prometheus-config: |-
    global:
      scrape_interval: 30s
    scrape_configs:
      - job_name: 'kubernetes-pods'

        kubernetes_sd_configs:
        - role: pod

        relabel_configs:
        # Scrape only pods with the annotation: prometheus.io/scrape = true
        - source_labels: [__meta_kubernetes_pod_annotation_prometheus_io_scrape]
          action: keep
          regex: true

        # If prometheus.io/path is specified, scrape this path instead of /metrics
        - source_labels: [__meta_kubernetes_pod_annotation_prometheus_io_path]
          action: replace
          target_label: __metrics_path__
          regex: (.+)

        # If prometheus.io/port is specified, scrape this port instead of the default
        - source_labels: [__address__, __meta_kubernetes_pod_annotation_prometheus_io_port]
          action: replace
          regex: ([^:]+)(?::\d+)?;(\d+)
          replacement: $1:$2
          target_label: __address__

        # If prometheus.io/scheme is specified, scrape with this scheme instead of http
        - source_labels: [__meta_kubernetes_pod_annotation_prometheus_io_scheme]
          action: replace
          regex: (http|https)
          target_label: __scheme__

        # Include the pod namespace as a label for each metric
        - source_labels: [__meta_kubernetes_namespace]
          action: replace
          target_label: kubernetes_namespace

        # Include the pod name as a label for each metric
        - source_labels: [__meta_kubernetes_pod_name]
          action: replace
          target_label: kubernetes_pod_name

        # [Optional] Include all pod labels as labels for each metric
        - action: labelmap
          regex: __meta_kubernetes_pod_label_(.+)
metadata:
  name: ama-metrics-prometheus-config
  namespace: kube-system

I deployed this through Terraform with another kubectl_manifest resource, and then forced traffic to my workloads with a looping Invoke-WebRequest in Powershell.

This succeeded! Very quickly I began to see metrics appear within my Grafana dashboards:

Now when I checked the Prometheus Targets debugging interface, I found an addition for ingress-nginx. You’ll note I also have a “down” entry there for my test workload, which doesn’t have a metrics interface for scraping (but was included in my podannotationnamespaceregex earlier).

Originally I thought that I was going to encounter namespace boundary problems, because the Monitoring docs for ingress-nginx talk about this limitation when using pod scraping. I thought I would be stuck because I am deploying in separate namespaces which indicates the need to use ServiceMonitor objects; and unfortunately the AKS Metrics add-on very-specifically doesn’t support Prometheus Operator CRDs like ServiceMonitor, so we need to use PodAnnotation scraping.

Fortunately after adding the scrape configuration, there wasn’t any further action that I needed to take, so perhaps the described limitation of Prometheus reaching across namespaces is modified by the default Azure deployment.

I’ll drop a link for one more helpful resource, which uses the Prometheus Operator installation and Service Monitors, but helped me gain some understanding of the components of this system: https://techcommunity.microsoft.com/t5/azure-stack-blog/notes-from-the-field-nginx-ingress-controller-for-production-on/ba-p/3781350

Azure Managed Prometheus and Grafana with Terraform – part 1

I’m learning about monitoring solutions for an Azure Kubernetes Service (AKS), and have been experimenting with Azure Managed Prometheus and Azure Managed Grafana. This is a multi-part blog series due to the length of content:

The Prometheus and Grafana stack is very common for Kubernetes environments, but the idea of not having to maintain the health of those systems is very attractive to me. When I picture integrating these solutions into the platform I’m building, the less complexity I add for my team the easier it is to support the platform.

There are a few key limitations unfortunately that might delay my usage of these solutions:

  • Azure Managed Prometheus isn’t currently available in the Azure US Government cloud (link). Expected Q2 2023 ()
  • Only support for K8s resources, not ingest from standalone VMs and other sources (link). This may be mitigated with extra self-managed Prometheus and Remote-write capabilities
  • Role Based Access Control within Managed Grafana isn’t available

One of my key considerations as I evaluated these managed services is how repeatable is implementation through code – I need to be able to reproduce environments on-demand and not depend on written procedures of manual intervention in Portal interfaces.

This Part 1 of the series will cover an initial setup of an environment to facilitate the proof of concept. I’m using Terraform as my deployment tool, running interactively against a local state file for convenience. Relying upon the Terraform providers for AzureRM, Kubernetes, and Helm, I am able to repeatably deploy this solution.

I will say that the methods I use in the following code are only suitable for proof-of-concept environments; there are much better ways to handle secret management and authentication for these providers when targeting a production system; this may include wrapper scripts to pull secrets interactively from a KeyVault, or using Azure Managed Identities for virtual machine resources and ensure Terraform runs from within that resource.

The source code for this part 1 post can be found here in my GitHub repo: aks-prometheus-grafana (part 1)

There are some opinionated resources and structures in what I’m configuring, based on ease-of-use, supporting systems, and integration in the broader platform that I’m building. These will be described throughout this post, and can be easily stripped out if they are unnecessary in other environments.

We begin by specifying required_providers, including the fully qualified address, as this is Terraform best practice (link). Normally I would also include version pinning on these providers in my root module.

terraform {
  # ---------------------------------------------------
  # Setup providers
  # ---------------------------------------------------
  required_providers {
    azurerm = {
      source  = "registry.terraform.io/hashicorp/azurerm"
    }
    kubernetes = {
      source  = "registry.terraform.io/hashicorp/kubernetes"
    }
    # Used to deploy kubectl_manifest resource
    kubectl = {
      source  = "gavinbunney/kubectl"
    }
    helm = {
      source  = "registry.terraform.io/hashicorp/helm"
    }
    random = {
      source  = "registry.terraform.io/hashicorp/random"
    }
  }
}

Next we’ll specify the Provider Configuration for each:

provider "azurerm" {
  features {}
  environment = "public"
}
provider "kubernetes" {
  host                   = azurerm_kubernetes_cluster.default.kube_admin_config.0.host
  username               = azurerm_kubernetes_cluster.default.kube_admin_config.0.username
  password               = azurerm_kubernetes_cluster.default.kube_admin_config.0.password
  client_certificate     = base64decode(azurerm_kubernetes_cluster.default.kube_admin_config.0.client_certificate)
  client_key             = base64decode(azurerm_kubernetes_cluster.default.kube_admin_config.0.client_key)
  cluster_ca_certificate = base64decode(azurerm_kubernetes_cluster.default.kube_admin_config.0.cluster_ca_certificate)
}
provider "kubectl" {
  host                   = azurerm_kubernetes_cluster.default.kube_admin_config.0.host
  username               = azurerm_kubernetes_cluster.default.kube_admin_config.0.username
  password               = azurerm_kubernetes_cluster.default.kube_admin_config.0.password
  client_certificate     = base64decode(azurerm_kubernetes_cluster.default.kube_admin_config.0.client_certificate)
  client_key             = base64decode(azurerm_kubernetes_cluster.default.kube_admin_config.0.client_key)
  cluster_ca_certificate = base64decode(azurerm_kubernetes_cluster.default.kube_admin_config.0.cluster_ca_certificate)
}
provider "helm" {
  kubernetes {
    host                   = azurerm_kubernetes_cluster.default.kube_admin_config.0.host
    username               = azurerm_kubernetes_cluster.default.kube_admin_config.0.username
    password               = azurerm_kubernetes_cluster.default.kube_admin_config.0.password
    client_certificate     = base64decode(azurerm_kubernetes_cluster.default.kube_admin_config.0.client_certificate)
    client_key             = base64decode(azurerm_kubernetes_cluster.default.kube_admin_config.0.client_key)
    cluster_ca_certificate = base64decode(azurerm_kubernetes_cluster.default.kube_admin_config.0.cluster_ca_certificate)
  }
  registry {
    # Manually perform a `helm repo update` on the runner before running Terraform
    url      = "oci://artifacts.private.registry"
    username = "api"
    # Pass in secret on environment variable named TF_VAR_artifactAPIToken
    password = var.artifactAPIToken
  }
}

Some key things to note from that code block above:

  • I’m using the defaults of the AzureRM provider to rely upon my authenticated session with Azure CLI – including the definition of an Azure Subscription to target.
  • The Kubernetes and Helm provider configurations are dependent on an “azurerm_kubernetes_cluster” resource that has yet to be defined in my configuration. This is a common (but not great way) to authenticate. A better choice would be to securely build a Kubeconfig on the worker that is to run Terraform, and reference that with the “config_path” attribute instead
  • I’m using a private registry for my Helm charts, where my organization has control over versions, content, and security scanning. This is authenticated using an API token that only contains read access, which I am passing in as an OS environment variable in the supported Terraform format.

Let’s create a few initial resources now:

variable "adminGroupObjectIds" {
  type        = list(string)
  description = "A list of Object IDs of Azure Active Directory Groups which should have Admin Role on the Cluster"
  default     = []
}
variable "artifactAPIToken" {
  type        = string
  description = "String containing API token for private artifact registry"
}
## ---------------------------------------------------
# Initial resource group
## ---------------------------------------------------
# Utilize the current Azure CLI context as a data source for future reference
data "azurerm_client_config" "current" {}

resource "azurerm_resource_group" "default" {
  name     = "rg-test"
  location = "eastus2"
}

## ---------------------------------------------------
# user name and password setup for AKS node pools
## ---------------------------------------------------
resource "random_string" "userName" {
  length  = 8
  special = false
  upper   = false
}
resource "random_password" "userPasswd" {
  length           = 32
  special          = true
  override_special = "!#$%&*()-_=+[]{}<>:?"
}

## ---------------------------------------------------
# Azure KeyVault and components
## ---------------------------------------------------
resource "azurerm_key_vault" "default" {
  name                            = "kv-aks1234" # Must resolve to 24 characters or less
  resource_group_name             = azurerm_resource_group.default.name
  location                        = azurerm_resource_group.default.location
  tenant_id                       = data.azurerm_client_config.current.tenant_id
  soft_delete_retention_days      = 7
  enabled_for_deployment          = true
  enabled_for_template_deployment = true
  sku_name                        = "standard"
}
# Store the generated username/password in the KeyVault
resource "azurerm_key_vault_secret" "node_admin_name" {
  name         = "aksadminname"
  value        = random_string.userName.result
  key_vault_id = azurerm_key_vault.default.id
}

resource "azurerm_key_vault_secret" "node_admin_passwd" {
  name         = "aksadminpasswd"
  value        = random_password.userPasswd.result
  key_vault_id = azurerm_key_vault.default.id
}

This config provides the capability to access the randomly generated username/password for the AKS nodes if required for troubleshooting without having to inspect the Terraform state file to get their values. Note, the KeyVault name must be globally unique.

Time to create the AKS cluster itself, including a Windows node pool because that is part of my environment:

resource "azurerm_kubernetes_cluster" "default" {
  name                          = "aks-eastus2-test"
  resource_group_name           = azurerm_resource_group.default.name
  location                      = azurerm_resource_group.default.location
  dns_prefix                    = azurerm_resource_group.default.name
  node_resource_group           = "rg-aks-eastus2-test_node"
  public_network_access_enabled = true

  azure_active_directory_role_based_access_control {
    managed                = true
    azure_rbac_enabled     = true
    # Grant Cluster Admin to AzureAD object ids supplied at runtime
    admin_group_object_ids = var.adminGroupObjectIds
  }

  key_vault_secrets_provider {
    secret_rotation_enabled  = true
    secret_rotation_interval = "2m"
  }
  network_profile {
    network_plugin = "azure"
    network_mode   = "transparent"
    network_policy = "calico"
  }

  default_node_pool {
    name       = "system"
    node_count = 1
    vm_size    = "Standard_B2ms"
    os_sku     = "Mariner"
  }

  windows_profile {
    admin_username = random_string.userName.result
    admin_password = random_password.userPasswd.result
  }

  identity {
    type = "SystemAssigned"
  }
}

resource "azurerm_kubernetes_cluster_node_pool" "default" {
  name                  = "win22"
  kubernetes_cluster_id = azurerm_kubernetes_cluster.default.id
  mode                  = "User" # Node Pool Type
  enable_node_public_ip = false
  enable_auto_scaling   = true
  node_count            = 1
  min_count             = 1
  max_count             = 5
  max_pods              = 10
  vm_size               = "Standard_B2ms"
  os_type               = "Windows"
  os_sku                = "Windows2022"
}

This config creates a cluster with Azure RBAC for Kubernetes enabled (the azure_active_directory_role_based_access_control block), integration with the CSI Secrets Store Driver for KeyVault integration (the key_vault_secrets_provider block) and a System-Assigned Managed Identity (the identity block).
Now a few final components in preparation of the cluster:

resource "azurerm_role_assignment" "clusteradmin-rbacclusteradmin" {
  scope                = azurerm_kubernetes_cluster.default.id
  role_definition_name = "Azure Kubernetes Service RBAC Cluster Admin"
  principal_id         = var.adminGroupObjectIds[0]
}
## ---------------------------------------------------
# Keyvault access policy for secrets providers
## ---------------------------------------------------
resource "azurerm_key_vault_access_policy" "akvp" {
  key_vault_id = azurerm_key_vault.default.id
  tenant_id    = data.azurerm_client_config.current.tenant_id
  object_id    = azurerm_kubernetes_cluster.default.key_vault_secrets_provider.0.secret_identity.0.object_id
  secret_permissions = [
    "Get"
  ]
}
resource "azurerm_key_vault_access_policy" "akv2k8s" {
  key_vault_id = azurerm_key_vault.default.id
  tenant_id    = data.azurerm_client_config.current.tenant_id
  object_id    = azurerm_kubernetes_cluster.default.kubelet_identity[0].object_id
  secret_permissions = [
    "Get"
  ]
}

We create a role assignment within the Cluster (as part of the Azure RBAC for Kubernetes) based on a user/group object id, and then 2 KeyVault access policies.

The first is for the Azure KeyVault integration using the managed identity that is created when enabling the csi-secrets-store-driver.

The second is created for the managed identity assigned to the Linux nodes which will be used by the Akv2K8s project when installed. In my environment I am using the native Azure KeyVault integration for Windows pods, but the Akv2k8s solution for Linux pods because it offers enhanced security by injecting secrets from a KeyVault into an environment variable only accessible by the running process of the pod itself. This is greater protection than storing the secret as a K8s secret which is retrievable inside the cluster with enough permissions.

Next I’m going to perform Helm installations of a couple charts to assist in making workloads run-able:

## ---------------------------------------------------
# Helm Install
## ---------------------------------------------------
resource "helm_release" "akv2k8s" {
  name              = "akv2k8s"
  chart             = "third-party-helm/akv2k8s"
  namespace         = "akv2k8s"
  version           = "2.3.2"
  create_namespace  = true
  dependency_update = true
  set {
    name  = "controller.nodeSelector.kubernetes\\.io/os"
    value = "linux"
  }
  set {
    name  = "env_injector.nodeSelector.kubernetes\\.io/os"
    value = "linux"
  }
  set {
    name  = "global.metrics.enabled"
    value = "true"
  }
}

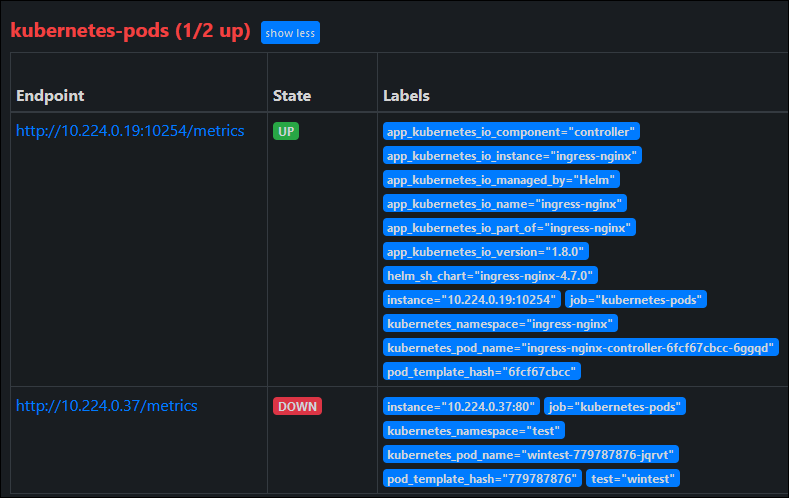
resource "helm_release" "ingress-nginx" {
  name              = "ingress-nginx"
  chart             = "third-party-helm/ingress-nginx"
  namespace         = "ingress-nginx"
  version           = "4.7.0"
  create_namespace  = true
  dependency_update = true
  set {
    name  = "controller.nodeSelector.kubernetes\\.io/os"
    value = "linux"
  }
  set {
    name  = "controller.service.annotations.service\\.beta\\.kubernetes\\.io/azure-load-balancer-health-probe-request-path"
    value = "/healthz"
  }
  set {
    name  = "metrics.enabled"
    value = "true"
  }
  set {
    name  = "controller.podAnnotations.prometheus\\.io/scrape"
    value = "true"
  }
  #set {
  #  name  = "controller.podAnnotations.prometheus\\.io/port"
  #  value = "10254"
  #}
}

Because I only have one Helm provider registered with a registry block, these chart sources are pulling through a feed on my private registry.

Since I have both Windows and Linux node pools, I need to set the nodeSelector attributes properly otherwise a Linux container will attempt and fail to run on a Windows node. I’m using the azure-load-balancer-health-probe-request-path annotation on ingress-nginx based on the examples provided in Microsoft Docs.

Finally we want to deploy a Windows workload into the cluster for testing and evaluation:

## ---------------------------------------------------
# Sample workload installation
## ---------------------------------------------------
resource "kubernetes_namespace" "test" {
  metadata {
    name = "test"
    labels = {
      # Used for akv2k8s integration
      "azure-key-vault-env-injection" = "enabled"
    }
  }
}
resource "kubernetes_deployment_v1" "wintest" {
  metadata {
    namespace = "test"
    name      = "wintest"
    labels = {
      test = "wintest"
    }
  }
  spec {
    replicas = 1
    selector {
      match_labels = {
        test = "wintest"
      }
    }
    template {
      metadata {
        labels = {
          test = "wintest"
        }
      }
      spec {
        container {
          image = "mcr.microsoft.com/windows/servercore/iis:windowsservercore-ltsc2022"
          name  = "wintest"
        }
      }
    }
  }
}
resource "kubernetes_service_v1" "wintest" {
  metadata {
    namespace = "test"
    name      = "wintest-svc"
  }
  spec {
    selector = {
      test = "wintest"
    }
    port {
      port        = 80
      target_port = 80
    }
  }
}

resource "kubernetes_ingress_v1" "wintest" {
  metadata {
    namespace = "test"
    name      = "wintest-ingress"
  }
  spec {
    ingress_class_name = "nginx"
    rule {
      http {
        path {
          path = "/"
          backend {
            service {
              name = "wintest-svc"
              port {
                number = 80
              }
            }
          }
        }
      }
    }
  }
}

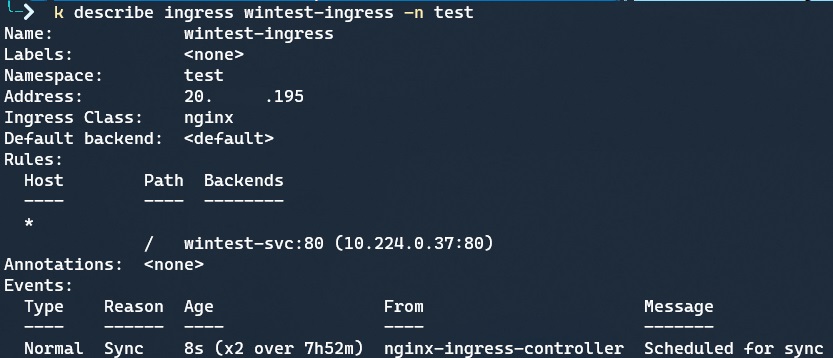
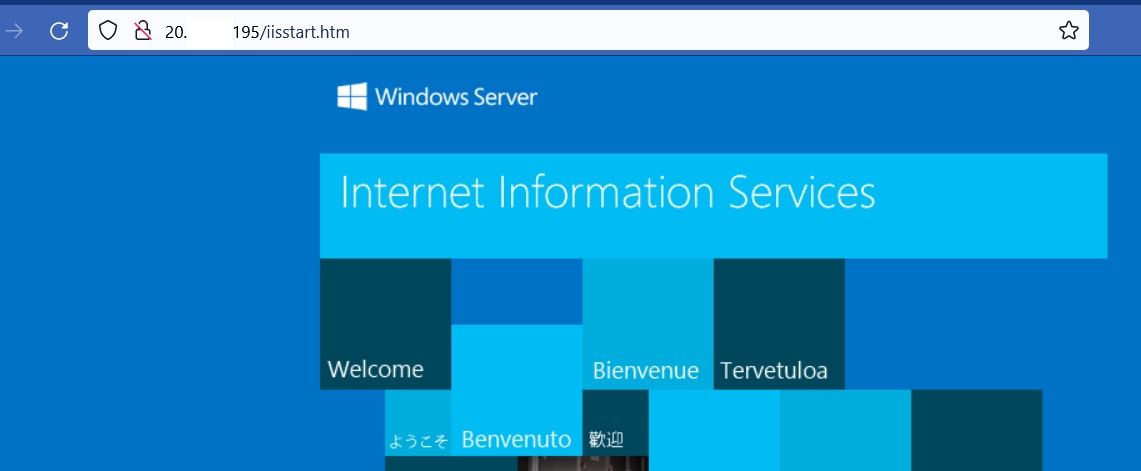
This produces a Deployment of a Windows Server 2022 IIS container, a Service, and in Ingress tied to the ingress-nginx controller that was created through Helm.

I can connect to my AKS cluster with Azure CLI, kubectl describe my Ingress to view it’s public IP address:

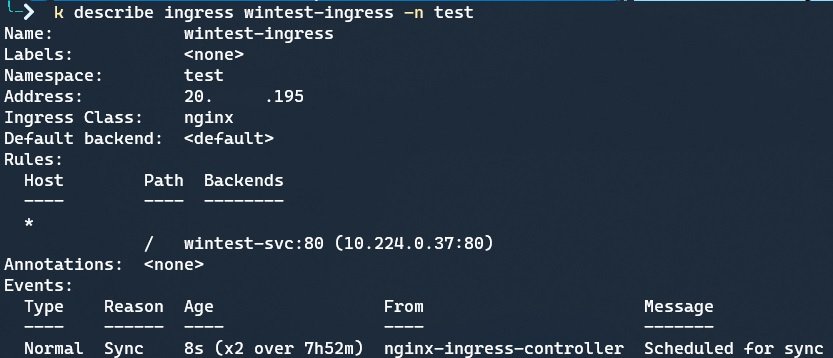
And then hit it in the browser on the “iisstart.htm” page to valid it is working:

Now we’re all set to begin working with the managed services of Prometheus and Grafana, which I’ll dig into in part 2.

Populate Azure File Share from DevOps Pipeline

Use case: There’s a set of files/scripts/templates that I want to keep in sync on a set of servers, but only on-demand.

A few different ways to solve this, but one way following a pattern I’ve used a few times is to have an Azure DevOps pipeline that populates and Azure File Share, and then a separate script deployed on the servers that can on-demand pull in files from the File Share.

The script below is a YAML pipeline for Azure DevOps, that uses an AzurePowerShell task.

The primary issue I had to work-around with this (at least using the Azure PowerShell module, is that the cmdlet “Set-AzStorageFileContent” requires the parent directory to exist; it won’t auto-create it. And unfortunately “New-AzStorageDirectory” has the same problem, not creating directories recursively.

So the PowerShell script below has two sections: first to create all the folders by ensuring each leaf in the path of each distinct folder gets created, and then populating with files.


variables:
  storageAccountName: "stg123"
  resourcegroupName: "teststorage-rg"
  fileShareName: "firstfileshare"

trigger:
  branches:
    include:
    - main
  paths:
    include: # Only trigger the pipeline on this path in the git repo
    - 'FileTemplates/*'

pool:
    vmImage: 'windows-latest'
steps:

- task: AzurePowerShell@5
  inputs:
    azureSubscription: 'AzureSubConnection' #This is the devops service connection name
    ErrorActionPreference: 'Stop'
    FailOnStandardError: true
    ScriptType: 'inlineScript'
    inline: |
      $accountKey = (Get-AzStorageAccountKey -ResourceGroupName $(resourcegroupName) -Name $(storageAccountName))[0].Value
      $ctx = New-AzStorageContext -StorageAccountName $(StorageAccountName) -StorageAccountKey $accountKey
      $s = Get-AzStorageShare $(fileShareName) -Context $ctx
      # We only want to copy a subset of files in the repo, so we'll set our script location to that path
      Set-Location "$(Build.SourcesDirectory)\FileTemplates"
      $CurrentFolder = (Get-Item .).FullName
      $files = Get-ChildItem -Recurse | Where-Object { $_.GetType().Name -eq "FileInfo"}

      # Get all the unique folders without filenames
      $folders = $files.FullName.Substring($Currentfolder.Length+1).Replace("\","/") | split-path -parent | Get-Unique

      # Create Folders for every possible path
      foreach ($folder in $folders) {
        if ($folder -ne ""){
          $folderpath = ("dbscripts\" + $folder).Replace("\","/") # Create a toplevel folder in front of each path to organize within the Azure Share
          $foldersPathLeafs = $folderpath.Split("/")
          if ($foldersPathLeafs.Count -gt 1) {
            foreach ($index in 0..($foldersPathLeafs.Count - 1)) {
              $desiredfolderpath = [string]::Join("/", $foldersPathLeafs[0..$index])
              try {
                $s.ShareClient.GetDirectoryClient("$desiredfolderpath").CreateIfNotExists()
              }
              catch {
                $message = $_
                Write-Warning "That didn't work: $message"
              }

            }
          }
        }
      }

      # Create each file
      foreach ($file in $files) {
        $path=$file.FullName.Substring($Currentfolder.Length+1).Replace("\","/")
        $path = "scripts/"+$path # Create a toplevel folder in front of each path to organize within the Azure Share
        Write-output "Writing: $($file.FullName)"
        try {
          Set-AzStorageFileContent -Share $s.CloudFileShare -Source $file.FullName -Path $path -Force
        }
        catch {
          $message = $_
          Write-Warning "That didn't work: $message"
        }
      }
    azurePowerShellVersion: 'LatestVersion'
  displayName: "Azure Files Storage Copy"

IIS applications and virtual directories with PowerShell

I’m currently building a container on a Windows Server Core base image with IIS. The intention will be to run this within Azure Kubernetes Service (AKS), on Windows node pools.

A very useful resource in understanding the IIS concepts discussed in this post comes from Octopus: https://octopus.com/blog/iis-powershell#recap-iis-theory

One of the challenges I’m working with is the desire to meet both these requirements:

  • Able to always place our application in a consistent and standard path (like c:\app)
  • Need to be able to serve the app behind customizable virtual paths
    • For example, /env/app/webservice or /env/endpoint
    • These virtual paths should be specified at runtime, not in the container build (to reduce the number of unique containers)
    • A unique domain cannot be required for each application

One of the thoughts is that while testing the application locally, I want to be able to reach the application at the root path (i.e. http://localhost:8080/) but when put together in the context of a distributed system, I want to serve this application behind a customizable path.

In AKS, using the ingress-nginx controller, I can use the “rewrite-target” annotation in order to have my ingress represent the virtual path while maintaining the application at the root of IIS in the container. However, this quickly falls down when various applications are used that might have non-relative links for stylesheets and javascript includes.

One idea was to place the application in the root (c:\inetpub\wwwroot) and then add a new Application on my virtual path pointing to the same physical path. However, this caused problems with duplicate web.config being recognized because it was picked up from the physical path at the root Application and my virtual path Application. This could be mitigated in the web.config with the use of “<location inheritInChildApplications=”false”>” tags, but I also realized I don’t need BOTH requirements to be available at the same time. If a variable virtual path is passed into my container, I don’t need the application served at the root.

With this in mind, I set about creating logic like this:

  1. In the Dockerfile, place the application at c:\app
  2. If the environment variable “Virtual Path” exists
    1. Create an IIS Application pointing at the supplied Virtual Path, with a physical path of c:\app
  3. else
    1. Change the physical path of “Default Web Site” to c:\app

I tested this in the GUI on a Windows Server 2019 test virtual machine, and it appeared to work for my application just fine. However, when I tested using PowerShell (intending to move functional code into my docker run.ps1 script), unexpected errors occurred.

Here’s what I was attempting:

New-WebVirtualDirectory -Name "envtest/app1/webservice" -Site "Default Web Site" -PhysicalPath "C:\inetpub\wwwroot"

And here is the error it produced for me:

The view at ‘~/Views/Home/Index.cshtml’ must derive from WebViewPage, or WebViewPage

Interestingly, displaying straight HTML within this virtual path for the Application works just fine – it is only the MVC app that has an error.

The application I’m testing with is a dotnet MVC application, but none of the common solutions to this problem are relevant – the application works just fine at the root of a website, just not when applied under a virtual path.

Using the context from the Octopus link above, I began digging a little deeper and testing. Primarily targeting the ApplicationHost.config file located at “C:\windows\system32\inetsrv\Config”.

When I manually created my pathing in the GUI that was successful (creating each virtual subdir), the structure within the Site in this config file looked like this:

<site name="Default Web Site" id="1">
    <application path="/">
        <virtualDirectory path="/" physicalPath="%SystemDrive%\inetpub\wwwroot" />
		<virtualDirectory path="/envtest" physicalPath="%SystemDrive%\inetpub\wwwroot" />
		<virtualDirectory path="/envtest/app1" physicalPath="%SystemDrive%\inetpub\wwwroot" />
    </application>
    <application path="envtest/app1/webservice" applicationPool="DefaultAppPool">
        <virtualDirectory path="/" physicalPath="C:\inetpub\wwwroot" />
    </application>
    <bindings>
        <binding protocol="http" bindingInformation="*:80:" />
    </bindings>
    <logFile logTargetW3C="ETW" />
</site>

However, when I used the PowerShell example above, this is what was generated:

<site name="Default Web Site" id="1">
    <application path="/">
        <virtualDirectory path="/" physicalPath="%SystemDrive%\inetpub\wwwroot" />
    </application>
    <application path="envtest/app1/webservice" applicationPool="DefaultAppPool">
        <virtualDirectory path="/" physicalPath="C:\inetpub\wwwroot" />
    </application>
    <bindings>
        <binding protocol="http" bindingInformation="*:80:" />
    </bindings>
    <logFile logTargetW3C="ETW" />
</site>

It seems clear that while IIS can serve content under the virtual path I created, MVC doesn’t like the missing virtual directories.


When I expanded my manual PowerShell implementation to look like this, then the application began to work without error:

New-WebVirtualDirectory -Name "/envtest" -Site "Default Web Site" -PhysicalPath "C:\inetpub\wwwroot"
New-WebVirtualDirectory -Name "/envtest/app1" -Site "Default Web Site" -PhysicalPath "C:\inetpub\wwwroot"
New-WebApplication -Name "/envtest/app1/webservice" -PhysicalPath "C:\app\" -Site "Default Web Site" -ApplicationPool "DefaultAppPool"

I could then confirm that my ApplicationHost.config file matched what was created in the GUI.


The last piece of this for me was turning a Virtual Path environment variable that could contain any kind of pathing, into the correct representation of IIS virtual directories and applications.

Here’s an example of how I’m doing that:

if (Test-Path "ENV:VirtualPath")
{
    # Trim the start in case a prefix forwardslash was supplied
    $ENV:VirtualPath = $ENV:VirtualPath.TrimStart("/")
    Write-Host "Virtual Path is passed, will configure IIS web application"
    # We have to ensure the Application/VirtualDirectory in IIS gets created properly in the event of multiple elements in the path
    # Otherwise IIS won't serve some applications properly, like ASP.NET MVC sites

    Import-Module WebAdministration
    # for each item in the Virtual Path, excluding the last Leaf
    foreach ($leaf in 0..($ENV:VirtualPath.Split("/").Count-2)) { # minus 1 for 0-based counting, minus 2 for dropping the last leaf
        if ($leaf -eq 0){
            # Check and see if we're the first index of the VirtualPath, and if so just use it
            $usepath = $ENV:VirtualPath.Split("/")[$leaf]
        } else {
            # If not first index, go through all previous index and concat
            $usepath = [string]::Join("/",$ENV:VirtualPath.Split("/")[0..$leaf])
        }
        New-WebVirtualDirectory -Name "$usepath" -Site "Default Web Site" -PhysicalPath "C:\inetpub\wwwroot" # Don't specify Application, default to root
    }

    # Create Application with the full Virtual Path (making last element effective)
    New-WebApplication -Name "$ENV:VirtualPath" -PhysicalPath "C:\app\" -Site "Default Web Site" -ApplicationPool "DefaultAppPool" # Expect no beginning forward slash
} else {
    # Since no virtual path was passed, we want Default Web Site to point to C:\app
    Set-ItemProperty -Path "IIS:\Sites\Default Web Site" -name "physicalPath" -value "C:\app\"
}


AKS StorageClass for Standard HDD managed disk

Today while exploring the Azure Kubernetes Service docs, specifically looking at Storage, I came across a note about StorageClasses:

You can create a StorageClass for additional needs using kubectl

This combined with the description of the default StorageClasses for Managed Disks being Premium and Standard SSD led me to question “what if I want a Standard HDD for my pod?”

This is absolutely possible!

First I took a look at the parameters for an existing StorageClass, the ‘managed-csi’:

While the example provided in the link above uses the old ‘in-tree’ methods of StorageClasses, this gave me the proper Provisioner value to use the Cluster Storage Interface (CSI) method.

I created a yaml file with these contents:

kind: StorageClass
apiVersion: storage.k8s.io/v1
metadata:
  name: managed-csi-hdd
provisioner: disk.csi.azure.com
reclaimPolicy: Retain
allowVolumeExpansion: True
volumeBindingMode: WaitForFirstConsumer
parameters:
  skuname: StandardHDD_LRS

In reality, I took a guess at the “skuname” parameter here, replacing the “StandardSSD_LRS” with “StandardHDD_LRS”. Having used Terraform before with Managed Disk sku’s I figured this wasn’t going to be valid, but I wanted to see what happened.

Then I performed a ‘kubectl apply -f filename.yaml’ to create my StorageClass. This worked without any errors.

To test, I created a PersistentVolumeClaim, and then a simple Pod, with this yaml:

apiVersion: v1
kind: PersistentVolumeClaim
metadata:
  name: test-hdd-disk
spec:
  accessModes:
  - ReadWriteOnce
  storageClassName: managed-csi-hdd
  resources:
    requests:
      storage: 5Gi
---
kind: Pod
apiVersion: v1
metadata:
  name: teststorage-pod
spec:
  nodeSelector:
        "kubernetes.io/os": linux
  containers:
    - name: teststorage
      image: mcr.microsoft.com/oss/nginx/nginx:1.15.5-alpine
      volumeMounts:
      - mountPath: "/mnt/azurehdd"
        name: hddvolume
  volumes:
    - name: hddvolume
      persistentVolumeClaim:
        claimName: test-hdd-disk

After applying this with kubectl, my PersistentVolumeClaim was in a Pending state, and the Pod wouldn’t create. I looked at the Events of my PersistentVolumeClaim, and found an error as expected:

This is telling me my ‘skuname’ value isn’t valid and instead I should be using a supported type like “Standard_LRS”.

Using kubectl I deleted my Pod, PersistentVolumeClaim, and StorageClass, modified my yaml, and re-applied.

This time, the claim was created successfully, and a persistent volume was dynamically generated. I can see that disk created as the correct type in the Azure Portal listing of disks:

The Supported Values in that error message also tells me I can create ZRS-enabled StorageClasses, but only for Premium and StandardSSD managed disks.

Here’s the proper functioning yaml for the StorageClass, with the skuname fixed:

kind: StorageClass
apiVersion: storage.k8s.io/v1
metadata:
  name: managed-csi-hdd
provisioner: disk.csi.azure.com
reclaimPolicy: Retain
allowVolumeExpansion: True
volumeBindingMode: WaitForFirstConsumer
parameters:
  skuname: Standard_LRS