AzCopy with Packer out of memory

One of my Packer builds for a Windows image is using AzCopy to download files from Azure blob storage. In some circumstances I’ve  had issues where the AzCopy “copy” command fails with a Go error, like this:

2022/01/06 10:00:02 ui:     hyperv-vmcx: Job e1fcf7c7-f32e-d247-79aa-376ef5d49bd6 has started
2022/01/06 10:00:02 ui:     hyperv-vmcx: Log file is located at: C:\Users\cxadmin\.azcopy\e1fcf7c7-f32e-d247-79aa-376ef5d49bd6.log
2022/01/06 10:00:02 ui:     hyperv-vmcx:
2022/01/06 10:00:06 ui error: ==> hyperv-vmcx: runtime: VirtualAlloc of 8388608 bytes failed with errno=1455
2022/01/06 10:00:06 ui error: ==> hyperv-vmcx: fatal error: out of memory
2022/01/06 10:00:06 ui error: ==> hyperv-vmcx:
2022/01/06 10:00:06 ui error: ==> hyperv-vmcx: runtime stack:
2022/01/06 10:00:06 ui error: ==> hyperv-vmcx: runtime.throw(0xbeac4b, 0xd)
2022/01/06 10:00:06 ui error: ==> hyperv-vmcx: 	/opt/hostedtoolcache/go/1.16.0/x64/src/runtime/panic.go:1117 +0x79
2022/01/06 10:00:06 ui error: ==> hyperv-vmcx: runtime.sysUsed(0xc023d94000, 0x800000)
2022/01/06 10:00:06 ui error: ==> hyperv-vmcx: 	/opt/hostedtoolcache/go/1.16.0/x64/src/runtime/mem_windows.go:83 +0x22e
2022/01/06 10:00:06 ui error: ==> hyperv-vmcx: runtime.(*mheap).allocSpan(0x136f960, 0x400, 0xc000040100, 0xc000eb9b00)
2022/01/06 10:00:06 ui error: ==> hyperv-vmcx: 	/opt/hostedtoolcache/go/1.16.0/x64/src/runtime/mheap.go:1271 +0x3b1
2022/01/06 10:00:06 ui error: ==> hyperv-vmcx: runtime.(*mheap).alloc.func1()
2022/01/06 10:00:06 ui error: ==> hyperv-vmcx: 	/opt/hostedtoolcache/go/1.16.0/x64/src/runtime/mheap.go:910 +0x5f
2022/01/06 10:00:06 ui error: ==> hyperv-vmcx: runtime.systemstack(0x0)
2022/01/06 10:00:06 ui error: ==> hyperv-vmcx: 	/opt/hostedtoolcache/go/1.16.0/x64/src/runtime/asm_amd64.s:379 +0x6b
2022/01/06 10:00:06 ui error: ==> hyperv-vmcx: runtime.mstart()
2022/01/06 10:00:06 ui error: ==> hyperv-vmcx: 	/opt/hostedtoolcache/go/1.16.0/x64/src/runtime/proc.go:1246

Notice the “fatal error: out of memory” there.

I had already set the AzCopy environment variable AZCOPY_BUFFER_GB to 1GB, and I also increased my pagefile size (knowing Windows doesn’t always grow it upon demand reliably) but these didn’t improve it.

Then I stumbled upon this GitHub issue from tomconte: https://github.com/Azure/azure-storage-azcopy/issues/781

I added this into my Packer build before AzCopy gets called, and it seems to have resolved my problem.
DSC disk resource failing due to defrag

I worked through an interesting problem today occurring with Desired State Configuration tied into Azure Automation.

In this scenario, Azure Virtual Machines are connected to Azure Automation for Desired State Configuration, being configured with a variety of resources. One of them is failing, the “Disk” resource, although it was previously working in the past.

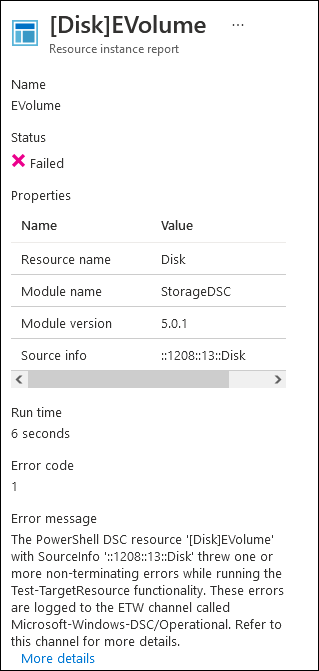
The PowerShell DSC resource ‘[Disk]EVolume’ with SourceInfo ‘::1208::13::Disk’ threw one or more non-terminating errors while running the Test-TargetResource functionality. These errors are logged to the ETW channel called Microsoft-Windows-DSC/Operational. Refer to this channel for more details.

I need more detail, so lets see what the interactive run of DSC on the failing virtual machine. While I can view the logs located in “C:\Windows\System32\Configuration\ConfigurationStatus”, I found that in this case, this doesn’t reveal any additional detail beyond what the Azure Portal does.

I run DSC interactively with this command:

Invoke-CimMethod -CimSession $env:computername -Name PerformRequiredConfigurationChecks -Namespace root/Microsoft/Windows/DesiredStateConfiguration -Arguments @{Flags=[Uint32]2} -ClassName MSFT_DscLocalConfigurationManager -Verbose

Now we can see the output of this resource in DSC better:

Invoke-CimMethod : Invalid Parameter
Activity ID: {aab6d6cd-1125-4e9c-8c4e-044e7a14ba07}
At line:1 char:1
+ Invoke-CimMethod -CimSession $env:computername -Name PerformRequiredC ...
+ ~~~~~~~~~~~~~~~~~~~~~~~~~~~~~~~~~~~~~~~~~~~~~~~~~~~~~~~~~~~~~~~~~~~~~
    + CategoryInfo          : InvalidArgument: (StorageWMI:) [Invoke-CimMethod], CimException
    + FullyQualifiedErrorId : StorageWMI 5,Get-PartitionSupportedSize,Microsoft.Management.Infrastructure.CimCmdlets.InvokeCimMethodCommand

This isn’t very useful on it’s own, but the error does lead to an issue logged against the StorageDSC module that is directly related:

https://github.com/dsccommunity/StorageDsc/issues/248

The “out-of-resource” test that ianwalkeruk provides reproduces the error on my system:

$partition = Get-Partition -DriveLetter 'E' | Select-Object -First 1
$partition | Get-PartitionSupportedSize

Running this on my system produces a similar error:

There does happen to be a known issue on the Disk resource in GitHub with Get-PartitionSupportedSize and the defragsvc:

https://github.com/dsccommunity/StorageDsc/wiki/Disk#defragsvc-conflict

Looking at the event logs on my VM, I can see that the nightly defrag from the default scheduled task has been failing:

The volume Websites (E:) was not optimized because an error was encountered: The parameter is incorrect. (0x80070057)

Looking at the docs for Get-PartitionSupportedSize, there is a note that says “This cmdlet starts the “Optimize Drive” (defragsvc) service.”

Based on timing of events, it appears like defrag hasn’t been able to successfully complete in a long time, because it’s duration is longer than the DSC refresh interval – when DSC runs and eventually triggers Get-PartitionSupportedSize, it aborts the defrag. Even running this manually I can see this occur:

The user cancelled the operation. (0x890000006)

At this point, I don’t know what it is about a failed defrag state that is causing Get-PartitionSupportedSize to fail with “Invalid Parameter” – even when defrag isn’t running that cmdlet fails.

However, in one of my systems with this problem, if I ensure that the defrag successfully finishes (by manually running it after each time DSC kills it, making incremental progress), then we can see Get-PartitionSupportedSize all of a sudden succeed!

And following this, DSC now succeeds!

So if you’re seeing “Invalid Parameter” coming from Get-PartitionSupportedSize, make sure you’ve got successful Defrag happening on that volume!

Migrate Azure Managed Disk between regions

This post is a reference for needing to move an Azure Managed Disk between regions. It is based on this Microsoft Docs article.

There are legacy posts containing information to use Az PowerShell to basically do a disk export to blob storage (with a vhd file) and then import that.

This procedure skips those intermediate steps, and uses AzCopy to do it directly.

If there’s no active data changing on the disk, you could consider taking a snapshot and then producing a new Managed Disk from your snapshot to perform the steps below – this way you wouldn’t need to turn off the VM using the Disk. However, the situations where this might be viable are probably rare.

You will need to:

First, shut down and deallocate your VM.

Then open a PowerShell terminal and connect to your Azure subscription.

Then populate this script, and execute each command in sequence.

# Name of the Managed Disk you are starting with
$sourceDiskName = "testweb1_c"
# Name of the resource group the source disk resides in
$sourceRG = "test-centralus-rg"
# Name you want the destination disk to have
$targetDiskName = "testweb1_c"
# Name of the resource group to create the destination disk in
$targetRG = "test-eastus2-rg"
# Azure region the target disk will be in
$targetLocate = "EastUS2"

# Gather properties of the source disk
$sourceDisk = Get-AzDisk -ResourceGroupName $sourceRG -DiskName $sourceDiskName

# Create the target disk config, adding the sizeInBytes with the 512 offset, and the -Upload flag
# If this is an OS disk, add this property: -OsType $sourceDisk.OsType
$targetDiskconfig = New-AzDiskConfig -SkuName 'Premium_LRS' -UploadSizeInBytes $($sourceDisk.DiskSizeBytes+512) -Location $targetLocate -CreateOption 'Upload'

# Create the target disk (empty)
$targetDisk = New-AzDisk -ResourceGroupName $targetRG -DiskName $targetDiskName -Disk $targetDiskconfig

# Get a SAS token for the source disk, so that AzCopy can read it
$sourceDiskSas = Grant-AzDiskAccess -ResourceGroupName $sourceRG -DiskName $sourceDiskName -DurationInSecond 86400 -Access 'Read'

# Get a SAS token for the target disk, so that AzCopy can write to it
$targetDiskSas = Grant-AzDiskAccess -ResourceGroupName $targetRG -DiskName $targetDiskName -DurationInSecond 86400 -Access 'Write'

# Begin the copy!
.\azcopy copy $sourceDiskSas.AccessSAS $targetDiskSas.AccessSAS --blob-type PageBlob

# Revoke the SAS so that the disk can be used by a VM
Revoke-AzDiskAccess -ResourceGroupName $sourceRG -DiskName $sourceDiskName

# Revoke the SAS so that the disk can be used by a VM
Revoke-AzDiskAccess -ResourceGroupName $targetRG -DiskName $targetDiskName


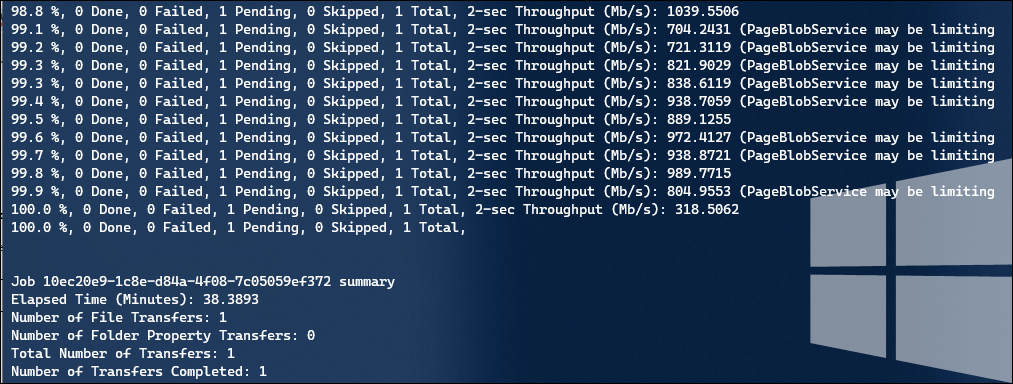
When you get to the AzCopy step, you should see results something like this:

In my experience, the transfer will go as fast as the slowest rated speed for your managed disk – the screenshot above was from a Premium P15 disk (256 GB) rated at 125 MBps (or ~ 1 Gbps).


Terraform console output

Official doc: https://www.terraform.io/docs/commands/console.html

“terraform console” is a command you can run, which gives you the opportunity to evaluate expressions and interpolation – very useful while building terraform.

To use it, on the command line, navigate to your terraform folder, and then run

terraform console

You will be met with this prompt (which doesn’t support any history through the “up” arrow key ?):

Here you can enter Terraform syntax and press enter to see the results.

Lets take a look at a resource group that exists in my configuration:

I entered in “azurerm_resource_group.mpn-trainlab-rg” and the console output all the properties in the state file for this resource.

I could further define my entry to a single property, and get this:

Now we can try this with some of our input variables. Lets say I have a complicated variable that I’m using to define disks, and I want to make sure when I reference that on a resource, its going to work:

data_disks = {
    ti-web = {
      count = 1
      size  = 64
      sku   = "Standard_LRS"
      caching = "ReadWrite"
    }
    production_u02 = {
      # Take the total data size you want, and divide it by the count of disks you want, to determine size
      count   = 4
      size    = 256
      sku     = "Premium_LRS" # Standard_LRS
      caching = "None"
    }
}

If I enter “var.data_disks” in the console, I would expect to get the exact same output as the code above, in JSON notation (lots of extra quotes and colons).

What if I’m trying to get the size of just the ti-web disk?

Looks like it works! Now I know on the resource for the “size” property, I can use “var.data_disks.ti-web.size” as a reference and it will provide my expected value.

Terraform plan output to file

A quick note to myself on how to get terraform plan output as a file.

By default running a “terraform plan” will output a nice graphical display of all expected changes. Sometimes you want to be able to distribute this as a file. In the past, I’ve tried commands like:

terraform plan > tfplan.txt

However that produces confusing output like this:


Instead, you can do this to get better output:

terraform plan -no-color > tfplan.txt

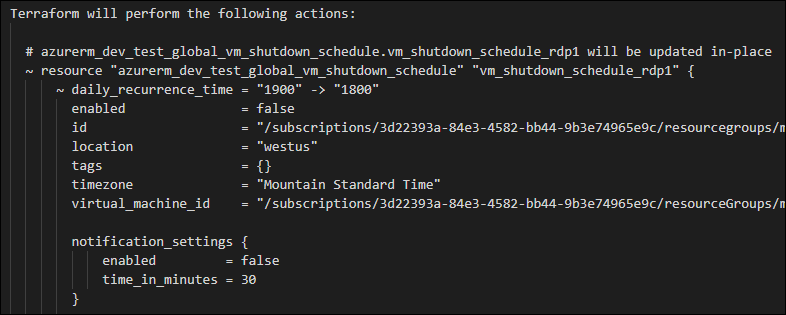
Now it will display in the console, and produce a text file that looks like this: