Did you know that you can get the status of an Azure Load Balancer health probe through the Azure REST API? It looks a little something like this:
$filter = "BackendIPAddress eq '*'" $uri = "https://management.azure.com/subscriptions/$($subscriptionId)/resourceGroups/$($resourcegroupname)/providers/Microsoft.Network/loadBalancers/$($loadbalancername)/providers/microsoft.insights/metrics?api-version=2018-01-01&metricnames=DipAvailability&`$filter=$($filter)" $response = Invoke-RestMethod -Uri $URI -Method GET -header $RequestHeader |
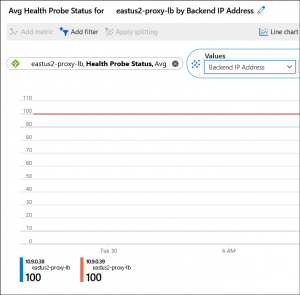
What we’re doing is using the Metric named “DipAvailability” which corresponds to the Portal display of “Health Probe Status”.
We then also apply a filter for “BackendIPAddress” so that it is clear the health count of each member; 100 equals 100% successful probes over the time frame.
I’ve previously configured PRTG to call an Azure Function in order to get health status of Application Gateway, and I wanted to do the same thing here. However, this Function is a bit different, in that I’m not using native Az PowerShell module commands (because they don’t exist for this purpose that I could find) but instead calling the API directly.
Typically, you would authenticate against the REST API with a service principal, and create a request through a series of token-generation and client-grant generation actions.
I didn’t want to do this – it is something I will come back to, to ensure a full understanding of the Oauth flow, but for now I wanted something simpler, like I’ve used before with REST calls against Update Management.
This method I’ve used depends upon a PowerShell script called Get-AzCachedAccessToken that I’ve sourced from the Technet Gallery.
In this case, I needed my Azure Function, using it’s Managed Identity, to call that PowerShell script, use the cached access token to build a Bearer Token object, and pass it to the REST call to authenticate. I could embed the contents of that script into my Function, but that is not scalable nor clean code.
Instead, I can have the Azure Function load that script as a Module at startup, where it becomes available for all other Functions.
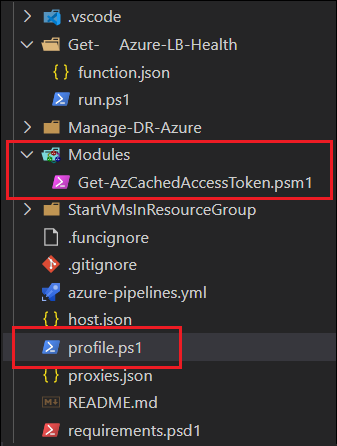
First, I take the Get-AzCachedAccessToken.ps1 file, and simply rename it as a *.psm1 file. This will get added to a “Modules” folder within the function (see below). I also found that I needed to find the profile.ps1 file for my function, and add the following:
foreach($file in Get-ChildItem -Path "$PSScriptRoot\Modules" -Filter *.psm1){ Import-Module $file.fullname } |
You can add these files in a couple different ways. I have my Function developed within Visual Studio Code, and delivered through an Azure DevOps pipeline, which means the code sits in a repository where each function is a folder with a “run.ps1” and “function.json” file. Using the VS Code extension will build out the file framework for you.
Here is where I added the Module and modified the profile.ps1:
Then I use a pipeline task for “Deploy Azure Function App” to push my code within a release pipeline.
The alternative to this code-first approach, is to modify the required files in the Azure Portal.
First you find your Function App, and then scroll down to “Advanced Tools”:
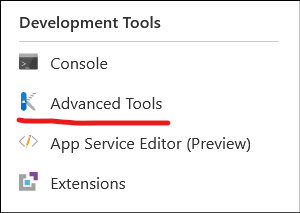
Click the “Go” link, and you’ll be taken to the Kudu Services page for your Function App.
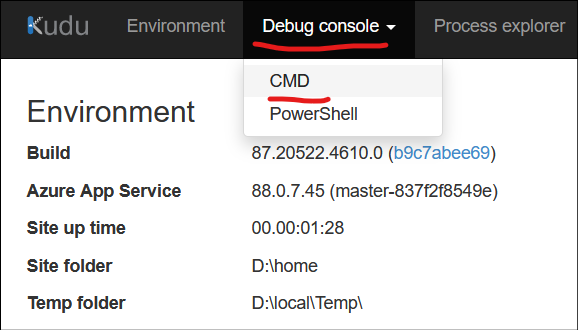
Within the new window that opened, you can to choose Debug Console -> CMD:
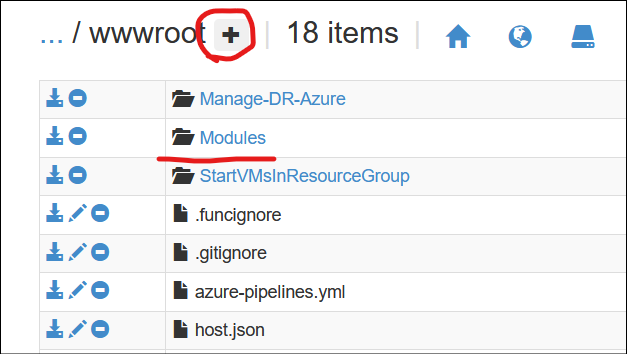
This will give you an in-browser display of the file system, where you can navigate to “site” -> “wwwroot”.
Here is where you want to create a new folder named Modules, and upload your *.psm1 file into. You’ll also find profiles.ps1 here which can be edited in the browser as well.
Once those modifications are complete, give your Function app a restart.
Within my PowerShell Function, I now can use the cmdlet Get-AzCachedAccessToken because it has been loaded as a module. I then take its output, add it to a Bearer variable which is passed as the Request Header, to authenticate against the API!
Select-AzSubscription -SubscriptionID $subscriptionid -TenantID $tenantid $BearerToken = ('Bearer {0}' -f (Get-AzCachedAccessToken)) $RequestHeader = @{ "Content-Type" = "application/json"; "Authorization" = "$BearerToken" } $filter = "BackendIPAddress eq '*'" # Call Azure Monitor REST API to get Metric value $uri = "https://management.azure.com/subscriptions/$($subscriptionId)/resourceGroups/$($resourcegroupname)/providers/Microsoft.Network/loadBalancers/$($loadbalancername)/providers/microsoft.insights/metrics?api-version=2018-01-01&metricnames=DipAvailability&`$filter=$($filter)" $response = Invoke-RestMethod -Uri $URI -Method GET -header $RequestHeader |
For this specific function, what I’m doing with the results are taking the timeseries result that is passed from the metric, bring it down to a 1 (if value is 100) or a 0 (if anything but 100) in order to re-use my PRTG custom lookups rather than building new ones:
# Create our Array List which we'll populate with custom ps object [System.Collections.ArrayList]$items = @() foreach ($value in $response.value.timeseries) { # Need to convert to PRTG expected values, so that we don't need additional lookup files $value.data.average[-1] # First make sure there is a value $convertedvalue = $null if ($value.data.average[-1]) { # If it is 100 then we're healthy if ($value.data.average[-1] -eq 100) { $convertedvalue = 1 } else { $convertedvalue = 0 } } else { # There was no average value found (host is probably off) so set to zero $convertedvalue = 0 } $items.Add([pscustomobject]@{ name = $value.metadatavalues.value; health = $convertedvalue; }) } # Expect output of $items to look like this: #name health #---- ------ #10.5.1.68 100 #10.5.1.13 0 # Now we wrap our output in a hashtable so PRTG can interpret it properly $body = @{ items = $items } # This outputs a 100 if Normal, and a 0 if not normal. PRTG sensor will then alert. |
See my other post about using PRTG to call an Azure Function for details on how I tie this result into a PRTG sensor.
