Azure Function with Managed Identity and REST API

Did you know that you can get the status of an Azure Load Balancer health probe through the Azure REST API? It looks a little something like this:

$filter = "BackendIPAddress eq '*'"
$uri = "https://management.azure.com/subscriptions/$($subscriptionId)/resourceGroups/$($resourcegroupname)/providers/Microsoft.Network/loadBalancers/$($loadbalancername)/providers/microsoft.insights/metrics?api-version=2018-01-01&metricnames=DipAvailability&`$filter=$($filter)"
$response = Invoke-RestMethod -Uri $URI -Method GET -header $RequestHeader

What we’re doing is using the Metric named “DipAvailability” which corresponds to the Portal display of “Health Probe Status”.

We then also apply a filter for “BackendIPAddress” so that it is clear the health count of each member; 100 equals 100% successful probes over the time frame.

I’ve previously configured PRTG to call an Azure Function in order to get health status of Application Gateway, and I wanted to do the same thing here. However, this Function is a bit different, in that I’m not using native Az PowerShell module commands (because they don’t exist for this purpose that I could find) but instead calling the API directly.

Typically, you would authenticate against the REST API with a service principal, and create a request through a series of token-generation and client-grant generation actions.

I didn’t want to do this – it is something I will come back to, to ensure a full understanding of the Oauth flow, but for now I wanted something simpler, like I’ve used before with REST calls against Update Management.

This method I’ve used depends upon a PowerShell script called Get-AzCachedAccessToken that I’ve sourced from the Technet Gallery.

In this case, I needed my Azure Function, using it’s Managed Identity, to call that PowerShell script, use the cached access token to build a Bearer Token object, and pass it to the REST call to authenticate. I could embed the contents of that script into my Function, but that is not scalable nor clean code.

Instead, I can have the Azure Function load that script as a Module at startup, where it becomes available for all other Functions.

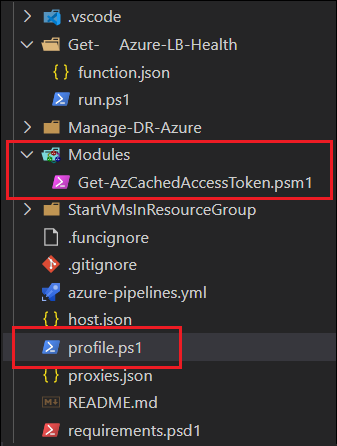
First, I take the Get-AzCachedAccessToken.ps1 file, and simply rename it as a *.psm1 file. This will get added to a “Modules” folder within the function (see below). I also found that I needed to find the profile.ps1 file for my function, and add the following:

foreach($file in Get-ChildItem -Path "$PSScriptRoot\Modules" -Filter *.psm1){
    Import-Module $file.fullname
}

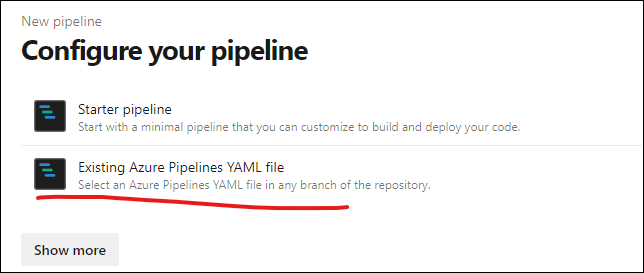
You can add these files in a couple different ways. I have my Function developed within Visual Studio Code, and delivered through an Azure DevOps pipeline, which means the code sits in a repository where each function is a folder with a “run.ps1” and “function.json” file. Using the VS Code extension will build out the file framework for you.

Here is where I added the Module and modified the profile.ps1:

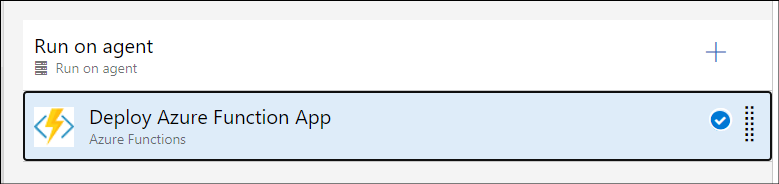
Then I use a pipeline task for “Deploy Azure Function App” to push my code within a release pipeline.

The alternative to this code-first approach, is to modify the required files in the Azure Portal.

First you find your Function App, and then scroll down to “Advanced Tools”:

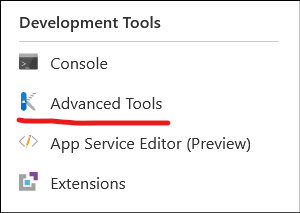
Click the “Go” link, and you’ll be taken to the Kudu Services page for your Function App.

Within the new window that opened, you can to choose Debug Console -> CMD:

This will give you an in-browser display of the file system, where you can navigate to “site” -> “wwwroot”.

Here is where you want to create a new folder named Modules, and upload your *.psm1 file into. You’ll also find profiles.ps1 here which can be edited in the browser as well.

Once those modifications are complete, give your Function app a restart.

Within my PowerShell Function, I now can use the cmdlet Get-AzCachedAccessToken because it has been loaded as a module. I then take its output, add it to a Bearer variable which is passed as the Request Header, to authenticate against the API!

    Select-AzSubscription -SubscriptionID $subscriptionid -TenantID $tenantid
    $BearerToken = ('Bearer {0}' -f (Get-AzCachedAccessToken))
    $RequestHeader = @{
        "Content-Type"  = "application/json";
        "Authorization" = "$BearerToken"
    }
    $filter = "BackendIPAddress eq '*'"
    # Call Azure Monitor REST API to get Metric value
    $uri = "https://management.azure.com/subscriptions/$($subscriptionId)/resourceGroups/$($resourcegroupname)/providers/Microsoft.Network/loadBalancers/$($loadbalancername)/providers/microsoft.insights/metrics?api-version=2018-01-01&metricnames=DipAvailability&`$filter=$($filter)"
    $response = Invoke-RestMethod -Uri $URI -Method GET -header $RequestHeader

For this specific function, what I’m doing with the results are taking the timeseries result that is passed from the metric, bring it down to a 1 (if value is 100) or a 0 (if anything but 100) in order to re-use my PRTG custom lookups rather than building new ones:

# Create our Array List which we'll populate with custom ps object
    [System.Collections.ArrayList]$items = @()
    foreach ($value in $response.value.timeseries) {
        # Need to convert to PRTG expected values, so that we don't need additional lookup files
        $value.data.average[-1]
        # First make sure there is a value
        $convertedvalue = $null
        if ($value.data.average[-1]) {
            # If it is 100 then we're healthy
            if ($value.data.average[-1] -eq 100) {
                $convertedvalue = 1
            }
            else {
                $convertedvalue = 0
            }
        }
        else { # There was no average value found (host is probably off) so set to zero
            $convertedvalue = 0
        }
        $items.Add([pscustomobject]@{  name = $value.metadatavalues.value; health = $convertedvalue; })
    }
    # Expect output of $items to look like this:
    #name      health
    #----      ------
    #10.5.1.68    100
    #10.5.1.13      0
    # Now we wrap our output in a hashtable so PRTG can interpret it properly
    $body = @{ items = $items }
    # This outputs a 100 if Normal, and a 0 if not normal. PRTG sensor will then alert.

See my other post about using PRTG to call an Azure Function for details on how I tie this result into a PRTG sensor.

Simple disk performance test on Linux

I recently had a need to benchmark some Azure VMs, as I’m looking at Azure Storage Fuse and want to evaluate where bottlenecks in performance might be. I’m mostly saving this as a reference so I can come back to it again in the future.

The ‘fio’ tool can be used to perform this benchmarking. I found this originally from an ArsTechnica article.

First, need to create a profile that fio will use. I created a few different ones for different scenarios; mostly around the disk target based on the directory attribute of each reader.

Gist of ini files

# Read test from P20
[global]
size=1g
direct=1
iodepth=8
ioengine=libaio
bs=512k

[reader1]
rw=randread
directory=/tmp
[reader2]
rw=randread
directory=/tmp
[reader3]
rw=randread
directory=/tmp
[reader4]
rw=randread
directory=/tmp

I saved this file to /tmp/fioread.ini. This will give me a test reading a 1GB file with a block size of 512k and iodepth of 8 in a random pattern. 4 readers are configured to maximize throughput.

Then, I called fio with this:

fio --runtime 60 --time_based /tmp/fioread.ini

This runs the test for 60 seconds, and the –time_based ensures it runs for the full time even if the dataset size has been processed (loops back around and begins again).

When I start the command, it will layout files as defined in the .ini file you’re using

Since I have 4 readers, it produces 4 x 1 GB files in /tmp:

Then it immediately goes into the test, and after 60 seconds, produces results.

Each reader will have it’s own block of stats, with a summary at the bottom:

In this case, I’ve gotten 139 MB/s reading from a P4 (30GB) disk on an E8s_V3. The disk has a throughput of 25MB/s but can burst to 170 MB/s, and the E8s_V3 will sustain 128 MB/s on a cached disk (which I have read/write cache on). I’m not exactly sure yet why I was able to exceed 128 MB/s; perhaps part of the reads were already coming from cache from the layout, but not all of them?

I suspect that if I set cache to None on this OS disk, I’d see closer to the 170 MB/s burst, because the E8s_V3 can sustain 192 MB/s on an uncached disk.

Understanding Azure Outbound Internet and Load Balancer

I deepened my understanding of Azure outbound Internet connections today. I’ve been working on setting up an outbound proxy using Squid, and just struggling with connectivity. I want my outbound proxy to be highly available, so I thought, “I’ll put it into a Load Balancer, and I want the Standard SKU”. As soon as I did this, my proxy stopped working.

I banged my head against that problem for an hour or two, and then came back to it another day, read the docs, and had a breakthrough in understanding.

Setup

Here’s the resource layout I’m working with:

I have a bunch of servers in a subnet. They use WPAD dns resolution to direct Internet traffic to the Private IP address of a load balancer, sitting in a different subnet.

Two Linux VMs in an availability set are the back-end of my load balancer. I use an inbound rule for port 3128 to receive the proxy traffic.

The outbound line to the Internet is what I assumed would happen: I’ve read through “Outbound Connections in Azure” a few times and thought I had a handle on what would occur.

The Problem

It didn’t work! As soon as I put my Squid VMs into the load balancer, they stopped being able to proxy traffic. So I thought, “lets put it in a Basic load balancer, it’d be cheaper anyway”. And that worked! At this time I didn’t really understand what was going on, and knew I needed to come back to it after some sleep.

The Discovery

Lets take a closer look at the Microsoft Doc I just linked above. There are 3 outbound scenarios it describes:

  1. VM with an Instance Level Public IP address (with or without Load Balancer)
    1. Not my scenario – I don’t have Public IP address attached to my Squid VMs
  2. Public Load Balancer associated with a VM (no Public IP address on the instance)
    1. Not my scenario – I’m using an Internal load balancer, not a Public one.
  3. Standalone VM (no Load Balancer, no Public IP address)
    1. This is what I thought the behavior would default to – use a dynamic public IP from Azure pool and SNAT outbound traffic

In the detail of Scenario 3, the first sentence says “In this scenario, the VM is not part of a public Load Balancer pool (and not part of an internal Standard Load Balancer pool) and does not have a Public IP address assigned to it.”

Well, I am part of an Internal Standard Load Balancer pool; where does that leave me?

The blue box just below makes it very clear:

Scenario #3 is NOT a fail-back option when using an Internal load balancer of Standard SKU.

Later on in the document, this is made more explicit:

"When using an internal Standard Load Balancer, outbound NAT is not available until outbound connectivity has been explicitly declared."

Scenario #3 IS the fail-back option when using an Internal Basic load balancer, which I think was the source of my assumption. This is why I can get Internet connectivity when I place my Squid VM into the back-end of a basic load balancer. The major downside of this is I cannot control the IP address my proxy communicates outbound on, which is a firm requirement for me.


I verified this problem and scenario #1 resolution: from my VM I used a ‘wget’ command while operating under my original design – it timed out:

Then I added a public IP address to one VM, and performed the same test:

The Solution

As the doc describes, there are a few solutions although at the time of this writing it is missing one.

  • add Public IP to each VM
  • add a public load balancer, create outbound rules, and add the squid as backend to it
  • add NAT gateway to the subnet

add Public IP to each VM

I can create a public IP address for each VM and associate it.

This will give me static IP addresses, but I have to do it for each VM in the back-end.

Each static Standard IP is 0.005/hour ($3.65 USD/mo).

Lets say I am transferring 100GB/mo outbound between the two VMs. Bandwidth is 95 GB (first 5 GB free) at $0.087/GB so $8.265 USD / mo.

Total cost = $15.565 USD / month

add a public load balancer, create outbound rules, and add the squid as backend to it

Turns out you can have the same VMs be back-ends to BOTH a public and an internal Standard load balancer at the same time.

This gives some flexibility, because now you can scale out in the backend, as long as you pay attention to the scaling guidelines from Microsoft and avoid SNAT port exhaustion.

You can apply only an Outbound rule (you must apply this) so that it acts only as outbound load balancer, and not in-bound.

Single public IP cost of $3.65 USD/mo still applies.

Standard Load Balancer with a small number of rules (first 5 are free) processing 100GB of traffic is $18.75 USD/mo.

We still need to pay the bandwidth charge since we have traffic egress to Internet: $8.265 USD / mo

Total cost: $27.015 USD / month

add NAT gateway to the subnet

A new feature of Azure that recently went GA is NAT Gateway (or Virtual Network NAT). This provides outbound connectivity for an entire subnet, rather than at a VM level.

Important to note, a NAT Gateway CANNOT be linked to a subnet that contains any Basic IP addresses, or Basic load balancers.

This simplifies beyond the outbound public load balancer; you can still attach to a public IP address, but do not need to manage individual outbound rules and backend pools.

If there are other resources in the subnet, they too can take advantage of the NAT Gateway and a static public IP address.

Single public IP cost of $3.65 USD/mo still applies.

It doesn’t seem like the NAT Gateway is integrated into the Pricing Calculator yet, but the Docs page has a section on Pricing:

  • Resource hours $0.045/hour * 730 = $32.85 USD / mo
  • Data processed $0.045/GB * 100GB = $4.5 USD / mo

We still need to pay the bandwidth charge since we have traffic egress to Internet: $8.265 USD / mo

Total cost: $49.265 USD / month


Azure Pipeline for Automation Runbooks

Azure Automation runbooks are very useful – particularly for scheduled or repeated operations. One downside I have observed is that they are very often disconnected from proper version control.

Microsoft has a solution for this: source control integration

You can connect a GitHub/Azure Repo to an Automation Account, which uses resources like RunAs accounts, personal access tokens (from your repo), and automation jobs to perform the sync.

I began evaluating this for the purposes of importing, publishing, and scheduling some runbooks, however there were two key reasons I felt a different direction was better suited:

  1. Flexibility – I could only sync a folder named “runbooks”, and only import and publish them. What if I only wanted a certain selection of runbooks? What if I wanted to segregate runbooks between different Automation Accounts? What if I wanted to manage my schedule definition as code too? Sure there are solutions to these problems, but then they become workarounds or addons to the source control integration.
  2. Consistency – other areas of ensuring version controlled code is released to some environment typically use continuous deployment tools; why would I treat my runbooks any different? If I’m already going to be using Azure DevOps pipelines for these areas, I want to keep that consistency going.

There are a few different ways that runbook management could be accomplished in an Azure DevOps pipeline: Azure PowerShell, ARM templates, Azure CLI.

For simplicity and speed of development, I chose to use Azure PowerShell, combined within a YAML pipeline definition.

My use-case here is taking my Update Management scripts and making them run automatically on a schedule. Based on that, I have the following structure in my repository:

GitHub link for code

PowerShell (Folder)
    Update Management (Folder)
        azure-pipelines.yaml
 	Set-UpdateManagementSchedule.ps1
 	Get-AzCachedAccessToken.ps1
 	New-UpdateManagementSchedule.ps1
        Publish-AARunbookFromDevOps.ps1
    New-EmailDelivery.ps1

Set-UpdateManagementSchedule.ps1 defines some time zones, and then iterates over them calling New-UpdateManagementSchedule.ps1 for each. At the end, it uses New-EmailDelivery.ps1 to send results by email.

New-UpdateManagementSchedule.ps1 calls Get-AzCachedAccessToken.ps1 in order to use an existing Az PowerShell context to create a bearer token and authenticate against Azure REST API with it (where I’m using Update Management endpoints).

Publish-AARunbookFromDevOps.ps1 is my script that gets called within the DevOps pipeline, to import and publish the runbooks to the automation account.

I want Set-UpdateManagementSchedule.ps1 to run once per month, because it calculates the appropriate timing of Update Management schedules. I don’t want any of the other scripts to have a schedule at all, since they’re just referenced at some point in time.

In order to make this all happen, I created a DevOps pipeline, stored within the “azure-pipelines.yaml” file.

The concept of storing the pipeline as code within YAML is very advantageous, however difficult to simply write from scratch. Often I will create a dummy pipeline in the GUI, using the Task Assistant (see below) and Azure DevOps task docs in order to understand the syntax and components of what I’m trying to achieve.

I can then take that YAML that has been progressively built, store it in my repository, and create a fresh pipeline and import using it.

In this case, my pipeline starts with a trigger definition, for which I learned and utilized path-based rules that Azure Repo supports:

trigger:
  branches:
    include:
    - master
  paths:
    include:
    - PowerShell/UpdateManagement/*

This will ensure the pipeline only triggers when a runbook within the UpdateManagement folder is modified, rather than my whole repository.

Using the AzurePowerShell task, I can trust that authentication to Azure will be handled appropriately as long as I supply a service connection (shown as the “azureSubscription” property below).

- task: AzurePowerShell@5
  inputs:
    azureSubscription: 'automation-rg' #This is the devops service connection name
    ErrorActionPreference: 'Stop'
    FailOnStandardError: true
    ScriptType: 'FilePath'
    ScriptPath: './PowerShell/UpdateManagement/Publish-AARunbookFromDevOps.ps1'
    ScriptArguments:
      -runbookname Get-AzCachedAccessToken `
      -runbookfile ./PowerShell/UpdateManagement/Get-AzCachedAccessToken.ps1 #`
      #-scheduleName $(userPassword)
    azurePowerShellVersion: 'LatestVersion'
  displayName: Deploy AA Runbook - Get-AzCachedAccessToken

For each Runbook that I want to handle in my pipeline, I’m calling the “Publish-AARunbookFromDevOps.ps1” script and supplying arguments related to that specific runbook. I wanted to break it out this way to give me the most flexibility to handle runbooks independently.

This script that is called is fairly static right now; I’m making a bunch of hard-coded assumptions such as “we will always overwrite the runbook if it exists rather than comparison checking”, and “every import needs a publish”, and “only 1 kind of schedule is going to be used”.

Limiting the schedule to my hard-coded values reduced the time-to-deploy this in my environment, because I didn’t have a need right now for further manipulation. This idea is related to “YAGNI” or “You aren’t going to need it” that I recently read about from Martin Fowler.

When the pipeline runs, it performs all it’s tasks in about 3:30 minutes

I can see that it has created a Schedule in my automation account, and linked it to the runbook:

Check out the README.md from the GitHub repo for details on re-using this code for yourself.