IIS applications and virtual directories with PowerShell

I’m currently building a container on a Windows Server Core base image with IIS. The intention will be to run this within Azure Kubernetes Service (AKS), on Windows node pools.

A very useful resource in understanding the IIS concepts discussed in this post comes from Octopus: https://octopus.com/blog/iis-powershell#recap-iis-theory

One of the challenges I’m working with is the desire to meet both these requirements:

  • Able to always place our application in a consistent and standard path (like c:\app)
  • Need to be able to serve the app behind customizable virtual paths
    • For example, /env/app/webservice or /env/endpoint
    • These virtual paths should be specified at runtime, not in the container build (to reduce the number of unique containers)
    • A unique domain cannot be required for each application

One of the thoughts is that while testing the application locally, I want to be able to reach the application at the root path (i.e. http://localhost:8080/) but when put together in the context of a distributed system, I want to serve this application behind a customizable path.

In AKS, using the ingress-nginx controller, I can use the “rewrite-target” annotation in order to have my ingress represent the virtual path while maintaining the application at the root of IIS in the container. However, this quickly falls down when various applications are used that might have non-relative links for stylesheets and javascript includes.

One idea was to place the application in the root (c:\inetpub\wwwroot) and then add a new Application on my virtual path pointing to theĀ same physical path. However, this caused problems with duplicate web.config being recognized because it was picked up from the physical path at the root Application and my virtual path Application. This could be mitigated in the web.config with the use of “<location inheritInChildApplications=”false”>” tags, but I also realized I don’t need BOTH requirements to be available at the same time. If a variable virtual path is passed into my container, I don’t need the application served at the root.

With this in mind, I set about creating logic like this:

  1. In the Dockerfile, place the application at c:\app
  2. If the environment variable “Virtual Path” exists
    1. Create an IIS Application pointing at the supplied Virtual Path, with a physical path of c:\app
  3. else
    1. Change the physical path of “Default Web Site” to c:\app

I tested this in the GUI on a Windows Server 2019 test virtual machine, and it appeared to work for my application just fine. However, when I tested using PowerShell (intending to move functional code into my docker run.ps1 script), unexpected errors occurred.

Here’s what I was attempting:

New-WebVirtualDirectory -Name "envtest/app1/webservice" -Site "Default Web Site" -PhysicalPath "C:\inetpub\wwwroot"

And here is the error it produced for me:

The view at ‘~/Views/Home/Index.cshtml’ must derive from WebViewPage, or WebViewPage

Interestingly, displaying straight HTML within this virtual path for the Application works just fine – it is only the MVC app that has an error.

The application I’m testing with is a dotnet MVC application, but none of the common solutions to this problem are relevant – the application works just fine at the root of a website, just not when applied under a virtual path.

Using the context from the Octopus link above, I began digging a little deeper and testing. Primarily targeting the ApplicationHost.config file located at “C:\windows\system32\inetsrv\Config”.

When I manually created my pathing in the GUI that was successful (creating each virtual subdir), the structure within the Site in this config file looked like this:

<site name="Default Web Site" id="1">
    <application path="/">
        <virtualDirectory path="/" physicalPath="%SystemDrive%\inetpub\wwwroot" />
		<virtualDirectory path="/envtest" physicalPath="%SystemDrive%\inetpub\wwwroot" />
		<virtualDirectory path="/envtest/app1" physicalPath="%SystemDrive%\inetpub\wwwroot" />
    </application>
    <application path="envtest/app1/webservice" applicationPool="DefaultAppPool">
        <virtualDirectory path="/" physicalPath="C:\inetpub\wwwroot" />
    </application>
    <bindings>
        <binding protocol="http" bindingInformation="*:80:" />
    </bindings>
    <logFile logTargetW3C="ETW" />
</site>

However, when I used the PowerShell example above, this is what was generated:

<site name="Default Web Site" id="1">
    <application path="/">
        <virtualDirectory path="/" physicalPath="%SystemDrive%\inetpub\wwwroot" />
    </application>
    <application path="envtest/app1/webservice" applicationPool="DefaultAppPool">
        <virtualDirectory path="/" physicalPath="C:\inetpub\wwwroot" />
    </application>
    <bindings>
        <binding protocol="http" bindingInformation="*:80:" />
    </bindings>
    <logFile logTargetW3C="ETW" />
</site>

It seems clear that while IIS can serve content under the virtual path I created, MVC doesn’t like the missing virtual directories.


When I expanded my manual PowerShell implementation to look like this, then the application began to work without error:

New-WebVirtualDirectory -Name "/envtest" -Site "Default Web Site" -PhysicalPath "C:\inetpub\wwwroot"
New-WebVirtualDirectory -Name "/envtest/app1" -Site "Default Web Site" -PhysicalPath "C:\inetpub\wwwroot"
New-WebApplication -Name "/envtest/app1/webservice" -PhysicalPath "C:\app\" -Site "Default Web Site" -ApplicationPool "DefaultAppPool"

I could then confirm that my ApplicationHost.config file matched what was created in the GUI.


The last piece of this for me was turning a Virtual Path environment variable that could contain any kind of pathing, into the correct representation of IIS virtual directories and applications.

Here’s an example of how I’m doing that:

if (Test-Path "ENV:VirtualPath")
{
    # Trim the start in case a prefix forwardslash was supplied
    $ENV:VirtualPath = $ENV:VirtualPath.TrimStart("/")
    Write-Host "Virtual Path is passed, will configure IIS web application"
    # We have to ensure the Application/VirtualDirectory in IIS gets created properly in the event of multiple elements in the path
    # Otherwise IIS won't serve some applications properly, like ASP.NET MVC sites

    Import-Module WebAdministration
    # for each item in the Virtual Path, excluding the last Leaf
    foreach ($leaf in 0..($ENV:VirtualPath.Split("/").Count-2)) { # minus 1 for 0-based counting, minus 2 for dropping the last leaf
        if ($leaf -eq 0){
            # Check and see if we're the first index of the VirtualPath, and if so just use it
            $usepath = $ENV:VirtualPath.Split("/")[$leaf]
        } else {
            # If not first index, go through all previous index and concat
            $usepath = [string]::Join("/",$ENV:VirtualPath.Split("/")[0..$leaf])
        }
        New-WebVirtualDirectory -Name "$usepath" -Site "Default Web Site" -PhysicalPath "C:\inetpub\wwwroot" # Don't specify Application, default to root
    }

    # Create Application with the full Virtual Path (making last element effective)
    New-WebApplication -Name "$ENV:VirtualPath" -PhysicalPath "C:\app\" -Site "Default Web Site" -ApplicationPool "DefaultAppPool" # Expect no beginning forward slash
} else {
    # Since no virtual path was passed, we want Default Web Site to point to C:\app
    Set-ItemProperty -Path "IIS:\Sites\Default Web Site" -name "physicalPath" -value "C:\app\"
}
 

DSC disk resource failing due to defrag

I worked through an interesting problem today occurring with Desired State Configuration tied into Azure Automation.

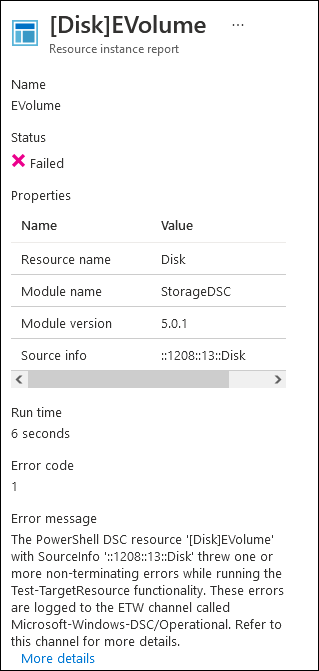
In this scenario, Azure Virtual Machines are connected to Azure Automation for Desired State Configuration, being configured with a variety of resources. One of them is failing, the “Disk” resource, although it was previously working in the past.

The PowerShell DSC resource ‘[Disk]EVolume’ with SourceInfo ‘::1208::13::Disk’ threw one or more non-terminating errors while running the Test-TargetResource functionality. These errors are logged to the ETW channel called Microsoft-Windows-DSC/Operational. Refer to this channel for more details.

I need more detail, so lets see what the interactive run of DSC on the failing virtual machine. While I can view the logs located in “C:\Windows\System32\Configuration\ConfigurationStatus”, I found that in this case, this doesn’t reveal any additional detail beyond what the Azure Portal does.

I run DSC interactively with this command:

Invoke-CimMethod -CimSession $env:computername -Name PerformRequiredConfigurationChecks -Namespace root/Microsoft/Windows/DesiredStateConfiguration -Arguments @{Flags=[Uint32]2} -ClassName MSFT_DscLocalConfigurationManager -Verbose

Now we can see the output of this resource in DSC better:

Invoke-CimMethod : Invalid Parameter
Activity ID: {aab6d6cd-1125-4e9c-8c4e-044e7a14ba07}
At line:1 char:1
+ Invoke-CimMethod -CimSession $env:computername -Name PerformRequiredC ...
+ ~~~~~~~~~~~~~~~~~~~~~~~~~~~~~~~~~~~~~~~~~~~~~~~~~~~~~~~~~~~~~~~~~~~~~
    + CategoryInfo          : InvalidArgument: (StorageWMI:) [Invoke-CimMethod], CimException
    + FullyQualifiedErrorId : StorageWMI 5,Get-PartitionSupportedSize,Microsoft.Management.Infrastructure.CimCmdlets.InvokeCimMethodCommand

This isn’t very useful on it’s own, but the error does lead to an issue logged against the StorageDSC module that is directly related:

https://github.com/dsccommunity/StorageDsc/issues/248

The “out-of-resource” test that ianwalkeruk provides reproduces the error on my system:

$partition = Get-Partition -DriveLetter 'E' | Select-Object -First 1
$partition | Get-PartitionSupportedSize

Running this on my system produces a similar error:

There does happen to be a known issue on the Disk resource in GitHub with Get-PartitionSupportedSize and the defragsvc:

https://github.com/dsccommunity/StorageDsc/wiki/Disk#defragsvc-conflict

Looking at the event logs on my VM, I can see that the nightly defrag from the default scheduled task has been failing:

The volume Websites (E:) was not optimized because an error was encountered: The parameter is incorrect. (0x80070057)

Looking at the docs for Get-PartitionSupportedSize, there is a note that says “This cmdlet starts the “Optimize Drive” (defragsvc) service.”

Based on timing of events, it appears like defrag hasn’t been able to successfully complete in a long time, because it’s duration is longer than the DSC refresh interval – when DSC runs and eventually triggers Get-PartitionSupportedSize, it aborts the defrag. Even running this manually I can see this occur:

The user cancelled the operation. (0x890000006)

At this point, I don’t know what it is about a failed defrag state that is causing Get-PartitionSupportedSize to fail with “Invalid Parameter” – even when defrag isn’t running that cmdlet fails.

However, in one of my systems with this problem, if I ensure that the defrag successfully finishes (by manually running it after each time DSC kills it, making incremental progress), then we can see Get-PartitionSupportedSize all of a sudden succeed!

And following this, DSC now succeeds!

So if you’re seeing “Invalid Parameter” coming from Get-PartitionSupportedSize, make sure you’ve got successful Defrag happening on that volume!

Install Visio volume license alongside Office 365

At my company we get a certain number of seats of Visio volume license from our Microsoft Partner benefits, but it is not a subscription product and the volume key cannot be simply entered to activate Visio, because our Office 365 is installed as O365ProPlusRetail.

Here I’ll describe how to install the Visio volume license product side-by-side with our standard installation of Office 365, which is a supported scenario according to this Microsoft doc.

At first I had problems where installing the product “VisioPro2019Volume” would downgrade my O365 build to the 1808 version. I posted a comment on this Microsoft Docs issue because it seemed related, and received a very helpful reply from Martin with another Microsoft Docs page describing how to build lean and dynamic install packages for O365. This was the key to configuring my XML file for proper side-by-side installation.

I also used the super helpful Office Customization Tool in support of figuring this out.

Procedure

    1. Download the Office Deployment Tool
    2. Install the tool to a folder on your workstation. Create a new XML file named “newvisio.xml” to look like this (update the PIDKEY value)
<Configuration ID="6659a04f-037d-4f23-b8a2-64c851090a5e">
  <Add Version="MatchInstalled">
    <Product ID="VisioPro2019Volume" PIDKEY="insert Key">
      <Language ID="MatchInstalled" TargetProduct="O365ProPlusRetail" />
    </Product>
  </Add>
</Configuration>
  1. Note: You can get the Key from the Partner portal (go into MPN ? Benefits ? Software) and enter it into your xml file
  2. If you have Visio installed already as part of O365, you will need to remove it:
      1. Create yourself a configuration xml file named removevisio.xml:
    <Configuration ID="ba49a53d-04c0-44a6-b591-c099d9c4e6ed">
      <Remove OfficeClientEdition="64" Channel="Monthly">
        <Product ID="VisioProRetail">
          <Language ID="en-us" />
          <ExcludeApp ID="Access" />
          <ExcludeApp ID="Excel" />
          <ExcludeApp ID="Groove" />
          <ExcludeApp ID="Lync" />
          <ExcludeApp ID="OneDrive" />
          <ExcludeApp ID="OneNote" />
          <ExcludeApp ID="Outlook" />
          <ExcludeApp ID="PowerPoint" />
          <ExcludeApp ID="Publisher" />
          <ExcludeApp ID="Teams" />
          <ExcludeApp ID="Word" />
        </Product>
      </Remove>
      <Display Level="Full" AcceptEULA="TRUE" />
    </Configuration>
    
    1. Place this file where the deployment tool was downloaded, and then run it:
    2. setup /configure removevisio.xml
    3. The uninstall will proceed. You’ll see an image like this; don’t be alarmed its not removing all of office if you set your XML properly
  3. Once the previous version uninstall is complete, install with this command:
  4. setup /configure newvisio.xml
  5. Now you should have Office 365 on subscription, but Visio on Volume License.

Update SCCM Maintenance Window through PowerShell

Sometimes trying to stay bleeding edge is tough – today’s example is when you want to install updates through SCCM a day or two after Patch Tuesday, particularly using Maintenance Windows to allow restarts within a specific time frame.

We use automatic deployment rules to update a Software Update Group every Patch Tuesday – scheduling this is easy because its always the second Tuesday of a month.

But I want the updates to install on Wednesday night, or Thursday morning. This ensures strict compliance requirements can be met, but allows 24 hours for testing. Can’t just schedule the install and restarts for “second Wednesday of the month” though, because if the first of the month is a Wednesday (like this month) then our actual install date happens to be the THIRD Wednesday of the month.

Previously we solved this by manually updating Maintenance Window schedules every month, painstaking selecting the right date and hoping we didn’t mess it up.

PowerShell took that risk away:


SCCM_UpdateMaintenanceWindowSchedule.ps1 – on GitHub


See the comments on the script for details of how it works. As a very brief overview:

I found Tim Curwick’s method of calculating Patch Tuesday, and used that in my script to reliably calculate my Wednesday or Thursday install date.

This script runs as System from an SCCM server on the 1st of every month. It performs the calculation, updates maintenance windows on specific Collections, and outputs a log to file and emails results.


SCVMM – Change VM NIC from Static to Dynamic IP

Just a quick post to document how to make a change with System Center Virtual Machine Manager.

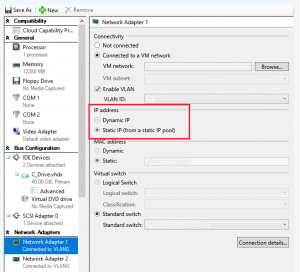
I have a VM with a NIC attached to a VM Network that has a Static IP Pool. For a few not-so-great reasons, I need to remove it from that pool back to a Dynamic IP address.

In the GUI, this option is disabled:

Here’s how to accomplish it with PowerShell:

# Get the virtual machine into an object
$vm = Get-SCVirtualMachine -Name "VMNAME"

# Find the destination VM Network you want to change to (the one without the Static IP Pool)
$vmnetwork = Get-SCVMNetwork -name "VMNETWORKNAME"

# Find the VM Subnet on the VM Network
$vmsubnet = Get-SCVMSubnet -VMNetwork $vmnetwork #Assume single subnet

# Using the pipe to find the NIC (assume single NIC), modify the properties to Dynamic
$vm | Get-SCVirtualNetworkAdapter | Set-SCVirtualNetworkAdapter -IPv4AddressType Dynamic -vmsubnet $vmsubnet