Terraform AzureRM provider 2.0 upgrade

Today I needed to upgrade a set of Terraform configuration to the AzureRM 2.0 provider (technically 2.9.0 as of this writing). My need is primarily to get some bug fixes regarding Application Gateway and SSL certificates, but I knew I’d need to move sooner or later as any new resources and properties are being developed on this new major version.

This post will outline my experience and some issues I faced; they’ll be very specific to my set of configuration but the process may be helpful for others.

To start, I made sure I had the following:

  • A solid source-control version that I could roll back to
  • A snapshot of my state file (sitting in an Azure storage account)

Then, within my ‘terraform’ block where I specify the backend and required versions, I updated the value for my provider version:

terraform {
  backend "azurerm" {
  }
  required_version = "~> 0.12.16"
  required_providers {
    azurerm = "~> 2.9.0"
  }
}

Next, I ran the ‘terraform init’ command with the upgrade switch; plus some other parameters at command line because my backend is in Azure Storage:

terraform init `
    -backend-config="storage_account_name=$storage_account" `
    -backend-config="container_name=$containerName" `
    -backend-config="access_key=$accountKey" `
    -backend-config="key=prod.terraform.tfstate" `
    -upgrade

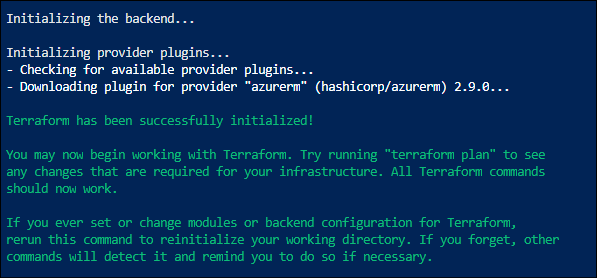
Since my required_providers property specified AzureRm at 2.9.0, the upgrade took place:

Now I could run a “terraform validate” and expect to get some syntax errors. I could have combed through the full upgrade guide and preemptively modified my code, but I found relying upon validate to call out file names and line numbers easier.

Below are some of the things I found I needed to change – had to run “terraform validate” multiple times to catch all the items:

Add a “features” property to the provider:

provider "azurerm" {
  subscription_id = var.subscription
  client_id       = "service principal id"
  client_secret   = "service principal secret"
  tenant_id       = "tenant id"
  features {}
}

Remove “network_security_group_id” references from subnets
Modify “address_prefix” to “address_prefixes on subnet, with values as a list

Virtual Machine Extension drops “resource_group”, “location”, and “virtual_machine_name” properties
Virtual Machine Extension requires “virtual_machine_id” property

Storage Account no longer has “enable_advanced_threat_protection” property
Storage Container no longer has “resource_group_name” property

Finally, the resources for Azure Backup VM policy and protection have been renamed – this is outlined in the upgrade guide (direct link).

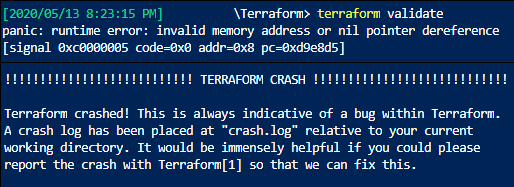
It was this last one that caused the most problems. Before I had replaced it, my “terraform validate” was crashing on a fatal panic:

Looking in the crash.log, I eventually found an error on line 2572:

2020/05/13 20:30:55 [ERROR] AttachSchemaTransformer: No resource schema available for azurerm_recovery_services_protected_vm.rsv-protect-rapid7console

This reminded me of the resource change in the upgrade guide and I modified it.

Now, “terraform validate” is successful, yay!


Not so fast though – my next move of “terraform plan” failed:

Error: no schema available for azurerm_recovery_services_protected_vm.rsv-protect-rapid7console while reading state; this is a bug in Terraform and should be reported

I knew this was because there was still a reference in my state file, so my first thought was to try a “terraform state mv” command, to update the reference:

 
terraform state mv old_resource_type.resource_name new_resource_type.resource_name
terraform state mv azurerm_recovery_services_protection_policy_vm.ccsharedeus-mgmt-backuppolicy azurerm_backup_policy_vm.ccsharedeus-mgmt-backuppolicy

Of course, it was too much to hope that would work; it error-ed out:

Cannot move
azurerm_recovery_services_protection_policy_vm.ccsharedeus-mgmt-backuppolicy
to azurerm_backup_policy_vm.ccsharedeus-mgmt-backuppolicy: resource types
don't match.

I couldn’t find anything else online about converting a pre-existing terraform state to the 2.0 provider with resources changing like this. And from past experience I knew that Azure Backup didn’t like deleting and re-creating VM protection and policies, so I didn’t want to try a “terraform taint” on the resource.

I decided to take a risk and modify my state file directly (confirmed my snapshot!!)

Connecting to my blob storage container, I downloaded a copy of the state file, and replaced all references of the old resource type with the new resource type.

After replacing the text, I uploaded my modified file back to the blob container, and re-ran “terraform plan”.

This worked! The plan ran successfully, and showed no further changes required in my infrastructure.

Build Azure Storage Fuse 1.2 from source

I’ve been looking to test out Azure Storage Fuse on a linux VM (Oracle Linux 7), and wanted to evaluate the authentication options to Azure.

Reading through the main README page, it describes “Managed Identity auth: (Only available for 1.2.0 or above)”, however the Releases has only been built up to 1.1.1.

The Wiki page on installation describes a method to build from source, so I thought I’d give that a shot.

Following the instructions, I hit an error when starting the build:

Unable to find the requested Boost libraries
 Could not find the following static Boost libraries:

          boost_filesystem
          boost_system

  No Boost libraries were found.  You may need to set BOOST_LIBRARYDIR to the
  directory containing Boost libraries or BOOST_ROOT to the location of
  Boost.


I confirmed that I had Boost installed from yum (1.53) in /usr/include/boost.

I first looked at the Issue list within the repository on GitHub, and found exactly what I needed! Issue #319 was reported with the same error, and the suggestion from richardharrison was effective for me:

In the file CMakeLists.txt
There are 2 lines of the format
set(Boost_USE_STATIC_LIBS ON)
simply change them to
set(Boost_USE_STATIC_LIBS OFF)

I modifed the CMakeLists.txt file on line #134 and #222, and changed the values and then re-ran ./build.sh

This produced a 23MB file: azure-storage-fuse-master/build/blobfuse

I did a quick test to validate that my build was working:

mkdir /mnt/blobfusetmp
mkdir /mnt/blobfuse
export AZURE_STORAGE_ACCOUNT=myaccountname
export AZURE_STORAGE_ACCESS_KEY=myaccesskey
 
./blobfuse /mnt/blobfuse --tmp-path=/mnt/blobfusetmp -o attr_timeout=240 -o entry_timeout=240 -o negative_timeout=120 --container-name=fuse --log-level=LOG_DEBUG --file-cache-timeout-in-seconds=120

A file within my container is now visible within my mount point!


Off to play with Managed Identity!

Terraform dynamic blocks in resources (Azure Backup Retention Policy)

This post will give an example of using Terraform dynamic blocks within an Azure resource. Typically this is done when you need multiple instances of a nested block within a resource, for example multiple “http_listener” within an Azure Application Gateway.

Here I’m using an Azure Backup retention policy, which as a Terraform resource (note I’m using resource version prior to AzureRM 2.0 provider, which are no longer supported) can have blocks for multiple different retention levels. In this case, we are only looking to have one of each type of nested block (retention_daily, retention_weekly, etc) however there are cases where we want zero instances of a block.
I’m sure there would be a way to simplify this code with a list(map(string)) variable, so that the individual nested blocks I’ve identified here aren’t necessary, however I haven’t yet spent the time to make that simplification.

A single-file example of this code can be found on my GitHub repo here.


First, create a Map variable containing the desired policy values:

variable "default_rsv_retention_policy" {
  type = map(string)
  default = {
      retention_daily_count = 14
      retention_weekly_count = 0
      #retention_weekly_weekdays = ["Sunday"]
      retention_monthly_count = 0
      #retention_monthly_weekdays = ["Sunday"]
      #retention_monthly_weeks = [] #["First", "Last"]
      retention_yearly_count = 0
      #retention_yearly_weekdays = ["Sunday"]
      #retention_yearly_weeks = [] #["First", "Last"]
      #retention_yearly_months = [] #["January"]
    }
}

In the example above, this policy will retain 14 daily backups, and nothing else.

If you wanted a more typical grandfather scenario, you could retain weekly backups for 52 weeks every Monday, and monthly backups for 36 months from the first Sunday of each month:

variable "default_rsv_retention_policy" {
  type = map(string)
  default = {
      retention_daily_count = 14
      retention_weekly_count = 52
      retention_weekly_weekdays = ["Sunday"]
      retention_monthly_count = 36
      retention_monthly_weekdays = ["Sunday"]
      retention_monthly_weeks = ['First'] #["First", "Last"]
      retention_yearly_count = 0
      #retention_yearly_weekdays = ["Sunday"]
      #retention_yearly_weeks = [] #["First", "Last"]
      #retention_yearly_months = [] #["January"]
    }
}

Now we’re going to use this map variable within a dynamic function. Check the GitHub link above for the full file, as I’m only going to insert the dynamic block here for explanation. Each of these blocks would go inside the “azurerm_backup_policy_vm” resource.


First up is the daily – in my case, I am making an assumption that there will ALWAYS be a daily value, and thus directly using the variable.

#Assume we will always have daily retention
  retention_daily {
    count = var.default_rsv_retention_policy["retention_daily_count"]
  }

Next we will add in the “retention_weekly” block:

dynamic "retention_weekly" {
    for_each = var.default_rsv_retention_policy["retention_weekly_count"] > 0 ? [1] : []
    content {
      count  = var.default_rsv_retention_policy["retention_weekly_count"]
      weekdays = var.default_rsv_retention_policy["retention_weekly_weekdays"]
    }
  }

The “for_each” is using conditional logic, in this format: condition ? true_val : false_val
It is evaluated as: “if the retention_weekly_count” value of our map variable is greater than zero, then provide 1 content block, else provide 0 content block.

From our first example of the variable I provided, since the weekly count is 0, this content block would then not appear in our terraform resource.

In the second example, we did provide a value greater than zero (52) and we also specified a weekday. This is what gets inserted into the content block as the property names and values.


Similarly, the monthly retention would look like this:

dynamic "retention_monthly" {
    for_each = var.default_rsv_retention_policy["retention_monthly_count"] > 0 ? [1] : []
    content {
      count  = var.default_rsv_retention_policy["retention_monthly_count"]
      weekdays = var.default_rsv_retention_policy["retention_monthly_weekdays"]
      weeks    = var.default_rsv_retention_policy["retention_monthly_weeks"]
    }
  }

Because of the nature of this Azure resource, there is a new content property named “weeks” which signifies the week of the month to take the backup on (we said “First”).
Using dynamic blocks is an effective way to parameterize your Terraform – even with the example I gave earlier about Azure Application Gateway, in that resource itself there are many other nested resource blocks that this would be useful for, like “disabled_rule_group” within the WAF configuration, or “backend_http_settings”, or “probe”. I would expect the same is true for other Azure load balancers or Front Door configurations.

Add PRTG sensor through PowerShell module

Once I established a way to perform an Azure Function call from a PRTG REST sensor, I wanted to programmatically deploy this sensor for consistency across multiple environments.

To do so I made use of the excellent PrtgAPI project from lordmilko. This wraps the PRTG REST API into easy to use and understand PowerShell, which is very effective for my team’s ability to use and re-use things written with it.

What follows is an extremely bare-bones method of deploying a PRTG custom REST sensor using PrtgAPI with PowerShell. What it does not contain are appropriate tests or error-handling, parameter change handling, or removal. Thus warned, use at your own risk.

GitHub script file

This example is specifically built for an Azure Function which monitors an Application Gateway health probe, and the parameters are tailored as such.
First I start by defining the parameters to be used, aligned with the Application Gateway http setting I want to monitor – as in my previous post I wanted a separate sensor for each http setting associated with a listener.

# Input Variables - update accordingly
$ClientCode = "abc"
$resourcegroupname = "$($clientcode)-srv-rg" # resource group where the Application Gateway is located
$appgwname = "$clientcode AppGw" # name of the application gateway
$httpsettingname = @("Test","Prod")
$probename = "Probe1"
$subscriptionid = "549d4d62" # Client Azure subscription
 
$appsvcname = "AppGw Monitor"
$appsvcFQDN = "prod-appsvc.azurewebsites.net"
$functionName = "Get-AppGw-Health"
$functionKey = "secret function key for PRTG"
$tenantid = "f5f7b07a" # Azure tenant id

Then I use the PrtgAPI module – install if not already, and connect to a PRTG Core:

# PrtgAPI is being used: https://github.com/lordmilko/PrtgAPI
#Check if module is installed, and install it if not
$moduleinstalled = get-module prtgapi -listavailable
if ($moduleinstalled) {
    Write-Host "Pre-requisite Module is installed, will continue"
}
else {
    Install-Package PrtgAPI -Source PSGallery -Force
    Write-Host "Installing PrtgApi from the PSGallery"
}
 
# Check and see if we're already connected to PRTG Core
$prtgconnection = Get-PrtgClient
if (!$prtgconnection) {
    # If not, make the connection
    Write-Host "You will now be prompted for your PRTG credentials"
    Connect-PrtgServer prtgserver.domain.com
}
Write-Host "Connected to PRTG. Proceeding with setup."

Next I test for existence of a device, which will be used to branch whether I am creating a sensor under the device, or need to create the device and the sensor together:

# Using our defined group structure, check for the device existence
$device = Get-Probe $probename | Get-Group "Services" | Get-Group "Application Gateways" | Get-Device $appsvcname

Because I have one Application Gateway with multple http settings serving multiple back-end pools, I need to do a foreach loop around each object in the httpsetting array. Inside that loop, I build the JSON body that will be passed in the POST request to the Azure Function:

$Body = @"
{
    "httpsettingname": "$setting",
    "resourcegroupname": "$resourcegroupname",
    "appgwname": "$appgwname",
    "subscriptionid": "$subscriptionid",
    "tenantid": "$tenantid"
}
"@

Now I check for the device and sensor (fairly self-explanatory) and finally get to the meat and potatoes of the sensor creation.

Up first is defining the parameters for the sensor that will be created. The wiki for PrtgAPI recommends the use of Dynamic Parameters and to start by constructing a set of DynamicSensorParameters from the raw sensor type identifier.

Once I have that in a PowerShell object, I begin to apply my own values for various parameter attributes:

# Gather a default set of parameters for the type of sensor that we want to create
            $params = Get-Device $device | New-SensorParameters -RawType restcustom | Select-object -First 1 # selecting first because PrtgApi seems to find multiple devices with same name
            # For some reason, above command creates two objects in Params, so we only target the first one by getting -First 1
 
            # Populate the sensor parameters with our desired values
            $params.query = "/api/$($functionName)?code=$functionKey"
            $params.jsonfile = "azureappgwhealth.template" # use the standard template that was built
            $params.protocol = 1 # sets as HTTPS
            $params.requestbody = $body
            $params.Interval = "00:5:00" # 5 minute interval, deviates from the default
            $params.requesttype = 1 # this makes it a POST instead of GET
            if ($setting -like "*prod*") {
                # Set some Tags on the sensor
                $params.Tags = @("restcustomsensor", "restsensor", "Tier2", "$($ClientCode.toUpper())", "ApplicationGateway", "PRTGMaintenance", "Production")
            }
            else {
                # Assume Test if not prod, set a different set of Tags
                $params.Tags = @("restcustomsensor", "restsensor", "Tier2", "$($ClientCode.toUpper())", "ApplicationGateway", "PRTGMaintenance", "NonProduction")
            }
            $params.Name = "$($appgwname) $($setting)"

Finally, I can create the sensor by using this one line:

$sensor = $device | Add-Sensor $params # Create the sensor

That’s pretty much it! For each of the different http settings and health probe back-ends I modify the variables at the top of this script, and then run it again; obviously there are much better ways to make this reproducible, however I haven’t been able to commit that time.

Azure Function called from PRTG REST sensor

Using PRTG for service monitoring has been fairly effective for me, particularly with HTTP Advanced sensors to monitor a website. However, as more and more Azure resources are utilized, I want to continue to centralize my alerting and notifications within a single platform and that means integrating some Azure resource status into PRTG.

At a high level, here’s what needs to happen:

  • Azure Function triggered on HTTP POST to query Azure resources and return data
  • PRTG custom sensor template to interpret the results of the Function data
  • PRTG custom lookup to establish a default up/down threshold
  • PRTG REST sensor to trigger the function, and use the sensor template and custom lookup to properly display results

Azure Function

For my first use-case, I wanted to see the health status of the back-end pool members of an Application Gateway:

The intended goal is if a member becomes unhealthy, PRTG would alert using our normal mechanisms. I could use an Azure Monitor alert to trigger something when this event happens, but in reality it is easier for PRTG to poll rather than Azure Monitor to trigger something in PRTG.

I’m not going to cover the full walk-through of building an Azure Function; instead here is a good starting point.

I’m using a PowerShell function, where the full source can be found here: GitHub link

Here’s a snippet of the part doing the heavy lifting:

#Proceed if all request body parameters are found
if ($appgwname -and $httpsettingname -and $resourcegroupname -and $subscriptionid -and $tenantid) {
    $status = [HttpStatusCode]::OK
    # Make sure we're using the right Subscription
    Select-AzSubscription -SubscriptionID $subscriptionid -TenantID $tenantid
    # Get the health status, using the Expanded Resource parameter
    $healthexpand = Get-AzApplicationGatewayBackendHealth -Name $appgwname -ResourceGroupName $resourcegroupname -ExpandResource "backendhealth/applicationgatewayresource"
    # If serving multiple sites out of one AppGw, use the parameter $httpsettingname to filter so we can better organize in PRTG
    $filtered = $healthexpand.BackEndAddressPools.BackEndhttpsettingscollection | where-object { $_.Backendhttpsettings.Name -eq "$($httpsettingname)-httpsetting" }
    # Return results as boolean integers, either health or not. Could modify this to be additional values if desired
    $items = $filtered.Servers | select-object Address, @{Name = 'Health'; Expression = { if ($_.Health -eq "Healthy") { 1 } else { 0 } } }
    # Add a top-level property so that the PRTG custom sensor template can interpret the results properly
    $body = @{ items = $items }
 
}

You can test this function using the Azure Functions GUI or Postman, or PowerShell like this:

    $appsvcname = "appsvc.azurewebsites.net"
    $functionName = "Get-AppGw-Health"
    $functionKey = " insert key here "
    $Body = @"
{
    "httpsettingname": " prodint ",
    "resourcegroupname": " rgname ",
    "appgwname": " appgw name ",
    "subscriptionid": " subid ",
    "tenantid": " tenant id "
}
"@
    $URI = "https://$($appsvcname)/api/$($functionName)?code=$functionKey"
    Invoke-RestMethod -Uri $URI -Method Post -body $body -ContentType "application/json"

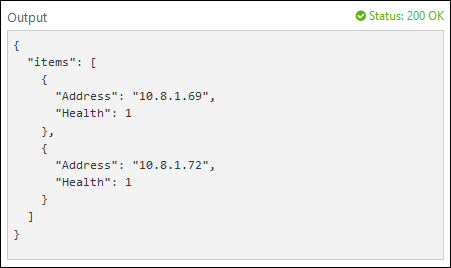
Expected results would look like this:

You can see the “Function Key” parameter in this code above; I’ve created a function key for our PRTG to authenticate against, rather than making this function part of a private VNET.


PRTG Custom Sensor Template

Now, in order to have PRTG interpret the results of that JSON body, and automatically create channels associated with each Item, we need to use a custom sensor template.

Here’s mine (github link):

{
  "prtg": {
    "description" : {
      "device": "azureapplicationgateway",
      "query": "/api/Get-AppGw-Health?code={key}",
      "comment": "Documentation is in Doc Library"
    },
    "result": [
      {
 
	"value": {
            #1: $..({ @.Address : @.Health }).*
        },
        "valueLookup": "prtg.customlookups.healthyunhealthy.stateonok",
        "LimitMode":0,
        "unit": "Custom",
      }
    ]
  }
}

The important part here is the “value” properties. The syntax for this isn’t officially documented, but Paessler support has provided a couple examples that I used, such as here and here. The #1 before the first semi-colon sets the channel name, and uses the first argument referenced within the braces (@.Address in this case). What is inside the braces associates the channel name to the value that is returned, which in this case is the boolean integer for “Health” that the Azure Function returns.

The valueLookup property references the custom lookup explained below.

This Sensor Template file needs to exist on the PRTG Probe that will be calling it, in this location:

Program Files (x86)\PRTG Network Monitor\Custom Sensors\rest


PRTG Custom Lookup

I want to be able to control what PRTG detects as “down” based on the values that my Function is returning. To do so, we apply a custom lookup (github link):

<?xml version="1.0" encoding="UTF-8"?>
  <ValueLookup id="prtg.customlookups.healthyunhealthy.stateonok" desiredValue="1" xmlns:xsi="http://www.w3.org/2001/XMLSchema-instance" xsi:noNamespaceSchemaLocation="PaeValueLookup.xsd">
    <Lookups>
      <SingleInt state="Error" value="0">
        Unhealthy
      </SingleInt>
      <SingleInt state="Ok" value="1">
        Healthy
      </SingleInt>
    </Lookups>
  </ValueLookup>

This matches my 0 or 1 return values to the PRTG states that a channel can be in. You can modify this to suit your Function return values.

This lookup file needs to exist on the PRTG Core, in this location:

Program Files (x86)\PRTG Network Monitor\lookups\custom

PRTG REST sensor

So lets put it all together now. Create a PRTG REST Sensor, and apply the following settings to it:

Your PostData should match the parameters you’re receiving into your Azure Function. The REST query directs to the URL where your function is located, and uses the function key that was generated for authentication purposes.

Important to note: the REST sensor depends upon the Device it is created under to generate the hostname for URL. This means you’ll need to have a Device created with a hostname matching your Function App URL, where the sensor’s REST Query references the function name itself.

Make sure the REST Configuration is directed to your custom sensor template; this can only be set on creation.

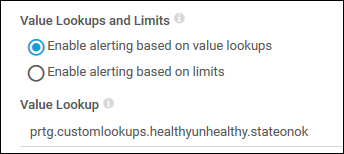
Then for each channel that gets auto-detected, you will go and modify it’s settings and apply the custom lookup:

With that, you should have a good sensor in PRTG relaying important information collected from Azure!

I’m also using this same method to collect Azure Site Recovery status from Azure and report it within PRTG, using this Function.