docker-compose environment variables and quotes

Today I am learning about using docker-compose to run a simple dotnet core Blazor server app, and I hit a snag.

For various reasons I won’t detail right now, I want my docker container to serve my app up over HTTPS, and this requires a bit of extra configuration for dotnet core.

After producing a certificate, I managed to get my container running with a a “docker run”, like this:

docker run --rm -p 44381:443 -e ASPNETCORE_HTTPS_PORT=44381 -e ASPNETCORE_URLS="https://+;http://+" -e Kestrel__Certificates__Default__Path=/https/aspnetapp.pfx -e Kestrel__Certificates__Default__Password=password -v $env:USERPROFILE\.aspnet\https:/https/ samplewebapp-blazor
No problems, I could hit https://localhost:44381 and it all worked great.
However, that’s messy and I wanted to experiment with docker-compose yml files to clean it up a bit. I produced this:
version: "3.8"
services:
  web:
    image: samplewebapp-blazor
    ports:
      - "44381:443"
    environment:
      - COMPOSE_CONVERT_WINDOWS_PATHS=1
      - ASPNETCORE_HTTPS_PORT=44381
      - ASPNETCORE_URLS="https://+;http://+"
      - Kestrel__Certificates__Default__Password="password"
      - Kestrel__Certificates__Default__Path="/https/aspnetapp.pfx"
    volumes:
      - "/c/Users/jeff.miles/.aspnet/https:/https/"
Then, I run “docker-compose up”. However, instead of success, I saw errors!
crit: Microsoft.AspNetCore.Server.Kestrel[0]
web_1  |       Unable to start Kestrel.
web_1  | Interop+Crypto+OpenSslCryptographicException: error:2006D080:BIO routines:BIO_new_file:no such file

My first thought was, “That’s got to be referring to the certificate – I must not have the volume syntax correct, and it isn’t mounted”. So I messed around with a bunch of different ways of specifying the local mount point, investigated edge cases with WSL2 and Docker Desktop, and wasted about 45 minutes with no results.

So I tagged in my buddy Matthew for his insight, and his first suggestion was “is it actually mounted?” In order to check, I had to get the container to run with docker-compose, so I commented out the environment variables for ASPNETCORE_URLS, and the Kestral values. This allowed the container to run, although I couldn’t actually hit the web app.

Then I was able to do: “docker exec -it containername bash”

Using this I could browse the filesystem, and verify the volume was mounted and the certificate was present.

Within that bash prompt, I manually set the environment variables, and then re-ran dotnet with the same entrypoint command as what builds my docker image. Surprisingly, the application loaded up successfully!

This tells me the volume is good, but something’s wrong with the passed-in variables.

First, I tried taking the quotes off the value of the Kestrel__Certificates__Default__Path variable. But then docker-compose gave me this error:

web_1  | crit: Microsoft.AspNetCore.Server.Kestrel[0]
web_1  |       Unable to start Kestrel.
web_1  | System.InvalidOperationException: Unrecognized scheme in server address '"https://+""'. Only 'http://' is supported.

I decided to remove all quotes from all environment variables (as a shot in the dark), and again surprisingly, it worked!

A bit of internet sleuthing later, and Matthew had produced this GitHub issue as explanation of what was going on.

Because I was wrapping the environment variables in quotes, they were actually getting injected into the container with quotes!

Here’s the end result of my compose file:

version: "3.8"
services:
  web:
    image: samplewebapp-blazor
    ports:
      - "44381:443"
    environment:
      - COMPOSE_CONVERT_WINDOWS_PATHS=1
      - ASPNETCORE_HTTPS_PORT=44381
      - ASPNETCORE_URLS=https://+;http://+
      - Kestrel__Certificates__Default__Password=password
      - Kestrel__Certificates__Default__Path=/https/aspnetapp.pfx
    volumes:
      - "/c/Users/jeff.miles/.aspnet/https:/https/"

It looks like as of docker-compose 1.26 (out now) that if you need quotes around environment variable values, you should use a .env file, which will work properly.

Azure Automation and DSC inside Pipeline

For a while I have been integrating Terraform resource deployment of Azure VMs with Azure Desired State Configuration inside of them (previous blog post).

Over time my method for deploying the Azure resources to support the DSC configurations has matured into a PowerShell script that checks and creates per-requisites, however there was still a bunch of manual effort to go through, including the creation of the Automation Run-As account.

This was one of the first things I started building in an Azure DevOps pipeline; it was a good idea having now spent a bunch of time getting it working, and learned a bunch too.

Some assumptions are made here. You have:

  • an Azure DevOps organization to play around with
  • an Azure subscription
  • the capability/authorization to create new service principals in the Azure Active Directory associated with your subscription.

You can find the GitHub repository containing the code here. with the README file containing the information required to use the code and replicate it.

A few of the key considerations that I wanted to include (and where they are solved) were:

  • How do I automatically create a Run-as account for Azure Automation, when it is so simple in the portal (1 click!)
    • Check the New-RunAsAccount.ps1 file, which gets called by the Create-AutomationAccount.ps1 script in a pipeline
  • Azure Automation default modules are quite out of date, and cause problems with using new DSC resources and syntax. Need to update them.
  • I make use of Az PowerShell in runbooks, so I need to add those modules, but Az.Accounts is a pre-req for the others, so it must be handled differently
    • Create-AutomationAccount.ps1 has a section to do this for Az.Accounts, and then a separate function that is called to import any other modules from the gallery that are needed (defined in the parameters file)
  • Want to use DSC composites, but need a mechanism of uploading that DSC module as an Automation Account module automatically
    • A separate pipeline found on “ModuleDeploy-pipeline.yml” is used with tasks to achieve this
  • Don’t repeat parameters between scripts or files – one location where I define them, and re-use them
    • See “dsc_parameters.ps1”, which gets dot-sourced in the scripts which are directly called from pipeline tasks

Most importantly, are the requirements to get started, being:

  • An Azure Subscription in which to deploy resources
  • An Azure KeyVault that will be used to generate certificates
  • An Azure Storage Account with a container, to store composite module zip
  • An Azure DevOps organization you can create pipelines in
  • An Azure Service Principal with the following RBAC or API permissions: (so that it can itself create new service principals)
    • must be “Application Administrator” on the Azure AD tenant
    • must be “Owner” on the subscription
    • must have appropriate rights to an access policy on the KeyVault to generate and retrieve Certificates
    • must be granted the following API permissions within the Azure Active Directory:
  • An Azure DevOps Service Connection linked to the Service Principal above


The result is that we have two different pipelines which can do the following:

  • ModuleDeploy-pipeline.yml pipeline runs and
    • takes module from repository and creates a zip file
    • uploads DSC composite module zip to blob storage
    • creates automation account if it doesn’t exist
    • imports DSC composite module to automation account from blob storage (with SAS)
  • azure-pipelines.yml pipeline runs and:
    • creates automation account if it doesn’t exist
    • imports/updates Az.Accounts module
    • imports/updates remaining modules identified in parameters
    • creates new automation runas account (and required service principal) if it doesn’t exist (generating an Azure KeyVault certificate to do so)
    • performs a ‘first-time’ run of the “Update-AutomationAzureModulesForAccount” runbook (because automation account is created with out-of-date default modules)
    • imports DSC configuration
    • compiles DSC configuration against configuration data


Terraform handling list of maps

Dropping a quick reference here on some specific use cases for Terraform syntax.

Scenario #1

I want to build an Azure Route Table. It is going to contain 1 or more routes, but those are dependent upon the implementation; one may have 1 or 2, another may have more or even zero.

A normal route table in Terraform would look like this:

resource "azurerm_route_table" "test-routetable" {
  name                = "testroutes"
  location            = var.location
  resource_group_name = var.resourcegroupname
  disable_bgp_route_propagation = false

  route {
    name                    = "clientsubnet_to_nva"
    address_prefix          = var.networkipaddress["clientsubnet"] # This is a map variable
    next_hop_type           = "VirtualAppliance"
    next_hop_in_ip_address  = local.nva-ge3_ip # a local that populates the ip of my network virtual appliance
  }
}

The intention here is that anything matching a specific subnet gets routed through a network virtual appliance to do stuff with (scan, forward, etc).

With Terraform, you can put the routes inside the route table resource, or create them as independent resources and link them to the route table resource.

To enable the ‘variable’ nature of my routes, I created a new variable:

variable "clientnetworks" {
  type = list(map(string))
  default = []
}

You can see this is a list of maps containing string values. This lets me supply input that looks like this:

clientnetworks = [
  # Values must follow CIDR notation, so /32 or /27 or /24 or something
 {
   name = "Clientsubnet1" # Name will be the route name, no spaces
   value = "10.1.1.0/24"
 }
 ,
 {
   name = "Clientsubnet2"
   value = "10.1.2.0/24"
 }
]


Now I need to make my ‘route’ block dynamic within the route table. For this, I use dynamic blocks with a foreach expression:

resource "azurerm_route_table" "test-routetable" {
  name                = "testroutes"
  location            = var.location
  resource_group_name = var.resourcegroupname
  disable_bgp_route_propagation = false

  # For each item in the list of this variable map, we create a route
  dynamic "route" {
        for_each = var.clientnetworks
        content {
          name                    = route.value["name"]
          address_prefix          = route.value["value"]
          next_hop_type           = "VirtualAppliance"
          next_hop_in_ip_address  = local.nva-ge3_ip # a local that populates the ip of my network virtual appliance
        }
      }
}

This is saying, “for each item in the clientnetworks variable, create a “route” block within my route table resource, and set it’s contents based upon the values found within the instance of the map variable element.

This achieves my goal, where I can populate the input variable with different contents for each implementation, and yet my resource declaration can stay consistent.

Scenario #2

I need to create network security group rules for the list of map values referenced in Scenario #1. This may be a single value, or multiple items, and I want them all contained within a single NSG rule.

I learned about Terraform Console today which really helped in testing and understanding the correct syntax to use here.

If my input looks like this:

clientnetworks = [
  # Values must follow CIDR notation, so /32 or /27 or /24 or something
 {
   name = "Clientsubnet1" # Name will be the route name, no spaces
   value = "10.1.1.0/24"
 }
 ,
 {
   name = "Clientsubnet2"
   value = "10.1.2.0/24"
 }
]

Then what I want to achieve is a list containing each “value” from each map in my variable list. In effect, “[10.1.1.0/24,10.1.2.0/24]”.

This is done using a “splat” expression, as identified in the Terraform docs.
I can use the following syntax from my variable:

var.clientnetworks[*].value

Putting this into an NSG rule resource, remembering to set plurality on “destination_address_prefixes”:

resource "azurerm_network_security_rule" "any_clientnetwork_any_mgmtnsg" {
  resource_group_name         = var.resourcegroupname
  name                        = "any_clientnetwork_any"
  priority                    = 1300
  direction                   = "Outbound"
  access                      = "Allow"
  protocol                    = "*"
  source_port_range           = "*"
  destination_port_range      = "*"
  source_address_prefix       = "*"
  destination_address_prefixes  = var.clientnetworks[*].value
  network_security_group_name = azurerm_network_security_group.mgmt-nsg.name
  description                 = "This allows outbound to client networks"
}

Last Note

I have tested these scenarios when the input variable exists but is empty, and not good things happen. With the route, if it exists and then I empty the variable, terraform won’t remove the route. But if it is already empty, then the dynamic block evaluates as empty and doesn’t create a route.

For the NSG, Terraform happily passes a validate and a plan, but when applying Azure comes back with an error because it cannot create the resource when the destination prefix is empty.

I could create some conditional logic within that property line to check for when the variable is empty, however I’m already using conditional logic from a different variable for the resource as a whole:

count = var.clientUsingVPN == true ? 1 : 0 # If client is using a VPN, we need this rule
I’m saying “if the client isn’t using a VPN, then don’t create this rule” and at that point, it doesn’t matter whether my variable that is a list of maps is empty or not.

Ingest JSON parameter file into PowerShell

I’m building an Azure DevOps pipeline, and wanted to separate out parameter input into it’s own file which may be re-used across multiple different task types. I investigated a method of declaring parameters in JSON, and then ingesting them in a PowerShell script and using it to populate PowerShell variables.

For the time being, I’ve simplified my code to just use a direct PowerShell dot-sourced file, but want to keep this code snippet here for future reference.

JSON File

{
    "subscriptionid": "3d22393a",
    "resourceGroupName": "test-rg",
    "azureLocation": "EastUS2",
    "automationAccountName": "test-auto",
    "dscConfigurationname": "dsc_baseconfig",
    "dscConfigurationFile": "dsc_baseconfig.ps1",
    "keyvaultName": "kv123"
}


PowerShell

# Import parameters from common JSON for reuse
# This file cannot have comments in it!
param(
    [string]$paramFile = '.\dsc_parameters.json'
)
# For each object in the JSON, create a powershell variable
$params = Get-Content $paramFile | ConvertFrom-Json
$params.PSObject.Properties | ForEach-Object {
    New-Variable -Name $_.Name -Value $_.Value -Force
}


Azure Pipeline for Automation Runbooks

Azure Automation runbooks are very useful – particularly for scheduled or repeated operations. One downside I have observed is that they are very often disconnected from proper version control.

Microsoft has a solution for this: source control integration

You can connect a GitHub/Azure Repo to an Automation Account, which uses resources like RunAs accounts, personal access tokens (from your repo), and automation jobs to perform the sync.

I began evaluating this for the purposes of importing, publishing, and scheduling some runbooks, however there were two key reasons I felt a different direction was better suited:

  1. Flexibility – I could only sync a folder named “runbooks”, and only import and publish them. What if I only wanted a certain selection of runbooks? What if I wanted to segregate runbooks between different Automation Accounts? What if I wanted to manage my schedule definition as code too? Sure there are solutions to these problems, but then they become workarounds or addons to the source control integration.
  2. Consistency – other areas of ensuring version controlled code is released to some environment typically use continuous deployment tools; why would I treat my runbooks any different? If I’m already going to be using Azure DevOps pipelines for these areas, I want to keep that consistency going.

There are a few different ways that runbook management could be accomplished in an Azure DevOps pipeline: Azure PowerShell, ARM templates, Azure CLI.

For simplicity and speed of development, I chose to use Azure PowerShell, combined within a YAML pipeline definition.

My use-case here is taking my Update Management scripts and making them run automatically on a schedule. Based on that, I have the following structure in my repository:

GitHub link for code

PowerShell (Folder)
    Update Management (Folder)
        azure-pipelines.yaml
 	Set-UpdateManagementSchedule.ps1
 	Get-AzCachedAccessToken.ps1
 	New-UpdateManagementSchedule.ps1
        Publish-AARunbookFromDevOps.ps1
    New-EmailDelivery.ps1

Set-UpdateManagementSchedule.ps1 defines some time zones, and then iterates over them calling New-UpdateManagementSchedule.ps1 for each. At the end, it uses New-EmailDelivery.ps1 to send results by email.

New-UpdateManagementSchedule.ps1 calls Get-AzCachedAccessToken.ps1 in order to use an existing Az PowerShell context to create a bearer token and authenticate against Azure REST API with it (where I’m using Update Management endpoints).

Publish-AARunbookFromDevOps.ps1 is my script that gets called within the DevOps pipeline, to import and publish the runbooks to the automation account.

I want Set-UpdateManagementSchedule.ps1 to run once per month, because it calculates the appropriate timing of Update Management schedules. I don’t want any of the other scripts to have a schedule at all, since they’re just referenced at some point in time.

In order to make this all happen, I created a DevOps pipeline, stored within the “azure-pipelines.yaml” file.

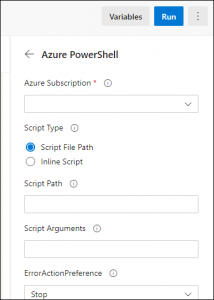
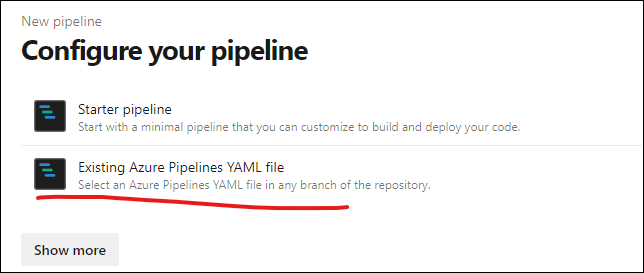
The concept of storing the pipeline as code within YAML is very advantageous, however difficult to simply write from scratch. Often I will create a dummy pipeline in the GUI, using the Task Assistant (see below) and Azure DevOps task docs in order to understand the syntax and components of what I’m trying to achieve.

I can then take that YAML that has been progressively built, store it in my repository, and create a fresh pipeline and import using it.

In this case, my pipeline starts with a trigger definition, for which I learned and utilized path-based rules that Azure Repo supports:

trigger:
  branches:
    include:
    - master
  paths:
    include:
    - PowerShell/UpdateManagement/*

This will ensure the pipeline only triggers when a runbook within the UpdateManagement folder is modified, rather than my whole repository.

Using the AzurePowerShell task, I can trust that authentication to Azure will be handled appropriately as long as I supply a service connection (shown as the “azureSubscription” property below).

- task: AzurePowerShell@5
  inputs:
    azureSubscription: 'automation-rg' #This is the devops service connection name
    ErrorActionPreference: 'Stop'
    FailOnStandardError: true
    ScriptType: 'FilePath'
    ScriptPath: './PowerShell/UpdateManagement/Publish-AARunbookFromDevOps.ps1'
    ScriptArguments:
      -runbookname Get-AzCachedAccessToken `
      -runbookfile ./PowerShell/UpdateManagement/Get-AzCachedAccessToken.ps1 #`
      #-scheduleName $(userPassword)
    azurePowerShellVersion: 'LatestVersion'
  displayName: Deploy AA Runbook - Get-AzCachedAccessToken

For each Runbook that I want to handle in my pipeline, I’m calling the “Publish-AARunbookFromDevOps.ps1” script and supplying arguments related to that specific runbook. I wanted to break it out this way to give me the most flexibility to handle runbooks independently.

This script that is called is fairly static right now; I’m making a bunch of hard-coded assumptions such as “we will always overwrite the runbook if it exists rather than comparison checking”, and “every import needs a publish”, and “only 1 kind of schedule is going to be used”.

Limiting the schedule to my hard-coded values reduced the time-to-deploy this in my environment, because I didn’t have a need right now for further manipulation. This idea is related to “YAGNI” or “You aren’t going to need it” that I recently read about from Martin Fowler.

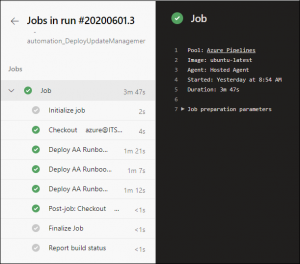
When the pipeline runs, it performs all it’s tasks in about 3:30 minutes

I can see that it has created a Schedule in my automation account, and linked it to the runbook:

Check out the README.md from the GitHub repo for details on re-using this code for yourself.