Expand page height based on iframe source

Since I’m using Mindtouch Core as an intranet site for my company, I have decided to encourage its further use by collecting the various tools and custom sites I have built into one area. Rather than require personnel to have bookmarks to a variety of different tools, I have created a links page within our Wiki, and sub-pages with iframes to each of the internal tools.

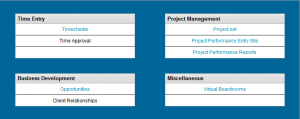
Toolbox display of links


The problem is, each iframe within a Wiki page needs it’s height set, and if I statically set it, sooner or later its going to be too big or too small. I want the height of the iframe to scale dynamically with the height of the content in the iframe.
This normally isn’t an issue, however the Wiki and source of the iframe are considered cross-domain; they’re on separate servers at separate paths. Most javascript solutions won’t work with this type of setup.

Luckily I found someone who does have a resolution. Full credit goes to John and his post here from 2006.

I will document how I got this to work within a Mindtouch wiki page, as that was the primary source of my problems with this code.


First, you’ll need to create a file with the following code:

<html>
  <head>
    <title>Resizing Page</title>
    <script type="text/javascript">
      /**
       * This iframe gets load by the first iframe. This one
       * will communicate with the main page telling it to
       * resize the iframe that has content in it. It will
       * get the height from the URL that was used to
       * link to this page, e.g. iframe-resize.html?height=456
       */
      function onLoad() {
        var params = window.location.search.substring( 1 ).split( '&' );
        var height;
        for( var i = 0, l = params.length; i < l; ++i ) {
          var parts = params[i].split( '=' );
          switch( parts[0] ) {
          case 'height':
            height = parseInt( parts[1] );
            break;
          }
        }
        if( typeof( height ) == 'number' ) {
          window.top.updateIFrame( height );
        }
      }
 
    window.onload = onLoad;
    </script>
  </head>
  <body>
    <p>Resizing IFrame...</p>
  </body>
</html>

Then, transfer this file to the filesystem of your wiki. I placed mine in /var/www/dekiwiki/config.

On the site that you want to appear inside the iframe, you need to add a few things. In the HEAD section:

<script type="text/javascript">
      /**
       * This function will update the URL on the inner iframe,
       * i.e. the iframe within an iframe.
       */
      function resizeThisFrame() {
        var iframe = document.getElementById( 'inneriframe' );
        var wrapper = document.getElementById( 'container' );
        var height = Math.max( document.body.offsetHeight, document.body.scrollHeight );
        iframe.src = 'http://yourwiki/config/iframetest-resize.html?height='+height;
      }
    </script>

In the above code, you must make sure your iframe ID matches, and the wrapper ID (I’m using a div tagged as ‘container’. Also, the last line should point to the file you put in the wiki filesystem.

Then, in the BODY tag, add:

  <body onload="resizeThisFrame()">

And then finally somewhere inside this source page, add a hidden iframe that matches the ID in the javascript above:

      <iframe id="inneriframe" width="10" height="10"></iframe>

Now, all that remains is to put an iframe on your wiki page, and then somewhere on the wiki page, paste the following in the WYSIWYG editor:

{{    <script type="text/javascript">"
      function updateIFrame( height ) {
        var iframe = document.getElementById( 'projectsite' );
        iframe.setAttribute( 'height', height );
      }"
    </script>}}

The ID in that javascript should match the iframe ID on your wiki page.

That’s all you need; now the iframe in the wiki page should dynamically expand with the contents!
Hide file revisions on Mindtouch page

I’ve currently got a Mindtouch Wiki set up in my company, and a recent request came in to be able to hide file revisions for individual pages. After a bit of searching through the Mindtouch developer site and forums, I found the CSS code necessary to hide the “+” icon to expand the list of file revisions.
To apply this, first create a new template, from your templates section: http://yourwiki/template:

In your new page, switch to source view, and paste this in:


<style type="text/css">/*<![CDATA[*/
#attachTable .group {
display: none !important;
}
.groupparent .col1 a {
display: none !important;
}
 /*]]>*/
 </style>


Now you can simply call that template from the toolbar on the page you wish to hide file revisions:

CKEditor toolbar with Templates shown


Here’s the difference:


Ajax AutoCompleteExtender with MSSQL datasource

I’m building a form and wanted to use the autocompleteextender control of the Ajax Toolkit. Having limited skills with ASP.net and C#, I began by looking for examples online. However, nothing I found and tried seemed to be working. I finally found a simple example here that helped me get on my way.

I’ve reproduced my code below as a self-reference, and to hopefully help someone else avoid troubles with this control.


Default.aspx

<!-- Need to have the toolkitscript manager in your page -->
<asp:ToolkitScriptManager ID="ToolkitScriptManager1" runat="server" EnablePageMethods="true" >
</asp:ToolkitScriptManager>
 
<!-- Textbox that the autocomplete will target -->
<asp:TextBox ID="CEMPNAMETextBox" runat="server" Text='<%# Bind("CEMPNAME") %>' />
 
<!-- AutocompleteControl -->
<asp:AutoCompleteExtender ID="AutoCompleteExtender1" runat="server"
                            TargetControlID="CEMPNAMETextBox"
                            MinimumPrefixLength="2"
                            CompletionSetCount="5" 
                            ServiceMethod="GetCompletionList" 
                            UseContextKey="True" />

TargetControlID – the ID of the textbox that we’ve chosen to use
ServiceMethod – name of the method as defined in your codebehind file

Default.aspx.cs (C#)

using System;
using System.Collections.Generic;
using System.Linq;
using System.Web;
using System.Web.UI;
using System.Web.UI.WebControls;
using System.Data;
using System.Data.SqlClient;
using System.Configuration;
 
namespace ITIventory
{
    public partial class _Default : System.Web.UI.Page
    {
            // AUTO COMPLETE SECTION
            [System.Web.Services.WebMethodAttribute(), System.Web.Script.Services.ScriptMethodAttribute()]
            public static string[] GetCompletionList(string prefixText, int count, string contextKey)
            {
                List ListCempName = new List(); // List Object
                try
                {
                    // Open the connection (can re-use connection string as defined in web.config)
                    SqlConnection SqlCon = new SqlConnection(System.Configuration.ConfigurationManager.ConnectionStrings["ITInventoryConnectionString"].ConnectionString);
                    SqlCon.Open();
 
                    // Create a Command
                    SqlCommand SqlComm = new SqlCommand();
                    SqlComm.Connection = SqlCon;
 
                    // Add a employee name SQl Parameter
                    SqlComm.Parameters.Add("@cempname", SqlDbType.VarChar).Value = prefixText; // retrievable throught prefixText parameter
 
                    // Query for get country name from database
                    SqlComm.CommandType = CommandType.Text;
                    SqlComm.CommandText = "SELECT cempname FROM BMEMP WHERE (BMEMP.LISTERM = 'false') AND (BMEMP.cempname LIKE ''+@cempname+'%') ";
 
                    // Read the data and add in List object.
                    SqlDataReader SqlDr = SqlComm.ExecuteReader();
 
                    if (SqlDr != null)
                    {
                        while (SqlDr.Read())
                        {
                            ListCempName.Add(SqlDr["cempname"].ToString());
                        }
                    }
                }
                catch (Exception ex)
                {
                    throw new Exception(ex.Message);
                }
                return ListCempName.ToArray();
            }
       }
}

Inject 3rd party drivers into WDS image

I use Windows Deployment Services (WDS) under Server 2008 to deploy images of Windows 7 x64 over PXE to my desktops and laptops.

I’ve standardized on Dell Latitude and Optiplex computers, so I want these drivers to remain in place after the sysprep, so they don’t need to be added later.

Apparently Server 2008 R2 WDS has the ability to add drivers through the GUI, but I don’t have that luxury yet. Here’s how I’ve gotten these drivers into my image.


The major prerequisite is that you’ll need the Windows AIK tools installed on your server. They can be found here:

http://www.microsoft.com/downloads/en/details.aspx?familyid=696DD665-9F76-4177-A811-39C26D3B3B34&displaylang=en

Note: you’ll need to have extracted folders of each driver you wish to inject, with the .INF file available. For each model, put all your drivers in it’s own folder under the master one. For example:

  • E5420
    • Video
    • LAN
    • Audio
    • Chipset

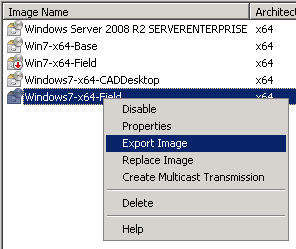
First, open the WDS console, and export the image you want to modify. Right click on the image, and choose Export. Export it to D:\ExportedImages

WDS Export image right click context menu

Then, from an elevated command prompt window, run the following (two separate lines):

"C:\program files\windows aik\tools\petools\copype.cmd" amd64 d:\windowspe-amd64
Imagex /mountrw D:\ExportedImages\Windows7-x64-Field.wim 1 mount

Then copy d:\windowspe-amd64\mount\windows\system32\dism.exe to d:\windowspe-amd64\mount\windows\system32\dism\

Use the following command template to inject the drivers for each system:

dism.exe  /image:d:\windowspe-amd64\mount /add-driver /driver:d:\drivers\E6420\ /recurse

When completed, run this command:

imagex /unmount /commit mount

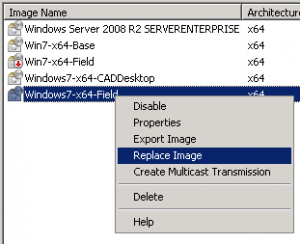
Now re-import the image, either by adding, or replacing the existing one from the right click menu.

Replace WDS image

Automated DFSR Backlog email

If you’re using DFSR for branch office replication, chances are you’re concerned about the number of files in the backlog queue. This page details a script I’ve been using to automate sending of emails, using a combination of blat and dfsrdiag.

To begin you’ll need to download Blat.

I suggest placing the Blat files within C:\Windows so that it’s automatically added to the system path; you could just use the full folder path when calling it though.

Here’s an example batch script I’m using for one replication group:

:: BATCH SCRIPT START
@ECHO OFF
dfsrdiag Backlog /receivingmember:hub-server /sendingmember:branch-server /rgname:domain.com\files\departments /rfname:Departments &gt;C:\users\administrator\documents\backdept-from-branch-server.txt
FOR /R "C:\users\administrator\documents\" %%F IN (backdept-from-branch-server.txt) DO (
       IF %%~zF GTR 3000 (blat C:\users\administrator\documents\backdept-from-branch-server.txt -to email@domain.com  -server smtp.domain.com -f dfsbacklog@domain.com -subject "Backlog exists: Departments incoming from Branch-Server"))
EXIT
pause
:: BATCH SCRIPT END


Here’s a quick rundown on what this is doing:

dfsrdiag Backlog: this command generates a backlog report for the specified sending and receiving server, for the specified replication group, and outputs it to a text file.

This report looks like this:

Member  Backlog File Count: 1367
Backlog File Names (first 100 files)
     1. File name: DSC03752.JPG
     2. File name: DSC03786.JPG
     3. File name: DSC03794.JPG
     4. File name: DSC03796.JPG
     5. File name: DSC03809.JPG
     6. File name: DSC03810.JPG


The next line in the script beginning with “FOR /R”, looks for the text file just generated, and runs logic on it.

IF %%~zF GTR 3000: If the size of the backlog report text file is greater than 3KB, then generate an email to the specified people, with the text file as the message body.

Scheduling the commands

So I’ve got 16 batch files that generate reports; 2 replications groups in two transfer directions to 4 separate locations. To reduce the number of scheduled tasks, and ensure that all 16 backlog reports aren’t run at the same time, I’ve got separate batch files that call 4 at a time, and are scheduled 5 minutes apart.