Mourning the loss of Dekiwiki

In 2007 I implemented Mindtouch Dekiwiki as an internal website. I was excited by the quality of the product, the extensibility, and most importantly the active community and developer interaction.

As Mindtouch grew, they incorporated more excellent features, and were very open about the direction of the product. The developer site contained a wealth of information about release schedules, change logs and tutorials for the product. I found myself interacting with the community regularly, posting information on how to do certain things, answering questions on the forums and filing bugs. I was encouraged that employees of Mindtouch were directly interacting with the community on a daily basis.

I don’t think the company that produced that product exists any longer. It’s been replaced by a buzzword-spewing, no-face entity who hides real information about their product behind flowery text and email signup forms. I lose a lot of interest when companies make it difficult to gather information about their product, and If you take a look at mindtouch.com you’ll find they’re one of the worst offenders. There is only a single line or two on the main page describing what the company is all about, and the product page itself is still undergoing an identity crisis with names such as Mindtouch TCS, Social Help System and just plain Mindtouch in most of the descriptions.

There is actually very little information about the product, no demo site or feature comparisions, no cost information or even licensing models. What videos there are, are hidden behind email sign-ups. As a company marketing it’s product, if you feel the need to hide what you’ve built behind a sign-up wall, you immediately make everyone who comes across it distrustful. Are they not confident enough to proudly show it off? Are they worried that the licensing model will scare people away?

The developer site is effectively dead, and so is Mindtouch Core, the open source edition of what once was Deki Wiki. Most frustrating of all is that Mindtouch Core (the open source derivative of Mindtouch) is no where to be found. Its basically impossible to find it now, which is sad considering that I remember the owners and developers passionate exclamations a few years ago that the product started as open source, would always remain open source and that it’s community would always be vital.

To be clear, I can’t really blame the leaders of Mindtouch for moving in this direction. One look at their customer list and you can see it’s a profitable transition. However I can’t help but be disappointed and a little bit betrayed. To see the excitement of the developers and of the users who are adding to the product is one thing that makes it very attractive. It tells me that the product is good enough to make people talk about it and invest time into it.

Dekiwiki, I’ll remember you fondly as I go looking for your replacement.


Mindtouch – Add links to horizontal link bar in Beechbeta-pale

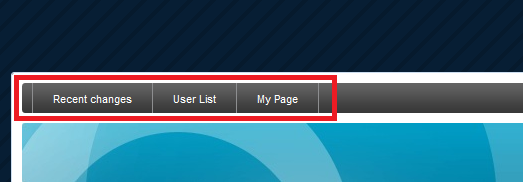
For the Mindtouch wiki at my company, I have taken a copy of Beechbeta-Pale and modified it to closer match our corporate image. Part of this modification includes the horiztonal link bar just below the wiki logo, as identified here:

horizontal menu bar with links


These links can be modified quite easily, which is great because this area provides a highly visible spot for common links.

To modify this area you’ll need SSH access to your wiki.

  • Navigate to: /var/www/dekiwiki/skins/beechbeta/pale (or your custom skin)
  • Modify html.php with Nano or your chosen file editor.
  • Find the line containing “<ul class=”nav”>” (around line 43)

If you want to add a static link, it will be in this form:

  • FTP
  • You can add the class “first” to the <li> to add a vertical bar on the left, or class “last” to add a vertical bar on the right.

    Comment out any predefined php functions (such as Watched Pages) that you don’t want to appear).

    Something additional I did on my wiki was separate links from the left and right on the horizontal link bar.

    For the links that you want to appear on the right, add a new class name to your <li> such as “customlink”.

    Then open the “_style.php” file from the same location as html.php, and jump down to around line 144, which should be “.nav last”.

    Add the following with your custom class name just below that:

    .nav .customlink{
    float:right;
    }


    Now your links should appear something like this:

    PHP form with Active Directory attribute lookup

    With the Mindtouch wiki I have set up, I occasionally use a small form and mysql database to meet someone’s needs. Right now that happens to be a few sign-up tables for some training sessions.

    I do this with an html form right in the page, pointing to a php file within the wiki’s OS, to a new mysql database on the linux VM that the wiki is packaged with. This way this form and database is externally available to my users without having to open up additional resources through our reverse proxy.


    One problem I came across is that the usenames are first initial last name, such as jmiles. However for readability I wanted this to be Jeff Miles. Despite using Active Directory single sign on for Mindtouch, it doesn’t record or use the AD displayname attribute unless you specifically tell it to, and then only for new users.

    Instead I have just incorporated an extra lookup into my PHP file to do the lookup for me.

    HTML Form:
    This form is placed within the source editor on your wiki page.
     

    Training Session: Manager Name:  


    PHP file:
    This php file is placed on the wiki, in /var/www/dekiwiki/config
     

     0)
                            {
                                    for ($i=0; $i<$entries["count"]; $i++)
                                            {
                                                    $fullname = $entries[$i]["displayname"][0];
                                            }
                            }
            // Close the connection
            ldap_unbind($ad);
    
    
    // Remainder of the variables from the form
    $session = $_REQUEST['session'] ;
    $manager_name = $_REQUEST['manager_name'] ;
    $username = $fullname;
    
    // Define the connection parameters to connect to the MySQL database.
    // This is a local database on the wiki VM.
    $conn = mysql_connect("localhost", "root", "password");
    mysql_select_db("qms_training",$conn);
    
    // If connection does not work, let the user know
    
    if (!$conn)
     {
      die('Could not connect: ' . mysql_error());
     }
    // Actual SQL command to insert new data into database. The On DUPLICATE KEY UPDATE command ensures
    // That if the key exists, it will be updated instead of a new one created.
    
    $username = mysql_real_escape_string($username);
    $manager_name = mysql_real_escape_string($manager_name);
    
    $sql="INSERT INTO session_tracking (username, manager_name, session)
    VALUES ('$username','$manager_name','$session')
    ON DUPLICATE KEY UPDATE session=VALUES(session), manager_name=VALUES(manager_name)";
    
    // Provides feedback for the user to know their submission was successful
    if (!mysql_query($sql,$conn))
    {
    die('Error: ' . mysql_error());
    }
    echo $username . ", your training session booking has been added.\n Please wait while the page is refreshed.";
    mysql_close($con)
    
    ?>


    Output in the wiki page:
    Place this text in the WYSIWYG editor on your wiki page. It will pull from your mysql database and display in table format. This requires the setup of an additional mysql extension, described here: http://developer.mindtouch.com/App_Catalog/MySql

    {{ mysql_qms_training.table{query: "SET @rank=0; SELECT @rank:=@rank+1 AS Count, username as 'Name', manager_name as Manager FROM session_tracking WHERE session = 'sp_nov17_830' ORDER BY username"} }}


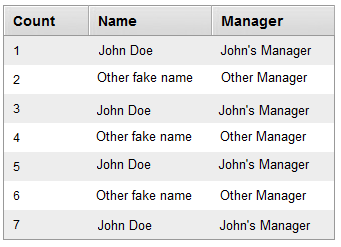
    Now, you’ll have output on your wiki page, with proper attributes from AD!
    (table shrunk for this image, it’ll actually be wider)

    Mindtouch – Show additional Active Directory information for user

    Beginning with Mindtouch 10.0, a feature for User Dashboards was added. Effectively this is an additional set of tabs within the “My Page” section for each user page on your wiki.

    Display dashboard tabs.


    Included in this Mindtouch has created an “Activity Dashboard”, which is a pretty great feature. For me and my company, it didn’t quite fit what we needed, so we have modified it, as well as added an additional tab within the dashboard.

    This post details how to add those additional tabs. In a future post I’ll show how I’ve modified the Activity Dashboard.

    What I wanted to provide for my users was a central spot to view additional Active Directory information about the user who’s page they were viewing. I originally wanted to place this information within the Activity Dashboard, but couldn’t get that working for some reason I can’t remember. Instead I ended up with a separate tab within the user dashboard.

    None of this would have been possible without this post from crb on the Mindtouch developer forums.

    To start you’ll need to have ssh or console access to your wiki. Navigate to /var/www/dekiwiki/deki/plugins/user_dashboard.

    Create a new folder with a related name to your new tab (“adpull” for example).

    Inside that folder, create a php file with the same name as the folder: adpull.php

    Fill out that php file with the following code. Take note of the comments separating the common code for additional dashboard tabs and the actual content of that tab.

    displayTitle = 'Info';
      //            $this->pagePath = 'Template:MindTouch_UserWelcome';
    //              parent::initPlugin();
            }
    
            public function getPluginId() {
                    return 'adpull';
            }
    
    // Fill out the following function with what you want to populate your tab page with. 		
      public function getHtml() {
       
    	// This sets up a connection to an Active Directory server to pull various attribues for the user page
       $dn = "OU=UserAccounts,DC=domain,DC=ca";
        $attributes = array("title", "department", "l", "telephonenumber", "mail");
        $username = $this->User->getUsername();
        $filter = "(samaccountname=$username)";
        $ad = ldap_connect("ldap://server.domain.ca") or die("Couldn't connect to AD!");
    
        ldap_set_option($ad, LDAP_OPT_PROTOCOL_VERSION, 3);
    
        $bd = ldap_bind($ad,"user@domain.ca","password") or die("Couldn't bind to AD!");
        $result = ldap_search($ad, $dn, $filter, $attributes);
        $entries = ldap_get_entries($ad, $result);
    
    		// For the results in the array, put them into this html output.
        for ($i=0; $i<$entries["count"]; $i++)
        {
            $html = '
    Title:
    City:
    Telephone:
    ' .$entries[$i]["title"][0]. "
    " .$entries[$i]["l"][0]. "
    " .$entries[$i]["telephonenumber"][0]. //"
    " //''.$entries[$i]["mail"][0].'' //.$entries[$i]["mail"][0]. "
    "; $html .='
    Email:
    '.$entries[$i]["mail"][0].''; } ldap_unbind($ad); //$html .=$template; return $html; } }


    The example above pulls out AD attributes for the page that’s being viewed. You could just as well fill the php function with:

    $html .='Hello World';
    return $html;

    Now all you need to do is enable this page in the configuration of Mindtouch.
    Navigate to the control panel, and choose Configuration


    Choose “Advanced Config”


    Find the config key ui/user_dashboards, and then add a comma and the name of what you named your folder:

    user_page,Template:MindTouch/Views/ActivityDashboard, adpull

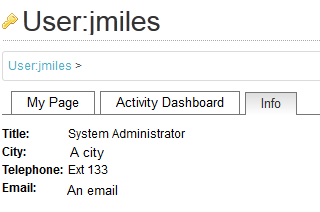
    Save that change, and now you should see an additional tab on your user dashboard:


    Create a discussion board for Mindtouch wiki

    A recent comment on my Mindtouch intro page asked how I built the discussion board.

    I originally got the code from the Mindtouch Developer site here, however I can’t seem to find the complete source code anymore. Either way, I’m pretty sure neilw, a valuable contributor to the Mindtouch community is the author of this code and full credit goes to him.

    The actual implementation is very simple. You just need to make a couple of templates.

    First, create the discussion board page template, or topic list:

    Template:/ForumTopicList


    {{wiki.create("Create New Topic",homepath,(args.template ?? "ForumTopic"),true,"Put Your Title Here")}}

    Topic Starter Replies Last Comment(C) or Edit(E) Views
    {{t.sticky}} {{web.link(t.page.uri, t.page.title)}}
     
    {{ t.originator; }} {{#t.page.comments}} {{date.format(string.substr(t.date,1),'yyyy-M-d H:mm');' '; if (t.change != '(new)') { 'by '; t.author; ' '; } t.change; }}
    {{t.page.viewcount}}
    (no topics yet)


    Then call this template somewhere on your page, with this:

    {{ template("ForumTopicList") }}

    Now, you need to create the template for the actual new topic post:

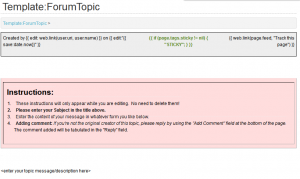
    Template:/ForumTopic

    Created by {{ edit: web.link(user.uri, user.name) }} on {{ edit:"{{ save:date.now}}" }}
     
    {{ if (page.tags.sticky != nil) { "STICKY"; } }} {{ web.link(page.feed, "Track this page") }}


    Instructions:

    1. These instructions will only appear while you are editing.  No need to delete them!
    2. Please enter your Subject in the title above.
    3. Enter the content of your message in whatever form you like below.
    4. Adding comment: If you're not the original creator of this topic, please reply by using the "Add Comment" field at the bottom of the page. The comment added will be tabulated in the "Reply" field.


    <enter your topic message/description here>

    You can modify this template to include whatever instructions you like.

    That’s it! To create a new topic, navigate to the page that you call the ForumTopicList template, and click the “Create New Topic” button:

    When others comment on the page that’s created, it will count as “replies” and show in the topic list.