Find Hyper-V VM GUID

While creating and converting VM’s using SCVMM puts the configuration files and VHD’s in a nicely structured set of folders, if you create a VM through Hyper-V Manager or convert using disk2vhd, the files will be stored based on the GUID for the VM, which isn’t found anywhere in the GUI tools for Hyper-V.
Luckily I came across this blog post to which I owe full credit for the solution:

http://blogs.technet.com/b/m2/archive/2008/07/04/how-to-get-the-bios-guid-from-a-hyper-v-vm.aspx?ppud=4&wa=wsignin1.0#comments

Save the VBS script below as guid.vbs, copy to your Hyper-V host, and use psexec to execute it with this:

psexec \\hyperv cmd.exe

cscript c:\guid.vbs

You are using PSexec right?

Option Explicit
Dim WMIService
Dim KvpComponents
Dim VMList
Dim VMSettingList
Dim VM
Dim item
Dim setting
Dim component
 
'Get instance of 'virtualization' WMI service on the local computer
Set WMIService = GetObject("winmgmts:\\.\root\virtualization")
'Get all the MSVM_ComputerSystem object
Set VMList = WMIService.ExecQuery("SELECT * FROM Msvm_ComputerSystem")   
For Each VM In VMList  
 if VM.Caption = "Virtual Machine" then      
  WScript.Echo "========================================"      
  WScript.Echo "VM Name: " & VM.ElementName      
  WScript.Echo "VM GUID: " & VM.Name     
  WScript.Echo "VM State: " & VM.EnabledState   
 
  ' Now get the BIOS GUID for this VM
  Set VMSettingList = WMIService.ExecQuery("SELECT * FROM Msvm_VirtualSystemSettingData")   
  For Each setting In VMSettingList
   Dim tempVMname
   tempVMName = "Microsoft:"  + VM.Name
   if setting.InstanceID = tempVMName then      
    WScript.Echo "VM BIOS GUID: " & setting.BIOSGUID  
   end if
  Next
 end if
Next

Silent Printer Deployment in Windows

If you don’t use a print server in your Windows environment (for which there are many valid reasons) then printer management can be a major frustration. We don’t use a print server, but rather create static printers with local TCP/IP ports.
Installing these one by one, or updating drivers had become a drain on time, so I set about finding out how to silently deploy them to our client PC’s.

Getting Started

You’ll need a few support files to get this deployment working. The first are 3 vbs scripts:

  • prndrvr.vbs
  • prnmngr.vbs
  • prnport.vbs

You can find these in C:\Windows\System32 on a Windows XP machine.

You’ll also need PSEXEC from here: http://technet.microsoft.com/en-us/sysinternals/bb897553

Place the VBS scripts on a network share, perhaps where you’ll be storing the deployment batch files.

The Script

Below is the contents of a single printer install batch file. You can also combine multiple printer commands into one file, so that all printers in one office would be deployed at once.

This batch file should be run from somewhere other than the client PC you’re deploying to. Make sure you have PSexec somewhere in the path on that machine.

::This Script installs the following: ## denotes commented out by default
:: Printer Name

:: If you do not wish a certain printer to be installed, make a copy of this file, comment out the specific printer, and run the file

:: Define computer to push to, and the password to use for psexec authentication
set computername=TestPC
set password=pa55w0rd

:: Printer1 ::
:: Deletes previously installed printer of the specified name
cscript "\\server\Deploy\prnmngr.vbs" -d -s %computername% -p "Old Printer" 

:: Deletes static port of previous printer, in case of mis-configuration
cscript "\\server\Deploy\prnport.vbs" -d -s %computername% -r IP_192.168.0.42

:: Creates TCP/IP port with specified IP address
cscript "\\server\Deploy\prnport.vbs" -a -s %computername% -r IP_192.168.0.28 -h 192.168.0.28 -o raw -n 9100

:: Copies driver for printer from server to local directory
psexec \\%computername% -u domain\adminaccount -p %password% xcopy /E "\\server\Printer\HP 4500ps W2K-WXP\*.*" "c:\printdrv\"

::Install printer driver to computer from specified location.
cscript "\\server\Deploy\prndrvr.vbs" -a -s %computername% -m "HP Designjet 4500ps HP-GL/2" -v 3 -e "Windows NT x86" -h "c:\printdrv" -i "c:\printdrv\dsgj4500.inf"

:: Removes local directory containing print driver
psexec \\%computername% -u domain\adminaccount -p %password% cmd.exe "/C rmdir /S /Q "c:\printdrv\""

:: Install the printer, using the print driver specified prior.
cscript "\\server\Deploy\prnmngr.vbs" -a -s %computername% -p "Plotter3" -m "HP Designjet 4500ps HP-GL/2" -r IP_192.168.0.28 -u domain\adminaccount -w %password%

:: Sets the Printer Properties according to a template created prior
psexec \\%computername% -u domain\adminaccount -p %password% regedit.exe /s \\server\Deploy\Preferences\SurveyPrinter-WinXP.reg 
pause

If you’re deploying to Windows 7 x64, make sure you’re using x64 drivers, and then in the driver install section, change this: -e “Windows NT x86” to this: -e “Windows x64”

As shown in the last command, you can set printer properties (such as including a duplexer, stapler, additional paper trays) by installing the printer on a test machine, configuring the options you want, and then exporting this registry key:

[HKEY_LOCAL_MACHINE\SOFTWARE\Microsoft\Windows NT\CurrentVersion\Print\Printers\Printer Name\PrinterDriverData]

You can also modify Printer Preferences using the same method. The registry key to export there is:

[HKEY_CURRENT_USER\Printers\DevModePerUser]

If you’re doing this, you’ll want to remove the extra printers from that key, and it must be run by the user who needs the preferences. Because of that I haven’t found a way to deploy the Printer Preferences directly to a user. Instead I just distribute the .reg file for them to run.

HP Printer Drivers

Recent versions of the HP printer drivers have been having problems installing using the VBS script. Because of this, a different command is used to install them:

psexec \\%computername% -u domain\adminaccount -p %password% rundll32.exe printui.dll PrintUIEntry /ia /f c:\printdrv\hpcu109u.inf /m "HP Universal Printing PCL 6"

Adobe Flash GPO Deploy error “InstallAx.exe”

Update: An updated script has been posted with some improvements, here.

“The file ‘installax.exe’ is not marked for installation”

This post details how to fix this issue, when Flash won’t uninstall correctly from a GPO deployment.

Adobe Flash PlayerThe Problem

I deploy the latest Flash versions through Group Policy, because it’s quick and simple. Some time ago, there was a version of Adobe Flash Player (10.1.5xx I think) that began causing problems with later versions.

What would happen is upon upgrades to Flash being pushed out, when updating the previous version an error would be logged. The GPO would successfully update the player, however it would continue to try updating every day, every time the computer started.

This occurred for both Windows 7 and Windows XP, and got to be quite annoying for my users.

When trying to update manually, the error that appeared was:

"The file 'installax.exe' is not marked for installation"

Here’s how I resolved it:

Based on various forum reports (http://forums.adobe.com/message/3124297) it seemed to be a problem with Flash leftovers.

On a test machine, I uninstalled all Flash versions, and then did a registry search, and removed these items:

[HKEY_CLASSES_ROOT\Installer\Features\4E867BFF724E3554CB631AF1E5269AD4]
[HKEY_CLASSES_ROOT\Installer\Features\6D98A6046E9005543B07D873D6BD65EB]
[HKEY_CLASSES_ROOT\Installer\Products\4E867BFF724E3554CB631AF1E5269AD4]
[HKEY_CLASSES_ROOT\Installer\Products\6D98A6046E9005543B07D873D6BD65EB]
[HKEY_CLASSES_ROOT\Installer\Features\00B86459180C72B4CA69A0A21353E906]
[HKEY_CLASSES_ROOT\Installer\Products\00B86459180C72B4CA69A0A21353E906]

These keys are a mix between Windows 7 x64 and Windows XP.

After that I manually installed the latest version, and it was successful. Now I needed to write a script that would remove these values and install the latest version.

The Script

I wanted to run this as a Shutdown script through group policy, rather than trying to push it out to all our clients through a scheduled task or something. This way it would eventually get applied to everyone. I think I’ll wait a period of time, and then disable this script and go back to a GPO msi install.

I made extensive use of echo and pause statements to ensure it was being applied correctly. Because I didn’t want a script for Windows 7 x64 and a separate one for Windows XP, there’s a bit of logic thrown in to check for version.

Here’s the script:

:: Adobe flash giving "installax" errors when updating from GPO :: This batch file will remove those errors and install 10.1.102.64
:: This batch file should be run from a shutdown or startup script

:: Check if Windows 7 or Windows XP, and goes to the proper section IF EXIST "C:\Program Files (x86)" goto :Win7Check
goto :WinXPCheck

:Win7Check
:: Check if the latest version is installed already in Windows 7. If so, exit. Otherwise install Set "AdobeVersion=" & setlocal & Set "$V="
:: Look in the Uninstall area of registry, where the installed version of Flash player is listed Set "RegKey=HKLM\SOFTWARE\Wow6432Node\Microsoft\Windows\CurrentVersion\Uninstall\Adobe Flash Player ActiveX"
Set "RegItem=DisplayVersion"
:: Take the output of a REG QUERY to the location above, and put it into the AdobeVersion variable
For /f "tokens=3*" %%! in (
   '2^>nul Reg.exe QUERY "%RegKey%" /v "%RegItem%" ^|(
   Findstr.exe /ri "\<%RegItem%\>"^)') Do Set "$V=%%!"
endlocal & call Set "AdobeVersion=%$V%"

:: If what is currently installed matches latest version, exit. Otherwise, go to install section
if "%AdobeVersion%" == "10.1.102.64" goto :exit
goto :Install

:WinXPCheck
:: Check if the latest version is installed already in Windows XP. If so, exit. Otherwise install Set "AdobeVersionXP=" & setlocal & Set "$T="
:: Look in the Uninstall area of registry, where the installed version of Flash player is listed Set "RegKeyXP=HKLM\SOFTWARE\Microsoft\Windows\CurrentVersion\Uninstall\Adobe Flash Player ActiveX"
Set "RegItemXP=DisplayVersion"
:: Take the output of a REG QUERY to the location above, and put it into the AdobeVersion variable For /f "tokens=3*" %%! in (
   '2^>nul Reg.exe QUERY "%RegKeyXP%" /v "%RegItemXP%" ^|(
   Findstr.exe /ri "\<%RegItemXP%\>"^)') Do Set "$T=%%!"
endlocal & call Set "AdobeVersionXP=%$T%"

:: If what is currently installed matches latest version, exit. Otherwise, go to install section
if "%AdobeVersionXP%" == "10.1.102.64" goto :exit
goto :Install

:Install ::Uninstall current versions of Flash from DFS share start /wait \\domain.com\apps\Public\General\adobeflash\uninstall_flash_player.exe -uninstall

:: Remove offending registry entries causing the error (mentioned below) regedit /s \\domain.com\apps\Public\General\adobeflash\flash_remove_fix.reg

:: Install latest version of Flash start /wait \\domain.com\apps\Public\General\adobeflash\install_flash_player_10.1.102.64.exe -install
goto :exit


:exit

The registry file mentioned contains this (what is at the top of this post, with the removal switch):

[-HKEY_CLASSES_ROOT\Installer\Features\4E867BFF724E3554CB631AF1E5269AD4]
[-HKEY_CLASSES_ROOT\Installer\Features\6D98A6046E9005543B07D873D6BD65EB]
[-HKEY_CLASSES_ROOT\Installer\Products\4E867BFF724E3554CB631AF1E5269AD4]
[-HKEY_CLASSES_ROOT\Installer\Products\6D98A6046E9005543B07D873D6BD65EB]
[-HKEY_CLASSES_ROOT\Installer\Features\00B86459180C72B4CA69A0A21353E906]
[-HKEY_CLASSES_ROOT\Installer\Products\00B86459180C72B4CA69A0A21353E906]

This script successfully runs on Windows 7 and Windows XP, and merely exits when the latest version is already done.

Check what version of Adobe Flash Player you have, and what is current:

http://www.adobe.com/software/flash/about/

Uninstall Utility used to remove Flash Player

http://kb2.adobe.com/cps/141/tn_14157.html

.NET Function to produce link to UNC path

The following code is not mine, but from personnel within our company who really helped me out. Thanks Dan!

We have a few reports built within SQL Reporting Services 2005. One of these reports lists financial information for our projects. A request was made to create a link between the project on the report, and the project’s folder within our DFS share.

This is the custom code used on the report to produce those results. Depending on how folders are stored, it could be very useful for others as well.

For this to make sense, here’s a quick primer on how we store our files:

Each project has a 5 digit unique identifier within our DFS. It looks like this: “34321 deptcode short description”. These are organized by the major ‘ten thousandth’ value. For example:

Jobs >
30000
31000
32000
33000

Now for the code. To begin, you need to add the custom code to your report:

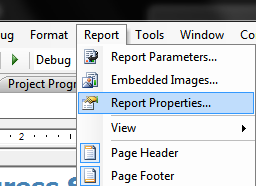
Report Properties

Use the “Code” tab, and paste the code in. Here’s the code I used, with comments:

'Start the function, with the value passed from the reportserver as jobnum Public Function Extract_jobs_path(ByVal jobnum As String) As String  'Find the first two digits of the folder name by taking the last 5 digits of the record and keeping first 2     Dim Prefix_job As String = Strings.mid(jobnum,5,2)     Dim Result As String = "" 'Make Director1 equal to the root folder of the job number (ie 33000), using the first two digits grabbed  Dim Director1 As New System.IO.DirectoryInfo(\\domain.ca\files\Jobs\ & Prefix_job & "000")      If Director1.Exists = True Then  'Grab the first 5 characters of the job number   Dim job_number As String =strings.mid(jobnum,5,5)  'Set Folder1 as the root folder, same as Director1   Dim Folder1 As String() = System.IO.Directory.GetDirectories(\\domain.ca\files\Jobs\ & Prefix_job & "000")  'For every subfolder of the root, search the first 5 digits and see if they match job_number   For Each subFolder As String In Folder1    If Strings.Mid(subFolder, 27, 5) = job_number Then        Result = subFolder            Exit For          End If         Next     End If 'If there was a match, switch around the slashes, add in the file:/// to build the link, 'and return the value     If Result <> "" Then      Result = Replace(Result, "\", "/")        Dim Poz1 As Integer = InStr(Result, "domain.ca")         If Poz1 > 0 Then          Return "file:///" & Result            End If         End If     End Function

Now all you need to do is call the code within a spot in your report. We have a table with a specific cell that has the code inserted into the “Navigation” properties of that cell, using this:

=Code.Extract_jobs_path(Fields!ProjectID.Value)


Clicking on that cell automatically opens the UNC path in Windows Explorer.

HTML form for PHP email submission

At my company we use a software product called Mindtouch Core as a company Wiki/intranet. A future post will detail our implementation.

One feature request was to automate the vacation request procedure in our company.

Because we wanted to keep it simple, is it not fully automated or database driven, but automates the sending of email through the use of a HTML form to a php page.

I make no claims on this being ‘good’ code, as I’m not a coder. However, it is functional and serves it’s purpose.

HTML Form

This is the current contents of our HTML form, with comments for explanation.

<!-- Location of the PHP functions to execute email submission. This resides within our Mindtouch file system -->
<form method="post" action="/config/vacplanner/vacemail.php">

<!-- Script used to auto-hide the sub-departments. Note the specified sub departments specified in orange. -->
 <script type="text/javascript">/*<![CDATA[*/
var hide=['business-sub','finacct-sub','next','id2'];
function setOpt()
{
resetOpt();
for(var i=0,sel=document.getElementsByTagName('select');i<sel.length;i++) { sel[i].onchange=function() { if(this.parentNode.tagName.toLowerCase()!='div') resetOpt(); try { document.getElementById(this.value).style.display=''; } catch(e){} ; } }
} window.addEventListener?window.addEventListener('load',setOpt,false):
window.attachEvent('onload',setOpt); function resetOpt()
{
for(var i=0;i<hide.length;i++) document.getElementById(hide[i]).style.display='none';
}
/*]]>*/</script>

Name: <br />
<!-- Using the variables built within Dekiscript (Mindtouch code) we can hide the username but auto-fill it in with whoever is viewing the page. --> 
<input name="username" type="hidden" value="{{user.name}}" /><br />

<!-- Department field uses the Select function of the form. The values are email addresses, which are passed to the php file to be used as recipients -->
 Department: <br />
<select name="department">
<option value="" selected="selected"></option>
<option value="business-sub">Business</option>
<option value="finacct-sub">Finance &amp; Acct</option>
<option value="email.address@domain.com">Engineering</option>
<option value="email.address@domain.com">Geomatics</option>
<option value="email.address@domain.com">Operations</option>
<option value="email.address@domain.com">Safety</option>
</select>
<!-- This is a sub-department, for better organization. This matches the javascript at the top. -->

<div id="business-sub">Business Sections: <select name="busdepartment">
<option value="" selected="selected"></option>
<option value="email.address@domain.com">Business Admin</option>
<option value="email.address@domain.com">HR</option>
</select></div>
<div id="finacct-sub">Fin&amp;Acct Sections: <select name="finacctdepartment">
<option value="" selected="selected"></option>
<option value="email.address@domain.com">Accounting</option>
<option value="email.address@domain.com">Facilities</option>
<option value="email.address@domain.com">IT</option>
</select></div>
<div id="id2">Element with an ID of "id2" <select>
<option selected="selected">Opt1</option>
<option>Opt2</option>
<option>Opt3</option>
</select></div>
<div id="next">"Next" element <select>
<option selected="selected">Opt1</option>
<option>Opt2</option>
<option>Opt3</option>
</select></div>
<br />

<!--Supervisors are set up the same as the Departments section -->
 <div id="Supervisors">Supervisor: <br />
<select name="supervisor">
<option value="" selected="selected"></option>
<option value="email.address@domain.com">John Doe</option>
</select></div>

<!--Section to gather vacation date information. Any type of text may be entered here. -->
 Last Working Date:<br />
<input name="lastworkdate" type="text" /><br />
Vacation Dates Requested:<br />
<input name="vacdatestart" type="text" /> To <input name="vacdateend" type="text" /><br />
Return to Work Date:<br />
<input name="returnworkdate" type="text" /><br />

<input type="submit" value="Submit" />
<!--A hidden field gathers the current date from the wiki, and submits it to the php file. -->
 <input type="hidden" name="date" value="{{ date.Date(date.now) }}" />
</form>

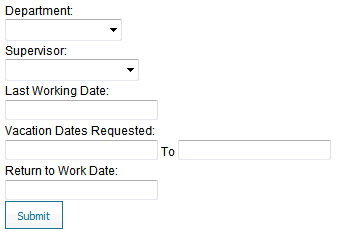
Here’s what the form looks like:

HTML form

PHP Backend

Here is the contents of our PHP form, again with comments for explanation:

<?php

// Required for email to work. Dependencies on existing files from the wiki.
require_once("/var/www/dekiwiki/phpmailer/class.phpmailer.php");
require_once("/var/www/dekiwiki/phpmailer/class.smtp.php");
require_once("/var/www/dekiwiki/phpmailer/language/phpmailer.lang-en.php");
// List of variables to gather from the vacform used on the wiki page. These map to the input boxes and department/supervisor dropdowns
$username = $_POST['username'];
$department = $_POST['department'];
$date = $_POST['date'];
$supervisor = $_POST['supervisor'];
$lastworkdate = $_POST['lastworkdate'];
$vacdatestart = $_POST['vacdatestart'];
$vacdateend = $_POST['vacdateend'];
$returnworkdate = $_POST['returnworkdate'];
$finacctdepartment = $_POST['finacctdepartment'];
$busdepartment = $_POST['busdepartment'];
// Used in conjunction with the IF statements below to add recipient.
$srchstrg = ".domain.com";
$wildcardsearch = preg_match("/$srchstrg/", $department);
$wildcardsearch2 = preg_match("/$srchstrg/", $finacctdepartment);
$wildcardsearch3 = preg_match("/$srchstrg/", $busdepartment);
// For our C-Level staff, we want the CEO to be automatically selected as supervisor. If the username is one of the below, supervisor is automatically set to CEO
if ($username=='jdoe' OR $username=='jsmith') {
$supervisor = 'big.cheese@domain.com';
}

// Error checking on empty fields
if ($lastworkdate=="") {
echo "Last Work Date was left blank. Please press Back to retry.";
die;
}

// Error checking on empty fields
if ($vacdatestart=="") {
echo "Vacation Start Date was left blank. Please press Back to retry.";
die;
}

// Error checking on empty fields
if ($vacdateend=="") {
echo "Vacation End Date was left blank. Please press Back to retry.";
die;
}

// Error checking on empty fields
if ($returnworkdate=="") {
echo "Return to Work Date was left blank. Please press Back to retry.";
die;
}

 // Error checking on empty fields, if all departments are empty
if ($department=="" && $finacctdepartment=="" && $busdepartment=="") {
echo "A Department was not selected. Please press Back to retry.";
die;
}

// Error checking on empty fields, if Business is selected but no sub-business department is.
if ($department=="business-sub" && $busdepartment=="") {
echo "A Business sub-department was not selected. Please press Back to retry.";
die;
}

if ($department=="finacct-sub" && $finacctdepartment=="") {
echo "A Finance&Accounting sub-department was not selected. Please press Back to retry.";
die;
}

if ($supervisor=="") {
echo "A Supervisor was not selected. Please press Back to retry.";
die;
}
if ($username=="") {
echo "A name was not entered. Please press Back to retry.";
die;
}
// Begin the code for the mail to be sent.
$mail = new PHPMailer();
$mail->IsSMTP(); // telling the class to use SMTP
$mail->Host = "smtp.domain.com"; // SMTP server

$mail->From = 'email@domain.com';
$mail->FromName = "Vacation Planner";

// Adds supervisor as recipient
$mail->AddAddress($supervisor);
// Used with wildcard searches above to determine if a department was selected, and if so, set that value as a recipient
if ( $wildcardsearch != 0 ) {
$mail->AddAddress($department);
}
else {
// Do Nothing
}

If ( $wildcardsearch2 !=0 ) {
$mail->AddAddress($finacctdepartment);
}
else {
// Do Nothing
}

If ($wildcardsearch3 !=0 ) {
$mail->AddAddress($busdepartment);
}
else {
// Do Nothing
}

// Sets the subject
$mail->Subject = "Vacation Request from $username";
$mail->IsHTML(true);

// Body is built from variables used in HTML form.
$mail->Body = "A request for Vacation time was received by <b>$username</b> on $date.
<br>
<br>
<b>Last Working Date:</b>
<br>
$lastworkdate
<br>
<b>Vacation Dates Requested:</b>
<br>
$vacdatestart To $vacdateend
<br>
<b>Return to Work Date:</b>
<br>
$returnworkdate
<br>
<br>
<b>Notes To Supervisor:</b>
If approved, please forward this request to appropriate department contact for entering into calendar.";

// Mail gets sent

if(!$mail->Send()) {
echo 'Request was not sent';
echo 'Mailer error: ' . $mail->ErrorInfo;
} else {
echo 'Thank You. Your request has been submitted.';
}
?>
<!-- Refreshes the page after 3 seconds, going back to the form. -->
<meta http-equiv="refresh" content="1;url=http://wiki.domain.com/Vacation_Planner" />

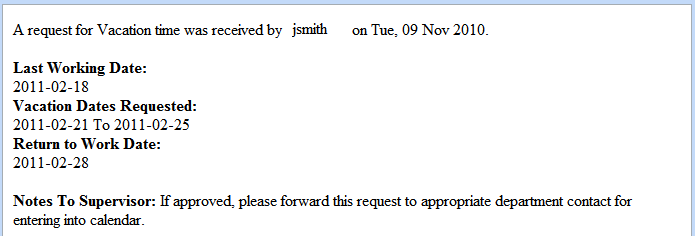
And the resulting email:

PHP email