Azure Function – Resolve DNS

As part of my search to provide outbound Deny on an Azure NSG with whitelisted FQDN entries, I started looking at Azure Functions.

The idea is that I would have an Automation runbook on a schedule, which called my function for a variety of domain names, receiving the resolved IP addresses in return. These would then be compared against outbound NSG rules, and if the resolved IP differs from what is in the NSG, it would update it.

In reality there isn’t much need for this, since you can do the DNS resolution right in the runbook with this:

$currentIpAddress = [system.net.dns]::GetHostByName("$fqdn").AddressList.IPAddressToString

There are other limitations with this idea as well:

  • for a globally-managed DNS behind some type of CDN or round-robin mechanism, its possible that IP resolution would continually be different. Take “smtp.office365.com” for example.
  • There isn’t a way to manage wildcard whitelists – “*.windowsupdate.com” isn’t something you can resolve to individual IP addresses.

All that being said, I still used this as a learning opportunity for my first function.

To begin, in the Azure Portal I went to the “App Services” blade, clicked “Add”, and searched for Function:

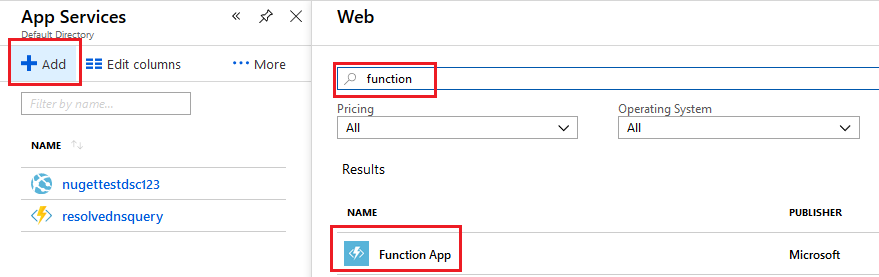
During creation I accepted most of the defaults, and was left with a v2 Function App and the initial “HttpTriggerCSharp1” function.

I am by no means a programmer, and certainly not familiar with C# from ASP.net Core as evidenced by my previous post. With that in mind, here is the contents of my function that I ended up with:

#r "Newtonsoft.Json"

using System.Net;
using Microsoft.AspNetCore.Mvc;
using Microsoft.Extensions.Primitives;
using Newtonsoft.Json;
using System.Text;

public static async Task<string[]> Run(HttpRequest req, ILogger log)
{
    log.LogInformation("C# HTTP trigger function processed a request.");

    string name = req.Query["name"];

    string requestBody = await new StreamReader(req.Body).ReadToEndAsync();
    dynamic data = JsonConvert.DeserializeObject(requestBody);
    name = name ?? data?.name;
    List collectedIP = new List();
    IPAddress[] ipaddresses = null;
    if (name != null){
        try
        {
            // Putting this in the Try because if it errored out I wanted to see that
            // as a defined message rather than failure of the function
            ipaddresses = Dns.GetHostAddresses(name);
        }
        catch (Exception)
        {
            log.LogInformation("Did not resolve IP from: " + name);
            collectedIP.Add("Did not resolve");
        }
        
        if (ipaddresses != null)
            {
                // Knowing that multiple IPs could be returned for a record, used a ForEach
                foreach (IPAddress ip in ipaddresses)
                {
                    log.LogInformation("Resolved " + name + " to " + ip.ToString());
                    // Add the resolved IP to a string list
                    collectedIP.Add(ip.ToString());
                    log.LogInformation("Added IP to list");
                }
                log.LogInformation("End of If Ipaddresses isn't null");
                
            }
            log.LogInformation("End of If Name isn't null");
    }     
    else
    {
        //return a string
        log.LogInformation("No IP passed In");
        collectedIP.Add("No IP passed in");
    }
    log.LogInformation("Ready to return value");
    // Return the string list as an array to the calling entity
    return collectedIP.ToArray();
}

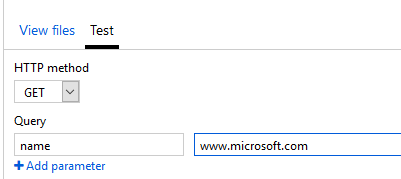
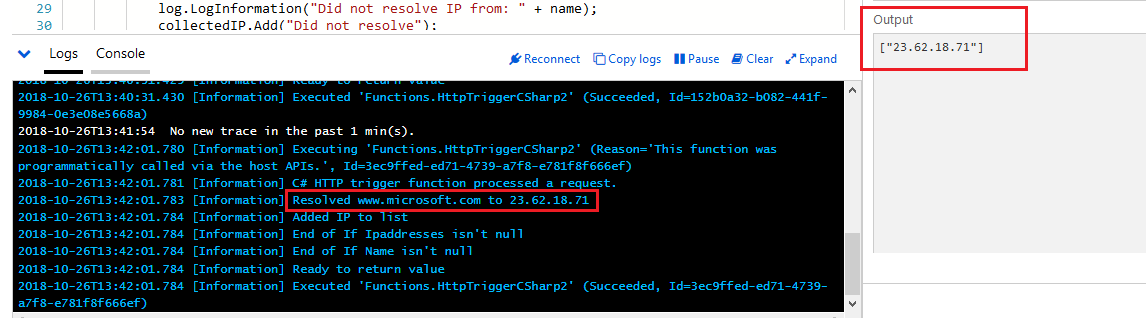
Now I run this function in Test mode, with a Query parameter as “name”:

And I get results both in my log, and the Output:
To bring this into my Automation runbook, I retrieved the function URL, and since this is a private function it includes my key value in it:
This PowerShell command is then used to invoke the function, with the parameter at the end of the URL:
$IPList = invoke-webrequest 'https://functionappname.azurewebsites.net/api/HttpTriggerCSharp1?code=<privatekey>&name=www.microsoft.com'
Due to the limitations I mentioned at the start of this post, I never went far enough in my runbook to connect this $IPList into logic for updating the NSG.

Azure Function learning

I’m playing around with an Azure Function that I’m going to eventually call from an Azure Automation runbook (post to come in the near future).

During this process, I learned some pretty key things as I was testing and going along. I’m a little embarrassed to post them publicly, but eventually a non-coder like myself somewhere is going to be trying the same thing and maybe this will help.

Function error-ing out during testing

In my function, I used a ForEach loop to add a string to a List<string> for each instances of a collection. My function would compile just fine but would always error out on this one line, with a really generic error. I only knew it was erroring out on this line because I placed a log output on the next line and it would never reach it.

[Error] Executed 'Functions.HttpTriggerCSharp2'

This was my poor coding skills, not beginning the list properly. I was starting it like this:

List<string> collectedIP = null;
But it really needed to be this to initialize it properly:
List<string> collectedIP = new List<string>();
Without this, adding to the collection isn’t possible. I’m sure that anyone who actually knows C# is shaking their head reading this, but I guess that’s what you get when you learn organically without real training.

Building the query string

I want to pass in a parameter to my function, using the query string. At the same time, I also want to use a function key so that this can’t be run anonymously.

Originally, I was trying this, with the ampersand delineating the second query parameter (after the function key):

Invoke-WebRequest https://appname.azurewebsites.net/api/functionName?code=functionKey&name=www.microsoft.com

In PowerShell, this returned the error:

The ampersand (&) character is not allowed. The & operator is reserved for future use; wrap an ampersand in double quotation marks ("&") to pass it as part of a string.

So I tried this string:

Invoke-WebRequest 'https://appname.azurewebsites.net/api/functionName?code=functionKey"&"name=www.microsoft.com'

But then I received the error:

Invoke-WebRequest : The remote server returned an error: (401) Unauthorized.

Well, I knew it wasn’t unauthorized because it ran properly in the browser. The actual fix was stupidly easy, I hadn’t put any quotes around the whole string – either single or double quotes was fine:

Invoke-WebRequest "https://appname.azurewebsites.net/api/functionName?code=functionKey&name=www.microsoft.com"

TLS Support in PowerShell

When I got to actually testing my function, I tried to call it from PowerShell in this format:

Invoke-WebRequest 'https://appname.azurewebsites.net/api/functionName?code=functionKey'

However, upon doing so I received this error:

iwr : The underlying connection was closed: An unexpected error occurred on a send.

A google search led me to discover that PowerShell by default will attempt to use TLS 1.0 for Invoke-WebRequest, unless you’re using PowerShell Core 6.

My Azure Function uses TLS 1.2 by default and as a minimum. This can be found on the “Platform Settings” page of the Function, under “SSL”:

The solution (at least as a workaround) is to force that session to use TLS 1.2 like this:

[System.Net.ServicePointManager]::SecurityProtocol = [System.Net.SecurityProtocolType]::Tls12

Primary source for this information was here.


Azure Multiple NICs or Static IPs through Terraform and DSC

A situation came up where I needed to have two HTTP bindings on port 80 on a web server residing in Azure. This would be 1 binding each on two different IIS sites within a single VM. The creation of this configuration isn’t as simple as one would initially expect, due to some Azure limitations.

There are two options in order to achieve this:

  • Add a secondary virtual network interface to the VM
  • Add a second static IP configuration on the primary virtual network interface of the VM.

For each of these, I wanted to deploy the necessary configuration through Terraform and Desired State Configuration (DSC).

Second IP Configuration

In this scenario, its quite simple to add a second static IP configuration in terraform:

resource "azurerm_network_interface" "testnic" {
  name                = "testnic"
  location            = "${var.location}"
  resource_group_name = "${azurerm_resource_group.test.name}"
  ip_configuration {
    name                          = "ipconfig1"
    subnet_id                     = "${azurerm_subnet.test.id}"
    private_ip_address_allocation = "static"
    private_ip_address            = "10.2.0.5"
    primary                       = true
  }
  ip_configuration {
    name                          = "ipconfig2"
    subnet_id                     = "${azurerm_subnet.test.id}"
    private_ip_address_allocation = "static"
    private_ip_address            = "10.2.0.6"
  }
}

However, when using static IP addresses like this, Azure requires you to perform configuration within the VM as well. This is necessary for both the primary IP configuration, as well as the secondary.

Here’s how you can configure it within DSC:

Configuration dsctest 
{ 
    Import-DscResource -ModuleName PSDesiredStateConfiguration 
    Import-DscResource -ModuleName xPSDesiredStateConfiguration 
    Import-DscResource -moduleName NetworkingDSC

    Node localhost {
        ## Rename VMNic
        NetAdapterName RenameNetAdapter 
        { 
            NewName = "PrimaryNIC"  
            Status = "Up" 
            InterfaceNumber = 1 
        }

        DhcpClient DisabledDhcpClient
        {
            State          = 'Disabled'
            InterfaceAlias = 'PrimaryNIC'
            AddressFamily  = 'IPv4'
            DependsOn = "[NetAdapterName]RenameNetAdapter "
        }

        IPAddress NewIPv4Address
        {
            #Multiple IPs can be comma delimited like this
            IPAddress      = '10.2.0.5/24','10.2.0.6/24'
            InterfaceAlias = 'PrimaryNIC'
            AddressFamily  = 'IPV4'
            DependsOn = "[NetAdapterName]RenameNetAdapter "
        }

        # Skip as source on secondary IP address, in order to prevent DNS registration of this second IP
        IPAddressOption SetSkipAsSource
        {
            IPAddress    = '10.2.0.6'
            SkipAsSource = $true
            DependsOn = "[IPAddress]NewIPv4Address"
        }
        DefaultGatewayAddress SetDefaultGateway 
        { 
            Address = '10.2.0.1' 
            InterfaceAlias = 'PrimaryNIC' 
            AddressFamily = 'IPv4' 
        }  
      
    }

}

Both the disable DHCP and DefaultGateway resources are required, otherwise you will lose connectivity to your VM.

Once the “SkipAsSource” runs, this sets the proper priority for the IP addresses, matching the Azure configuration.


Second NIC

When adding a second NIC in Terraform, you have to add a property (“primary_network_interface_id”) on the VM resource for specifying the primary NIC.

resource "azurerm_network_interface" "testnic1" {
  name                = "testnic"
  location            = "${var.location}"
  resource_group_name = "${azurerm_resource_group.test.name}"
  ip_configuration {
    name                          = "ipconfig1"
    subnet_id                     = "${azurerm_subnet.test.id}"
    private_ip_address_allocation = "static"
    private_ip_address            = "10.2.0.5"
  }

}
resource "azurerm_network_interface" "testnic2" {
  name                = "testnic"
  location            = "${var.location}"
  resource_group_name = "${azurerm_resource_group.test.name}"
  ip_configuration {
    name                          = "ipconfig1"
    subnet_id                     = "${azurerm_subnet.test.id}"
    private_ip_address_allocation = "static"
    private_ip_address            = "10.2.0.6"
  }

}

resource "azurerm_virtual_machine" "test" {
  name                  = "helloworld"
  location              = "${var.location}"
  resource_group_name   = "${azurerm_resource_group.test.name}"
  network_interface_ids = ["${azurerm_network_interface.testnic1.id}","${azurerm_network_interface.testnic2.id}"]
  primary_network_interface_id = "${azurerm_network_interface.test.id}"
  vm_size               = "Standard_A1"
  
  storage_image_reference {
    publisher = "MicrosoftWindowsServer"
    offer     = "WindowsServer"
    sku       = "2016-Datacenter"
    version   = "latest"
  }
 
  storage_os_disk {
    name          = "myosdisk1"
    vhd_uri       = "${azurerm_storage_account.test.primary_blob_endpoint}${azurerm_storage_container.test.name}/myosdisk1.vhd"
    caching       = "ReadWrite"
    create_option = "FromImage"
  }
 
  os_profile {
    computer_name  = "helloworld"
    admin_username = "${var.username}"
    admin_password = "${var.password}"
  }

  os_profile_windows_config {
    provision_vm_agent = true
    enable_automatic_upgrades = true
  }
 
}

In this scenario, once again Azure requires additional configuration for this to work. The secondary NIC does not get a default gateway and cannot communicate out of it’s subnet.

One way to solve this with DSC is to apply a default route for that interface, with a higher metric than the primary interface. In this case, we don’t need to specify static IP addresses inside the OS through DSC, since there’s only one per virtual NIC.

Configuration dsctest 
{ 
    Import-DscResource -ModuleName PSDesiredStateConfiguration 
    Import-DscResource -ModuleName xPSDesiredStateConfiguration 
    Import-DscResource -moduleName NetworkingDSC

    Node localhost {
        ## Rename VMNic(s) 
        NetAdapterName RenameNetAdapter 
        { 
            NewName = "PrimaryNIC" 
            Status = "Up" 
            InterfaceNumber = 1 
            Name = "Ethernet 2"
        }
        NetAdapterName RenameNetAdapter_apps
        { 
            NewName = "SecondaryNIC"  
            Status = "Up" 
            InterfaceNumber = 2
            Name = "Ethernet 3"
        }

        Route NetRoute1
        {
            Ensure = 'Present'
            InterfaceAlias = 'SecondaryNIC'
            AddressFamily = 'IPv4'
            DestinationPrefix = '0.0.0.0'
            NextHop = '10.2.0.1'
            RouteMetric = 200
        }
      
    }

}

You could also add a Default Gateway resource to the second NIC, although I haven’t specifically tested that.

Generally speaking, I’d rather add a second IP to a single NIC – having two NICs on the same subnet with the same effective default gateway might function, but doesn’t seem to be best practice to me.

DSC IIS bindings and SSL certificates

This was a tricky one that really didn’t leave me with an ideal solution.

In using DSC, I want my compiled node configurations to be generic, like “webserver” instead of “webserver01”, in order for them to be re-used by VMs sharing the same characteristics, and to avoid duplicating information like IP addressing and VM names which has already been specified in the Terraform configuration for deployment.

At the same time, I want to be able to deploy a web server with a site on port 443 and a self-signed certificate which is created by DSC.

Combining these two ideas was not something I found I could accomplish with pre-existing modules.

I first looked to the xWebsiteAdministration DSC module, which contains the functions xWebsite among others. With this, I could use the following syntax:

xWebSite Admin { 
            Name = "Admin"
            PhysicalPath = "E:\inetpub\AdminSite"
            State = "Started"
            ApplicationPool = "Admin"
            Ensure = "Present"
            BindingInfo     = @(
                MSFT_xWebBindingInformation
                {
                    Protocol              = "HTTPS"
                    Port                  = 443
                    CertificateThumbprint = ""
                    CertificateStore      = "MY"
                })
            LogPath = "E:\inetpub\logs\AdminSite"
            DependsOn = "[File]E_AdminSite"
         }

Here, I want to pass in the thumbprint of my previously generated self-signed certificate. However, I don’t know it’s thumbprint, and it will be unique when I deploy this node configuration between a Web01 and a Web02 VM.

I tried resolving the thumbprint like this: CertificateThumbprint = (Get-ChildItem Cert::\LocalMachine\My | where {$_.Subject -like “*$($Node.ClientCode).com*”}), however that continued to give me DSC errors when it was attempting to apply, about a null reference.

When I came across this StackOverflow question it was clear why this wasn’t working. Since the compilation happens on Azure servers, of course they won’t have a certificate matching my subject name, and thus it can’t generate a thumbprint.

So instead I thought, I can just create a script that applies the certificate after the website has been created. Here is where I ran into additional problems:

  • If I create the xWebsite with HTTPS and 443 with no certificate, it errors
  • If I create the xWebsite with no binding information, it default assigns HTTP with port 80 (conflicting with another website that I have)
  • If I create the xWebsite with HTTP and port 8080 as a placeholder value, now I have IIS listening on ports I don’t actually want open
  • If I create the xWebsite with HTTP and port 8080 and then cleanup that binding afterwards with a Script, on the next run DSC is going to try and re-apply that binding, since I’ve effectively said it is my desired state

Ultimately what I was left with was creating a script that deployed the whole website, and not using xWebsite at all. Like I said, not ideal but it does work to meet my requirements.

Here’s the script that I’ve worked out:

Script WebsiteApps          
        {            
            # Must return a hashtable with at least one key            
            # named 'Result' of type String            
            GetScript = {            
                Return @{            
                    Result = [string]$(Get-ChildItem "Cert:\LocalMachine\My")            
                }            
            }            
            
            # Must return a boolean: $true or $false            
            TestScript = {            
                Import-Module WebAdministration
                # Grab the IP based on the interface name, which is previously set in DSC
                $ip1  = (get-netipaddress -addressfamily ipv4 -InterfaceAlias $($Using:Node.VLAN)).IPAddress
                # Find out if we've got anything bound on this IP for port 443
                $bindcheck = get-webbinding -name "Apps" -IPAddress $ip1 -Port 443
                $bindcheckwildcard = get-webbinding -name "Apps" | where-object { $_.BindingInformation -eq "*:80:"}
                # If site exists
                    if (Test-Path "IIS:\Sites\Apps")
                    { 
                        Write-Verbose "Apps site exists."
                        # if log file setting correct
                        if ((get-itemproperty "IIS:\Sites\Apps" -name logfile).directory -ieq "E:\inetpub\logs\AppsSite")
                           {
                               Write-Verbose "Log file is set correctly."
                                   # if IP bound on port 443
                                   if ($bindcheckhttps)
                                   { 
                                       Write-Verbose "443 is bound for Apps."
                                       #if SSL certificate bound
                                       if (Test-path "IIS:\SslBindings\$ip1!443")
                                       {
                                            Write-Verbose "SSL Certificate is bound for Apps"
                                            # wildcard binding check for Apps
                                            if (-not ($bindcheckwildcard)) {
                                                Write-Verbose "* binding does not exist for Apps."
                                                Return $true
                                            }
                                            else
                                            {
                                                Write-Verbose "* binding exists for Apps."
                                                Return $false
                                            }
                                       }
                                       else
                                       {
                                           Write-Verbose "SSL Certificate is NOT bound for Apps"
                                           Return $false
                                       }
                                   }
                                   else
                                   {
                                       Write-Verbose "IP not bound on 443 for Apps."
                                       Return $false
                                   }
                           }
                            else 
                            {
                               Write-Verbose "Log file path is not set correctly"
                               Return $false
                            } 
                   }
                   else
                   {
                       Write-Verbose "Apps site does not exist"
                       Return $false
                   }
                }    
            
            # Returns nothing            
            SetScript = {
                $computerName = $Env:Computername
                $domainName = $Env:UserDnsDomain
                
                $apps = Get-Item "IIS:\Sites\Apps"
                $ip1  = (get-netipaddress -addressfamily ipv4 -InterfaceAlias $($Using:Node.VLAN)).IPAddress
                $bindcheckhttps = get-webbinding -name "Apps"  -IPAddress $ip1 -Port 443
                $bindcheckwildcard = get-webbinding -name "Apps" | where-object { $_.BindingInformation -eq "*:80:"}

                 # If site not exists
                    if (-not (Test-Path "IIS:\Sites\Apps"))
                    { 
                        Write-Verbose "Creating Apps site"
                        New-Website -Name "Apps" -PhysicalPath E:\inetpub\AppsSite -ApplicationPool "Apps"
                    }
                     
                    # if port 443 not bound
                    if (-not ($bindcheckhttps))
                    { 
                        Write-Verbose "Binding port 443"
                        $apps = Get-Item "IIS:\Sites\Apps"
                        New-WebBinding -Name $apps.Name -protocol "https" -Port 443 -IPAddress $ip1
                    }
                    if ($bindcheckwildcard)
                    {
                        Write-Verbose "Removing wildcard binding for Apps"
                        get-webbinding -name "Apps" | where-object { $_.BindingInformation -eq "*:80:"} | Remove-Webbinding
                    } 
                            
                    #if SSL certificate not bound        
                    if (-not (Test-path "IIS:\SslBindings\$ip1!443"))
                        {
                            Write-Verbose "Binding SSL certificate"
                            Get-ChildItem cert:\LocalMachine\My | where-object { $_.Subject -match "CN\=$Computername\.$DomainName" } | select -First 1 | New-Item IIS:\SslBindings\$ip1!443
                        }
                    
                    # if log file setting correct
                    if (-not ((get-itemproperty "IIS:\Sites\Apps" -name logfile).directory -ieq "E:\inetpub\logs\AppsSite"))
                        {
                            Write-Verbose "Setting log file to the proper directory"
                            Set-ItemProperty "IIS:\Sites\Apps" -name logFile -value @{directory="E:\inetpub\logs\AppsSite"}
                        }
                } 
            DependsOn = "[xWebAppPool]Apps","[Script]GenerateSelfSignedCert"
        }


Terraform AzureRM Backend

One of the primary items I wanted to accomplish before my latest use of Terraform in production was storing the state file in a central location for shared use within my team.

This is controlled in Terraform by the “backend“. In my particular case, I was interested in the AzureRM backend.

There are a few ways to accomplish this configuration, but one of my requirements was to not actually store any key string in a file. Rather, I’m relying upon the Azure Cloud Shell as my deployment environment for Terraform, which I will have already authenticated to and can dynamically connect to resources within my subscription.

First I define a simple “backend.tf” file.

terraform {
    backend "azurerm" {}
}

Next, I wrote a wrapper script (“InitWrapper.ps1”) to actually run my “Terraform Init” command, passing in the variables for the backend as documented by Terraform.


$subscription_id = "e86a3dce" #
$resource_group = "Default"
$storage_account = "terraformstates"
$containerName = "Client1"

# Get the Storage Account Key for use in loading the backend file
Select-AzureRmSubscription -SubscriptionId $subscription_id
$accountKey = (Get-AzureRmStorageAccountKey -ResourceGroupName $resource_group -Name $storage_account)[0].Value

# Perform init
terraform init `
    -backend-config="storage_account_name=$storage_account" `
    -backend-config="container_name=$containerName" `
    -backend-config="access_key=$accountKey" `
    -backend-config="key=prod.terraform.tfstate"

You can see here I’m referencing a storage account, and a blob container. This way you can isolate state files within a container for purposes of RBAC or management.
The last parameter I’m passing in is “key” which tells Terraform what to name the state file.

The end result of running this is a file in my Azure Cloud Shell share (/home/azureuser/clouddrive/client1 is where I would typically change directory to) named “terraform.tfstate” which is a pointer to my backend sitting in an Azure storage account blob container.

Now I no longer need to run the init file unless there are specific Terraform changes that need to be initialized in my cloud shell.

If another team member wishes to work with the same state file, they can run the Init wrapper, and their local state pointer will connect to the same “prod.terraform.tfstate” and be able to create/modify infrastructure in the same way.