docker-compose environment variables and quotes

Today I am learning about using docker-compose to run a simple dotnet core Blazor server app, and I hit a snag.

For various reasons I won’t detail right now, I want my docker container to serve my app up over HTTPS, and this requires a bit of extra configuration for dotnet core.

After producing a certificate, I managed to get my container running with a a “docker run”, like this:

docker run --rm -p 44381:443 -e ASPNETCORE_HTTPS_PORT=44381 -e ASPNETCORE_URLS="https://+;http://+" -e Kestrel__Certificates__Default__Path=/https/aspnetapp.pfx -e Kestrel__Certificates__Default__Password=password -v $env:USERPROFILE\.aspnet\https:/https/ samplewebapp-blazor
No problems, I could hit https://localhost:44381 and it all worked great.
However, that’s messy and I wanted to experiment with docker-compose yml files to clean it up a bit. I produced this:
version: "3.8"
services:
  web:
    image: samplewebapp-blazor
    ports:
      - "44381:443"
    environment:
      - COMPOSE_CONVERT_WINDOWS_PATHS=1
      - ASPNETCORE_HTTPS_PORT=44381
      - ASPNETCORE_URLS="https://+;http://+"
      - Kestrel__Certificates__Default__Password="password"
      - Kestrel__Certificates__Default__Path="/https/aspnetapp.pfx"
    volumes:
      - "/c/Users/jeff.miles/.aspnet/https:/https/"
Then, I run “docker-compose up”. However, instead of success, I saw errors!
crit: Microsoft.AspNetCore.Server.Kestrel[0]
web_1  |       Unable to start Kestrel.
web_1  | Interop+Crypto+OpenSslCryptographicException: error:2006D080:BIO routines:BIO_new_file:no such file

My first thought was, “That’s got to be referring to the certificate – I must not have the volume syntax correct, and it isn’t mounted”. So I messed around with a bunch of different ways of specifying the local mount point, investigated edge cases with WSL2 and Docker Desktop, and wasted about 45 minutes with no results.

So I tagged in my buddy Matthew for his insight, and his first suggestion was “is it actually mounted?” In order to check, I had to get the container to run with docker-compose, so I commented out the environment variables for ASPNETCORE_URLS, and the Kestral values. This allowed the container to run, although I couldn’t actually hit the web app.

Then I was able to do: “docker exec -it containername bash”

Using this I could browse the filesystem, and verify the volume was mounted and the certificate was present.

Within that bash prompt, I manually set the environment variables, and then re-ran dotnet with the same entrypoint command as what builds my docker image. Surprisingly, the application loaded up successfully!

This tells me the volume is good, but something’s wrong with the passed-in variables.

First, I tried taking the quotes off the value of the Kestrel__Certificates__Default__Path variable. But then docker-compose gave me this error:

web_1  | crit: Microsoft.AspNetCore.Server.Kestrel[0]
web_1  |       Unable to start Kestrel.
web_1  | System.InvalidOperationException: Unrecognized scheme in server address '"https://+""'. Only 'http://' is supported.

I decided to remove all quotes from all environment variables (as a shot in the dark), and again surprisingly, it worked!

A bit of internet sleuthing later, and Matthew had produced this GitHub issue as explanation of what was going on.

Because I was wrapping the environment variables in quotes, they were actually getting injected into the container with quotes!

Here’s the end result of my compose file:

version: "3.8"
services:
  web:
    image: samplewebapp-blazor
    ports:
      - "44381:443"
    environment:
      - COMPOSE_CONVERT_WINDOWS_PATHS=1
      - ASPNETCORE_HTTPS_PORT=44381
      - ASPNETCORE_URLS=https://+;http://+
      - Kestrel__Certificates__Default__Password=password
      - Kestrel__Certificates__Default__Path=/https/aspnetapp.pfx
    volumes:
      - "/c/Users/jeff.miles/.aspnet/https:/https/"

It looks like as of docker-compose 1.26 (out now) that if you need quotes around environment variable values, you should use a .env file, which will work properly.

Azure Automation and DSC inside Pipeline

For a while I have been integrating Terraform resource deployment of Azure VMs with Azure Desired State Configuration inside of them (previous blog post).

Over time my method for deploying the Azure resources to support the DSC configurations has matured into a PowerShell script that checks and creates per-requisites, however there was still a bunch of manual effort to go through, including the creation of the Automation Run-As account.

This was one of the first things I started building in an Azure DevOps pipeline; it was a good idea having now spent a bunch of time getting it working, and learned a bunch too.

Some assumptions are made here. You have:

  • an Azure DevOps organization to play around with
  • an Azure subscription
  • the capability/authorization to create new service principals in the Azure Active Directory associated with your subscription.

You can find the GitHub repository containing the code here. with the README file containing the information required to use the code and replicate it.

A few of the key considerations that I wanted to include (and where they are solved) were:

  • How do I automatically create a Run-as account for Azure Automation, when it is so simple in the portal (1 click!)
    • Check the New-RunAsAccount.ps1 file, which gets called by the Create-AutomationAccount.ps1 script in a pipeline
  • Azure Automation default modules are quite out of date, and cause problems with using new DSC resources and syntax. Need to update them.
  • I make use of Az PowerShell in runbooks, so I need to add those modules, but Az.Accounts is a pre-req for the others, so it must be handled differently
    • Create-AutomationAccount.ps1 has a section to do this for Az.Accounts, and then a separate function that is called to import any other modules from the gallery that are needed (defined in the parameters file)
  • Want to use DSC composites, but need a mechanism of uploading that DSC module as an Automation Account module automatically
    • A separate pipeline found on “ModuleDeploy-pipeline.yml” is used with tasks to achieve this
  • Don’t repeat parameters between scripts or files – one location where I define them, and re-use them
    • See “dsc_parameters.ps1”, which gets dot-sourced in the scripts which are directly called from pipeline tasks

Most importantly, are the requirements to get started, being:

  • An Azure Subscription in which to deploy resources
  • An Azure KeyVault that will be used to generate certificates
  • An Azure Storage Account with a container, to store composite module zip
  • An Azure DevOps organization you can create pipelines in
  • An Azure Service Principal with the following RBAC or API permissions: (so that it can itself create new service principals)
    • must be “Application Administrator” on the Azure AD tenant
    • must be “Owner” on the subscription
    • must have appropriate rights to an access policy on the KeyVault to generate and retrieve Certificates
    • must be granted the following API permissions within the Azure Active Directory:
  • An Azure DevOps Service Connection linked to the Service Principal above


The result is that we have two different pipelines which can do the following:

  • ModuleDeploy-pipeline.yml pipeline runs and
    • takes module from repository and creates a zip file
    • uploads DSC composite module zip to blob storage
    • creates automation account if it doesn’t exist
    • imports DSC composite module to automation account from blob storage (with SAS)
  • azure-pipelines.yml pipeline runs and:
    • creates automation account if it doesn’t exist
    • imports/updates Az.Accounts module
    • imports/updates remaining modules identified in parameters
    • creates new automation runas account (and required service principal) if it doesn’t exist (generating an Azure KeyVault certificate to do so)
    • performs a ‘first-time’ run of the “Update-AutomationAzureModulesForAccount” runbook (because automation account is created with out-of-date default modules)
    • imports DSC configuration
    • compiles DSC configuration against configuration data


Azure Function with Managed Identity and REST API

Did you know that you can get the status of an Azure Load Balancer health probe through the Azure REST API? It looks a little something like this:

$filter = "BackendIPAddress eq '*'"
$uri = "https://management.azure.com/subscriptions/$($subscriptionId)/resourceGroups/$($resourcegroupname)/providers/Microsoft.Network/loadBalancers/$($loadbalancername)/providers/microsoft.insights/metrics?api-version=2018-01-01&metricnames=DipAvailability&`$filter=$($filter)"
$response = Invoke-RestMethod -Uri $URI -Method GET -header $RequestHeader

What we’re doing is using the Metric named “DipAvailability” which corresponds to the Portal display of “Health Probe Status”.

We then also apply a filter for “BackendIPAddress” so that it is clear the health count of each member; 100 equals 100% successful probes over the time frame.
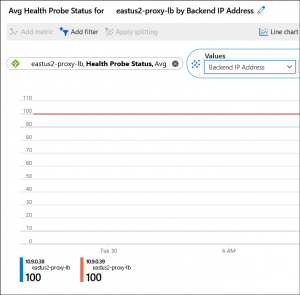
I’ve previously configured PRTG to call an Azure Function in order to get health status of Application Gateway, and I wanted to do the same thing here. However, this Function is a bit different, in that I’m not using native Az PowerShell module commands (because they don’t exist for this purpose that I could find) but instead calling the API directly.

Typically, you would authenticate against the REST API with a service principal, and create a request through a series of token-generation and client-grant generation actions.

I didn’t want to do this – it is something I will come back to, to ensure a full understanding of the Oauth flow, but for now I wanted something simpler, like I’ve used before with REST calls against Update Management.

This method I’ve used depends upon a PowerShell script called Get-AzCachedAccessToken that I’ve sourced from the Technet Gallery.

In this case, I needed my Azure Function, using it’s Managed Identity, to call that PowerShell script, use the cached access token to build a Bearer Token object, and pass it to the REST call to authenticate. I could embed the contents of that script into my Function, but that is not scalable nor clean code.

Instead, I can have the Azure Function load that script as a Module at startup, where it becomes available for all other Functions.

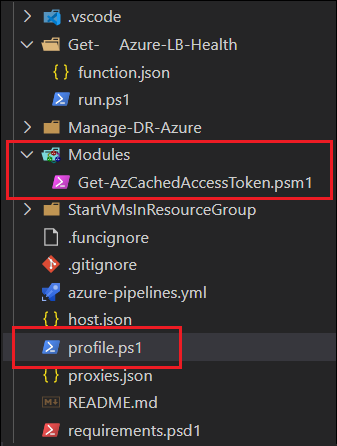
First, I take the Get-AzCachedAccessToken.ps1 file, and simply rename it as a *.psm1 file. This will get added to a “Modules” folder within the function (see below). I also found that I needed to find the profile.ps1 file for my function, and add the following:

foreach($file in Get-ChildItem -Path "$PSScriptRoot\Modules" -Filter *.psm1){
    Import-Module $file.fullname
}

You can add these files in a couple different ways. I have my Function developed within Visual Studio Code, and delivered through an Azure DevOps pipeline, which means the code sits in a repository where each function is a folder with a “run.ps1” and “function.json” file. Using the VS Code extension will build out the file framework for you.

Here is where I added the Module and modified the profile.ps1:
Then I use a pipeline task for “Deploy Azure Function App” to push my code within a release pipeline.

The alternative to this code-first approach, is to modify the required files in the Azure Portal.

First you find your Function App, and then scroll down to “Advanced Tools”:
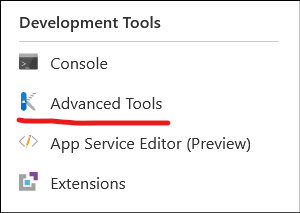
Click the “Go” link, and you’ll be taken to the Kudu Services page for your Function App.

Within the new window that opened, you can to choose Debug Console -> CMD:
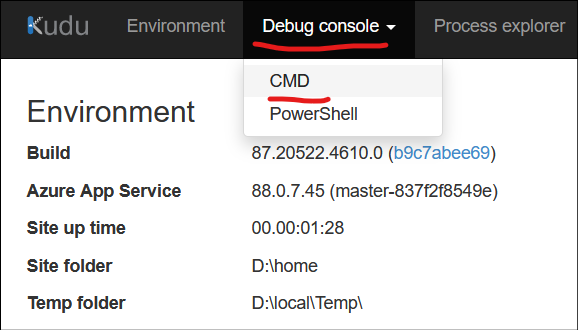
This will give you an in-browser display of the file system, where you can navigate to “site” -> “wwwroot”.

Here is where you want to create a new folder named Modules, and upload your *.psm1 file into. You’ll also find profiles.ps1 here which can be edited in the browser as well.
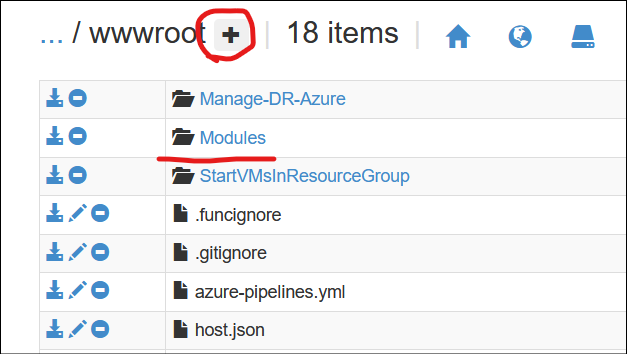
Once those modifications are complete, give your Function app a restart.

Within my PowerShell Function, I now can use the cmdlet Get-AzCachedAccessToken because it has been loaded as a module. I then take its output, add it to a Bearer variable which is passed as the Request Header, to authenticate against the API!

    Select-AzSubscription -SubscriptionID $subscriptionid -TenantID $tenantid
    $BearerToken = ('Bearer {0}' -f (Get-AzCachedAccessToken))
    $RequestHeader = @{
        "Content-Type"  = "application/json";
        "Authorization" = "$BearerToken"
    }
    $filter = "BackendIPAddress eq '*'"
    # Call Azure Monitor REST API to get Metric value
    $uri = "https://management.azure.com/subscriptions/$($subscriptionId)/resourceGroups/$($resourcegroupname)/providers/Microsoft.Network/loadBalancers/$($loadbalancername)/providers/microsoft.insights/metrics?api-version=2018-01-01&metricnames=DipAvailability&`$filter=$($filter)"
    $response = Invoke-RestMethod -Uri $URI -Method GET -header $RequestHeader

For this specific function, what I’m doing with the results are taking the timeseries result that is passed from the metric, bring it down to a 1 (if value is 100) or a 0 (if anything but 100) in order to re-use my PRTG custom lookups rather than building new ones:

# Create our Array List which we'll populate with custom ps object
    [System.Collections.ArrayList]$items = @()
    foreach ($value in $response.value.timeseries) {
        # Need to convert to PRTG expected values, so that we don't need additional lookup files
        $value.data.average[-1]
        # First make sure there is a value
        $convertedvalue = $null
        if ($value.data.average[-1]) {
            # If it is 100 then we're healthy
            if ($value.data.average[-1] -eq 100) {
                $convertedvalue = 1
            }
            else {
                $convertedvalue = 0
            }
        }
        else { # There was no average value found (host is probably off) so set to zero
            $convertedvalue = 0
        }
        $items.Add([pscustomobject]@{  name = $value.metadatavalues.value; health = $convertedvalue; })
    }
    # Expect output of $items to look like this:
    #name      health
    #----      ------
    #10.5.1.68    100
    #10.5.1.13      0
    # Now we wrap our output in a hashtable so PRTG can interpret it properly
    $body = @{ items = $items }
    # This outputs a 100 if Normal, and a 0 if not normal. PRTG sensor will then alert.

See my other post about using PRTG to call an Azure Function for details on how I tie this result into a PRTG sensor.

Install Visio volume license alongside Office 365

At my company we get a certain number of seats of Visio volume license from our Microsoft Partner benefits, but it is not a subscription product and the volume key cannot be simply entered to activate Visio, because our Office 365 is installed as O365ProPlusRetail.

Here I’ll describe how to install the Visio volume license product side-by-side with our standard installation of Office 365, which is a supported scenario according to this Microsoft doc.

At first I had problems where installing the product “VisioPro2019Volume” would downgrade my O365 build to the 1808 version. I posted a comment on this Microsoft Docs issue because it seemed related, and received a very helpful reply from Martin with another Microsoft Docs page describing how to build lean and dynamic install packages for O365. This was the key to configuring my XML file for proper side-by-side installation.

I also used the super helpful Office Customization Tool in support of figuring this out.

Procedure

    1. Download the Office Deployment Tool
    2. Install the tool to a folder on your workstation. Create a new XML file named “newvisio.xml” to look like this (update the PIDKEY value)
<Configuration ID="6659a04f-037d-4f23-b8a2-64c851090a5e">
  <Add Version="MatchInstalled">
    <Product ID="VisioPro2019Volume" PIDKEY="insert Key">
      <Language ID="MatchInstalled" TargetProduct="O365ProPlusRetail" />
    </Product>
  </Add>
</Configuration>
  1. Note: You can get the Key from the Partner portal (go into MPN ? Benefits ? Software) and enter it into your xml file
  2. If you have Visio installed already as part of O365, you will need to remove it:
      1. Create yourself a configuration xml file named removevisio.xml:
    <Configuration ID="ba49a53d-04c0-44a6-b591-c099d9c4e6ed">
      <Remove OfficeClientEdition="64" Channel="Monthly">
        <Product ID="VisioProRetail">
          <Language ID="en-us" />
          <ExcludeApp ID="Access" />
          <ExcludeApp ID="Excel" />
          <ExcludeApp ID="Groove" />
          <ExcludeApp ID="Lync" />
          <ExcludeApp ID="OneDrive" />
          <ExcludeApp ID="OneNote" />
          <ExcludeApp ID="Outlook" />
          <ExcludeApp ID="PowerPoint" />
          <ExcludeApp ID="Publisher" />
          <ExcludeApp ID="Teams" />
          <ExcludeApp ID="Word" />
        </Product>
      </Remove>
      <Display Level="Full" AcceptEULA="TRUE" />
    </Configuration>
    
    1. Place this file where the deployment tool was downloaded, and then run it:
    2. setup /configure removevisio.xml
    3. The uninstall will proceed. You’ll see an image like this; don’t be alarmed its not removing all of office if you set your XML properly
  3. Once the previous version uninstall is complete, install with this command:
  4. setup /configure newvisio.xml
  5. Now you should have Office 365 on subscription, but Visio on Volume License.

Add PRTG sensor through PowerShell module

Once I established a way to perform an Azure Function call from a PRTG REST sensor, I wanted to programmatically deploy this sensor for consistency across multiple environments.

To do so I made use of the excellent PrtgAPI project from lordmilko. This wraps the PRTG REST API into easy to use and understand PowerShell, which is very effective for my team’s ability to use and re-use things written with it.

What follows is an extremely bare-bones method of deploying a PRTG custom REST sensor using PrtgAPI with PowerShell. What it does not contain are appropriate tests or error-handling, parameter change handling, or removal. Thus warned, use at your own risk.

GitHub script file

This example is specifically built for an Azure Function which monitors an Application Gateway health probe, and the parameters are tailored as such.
First I start by defining the parameters to be used, aligned with the Application Gateway http setting I want to monitor – as in my previous post I wanted a separate sensor for each http setting associated with a listener.

# Input Variables - update accordingly
$ClientCode = "abc"
$resourcegroupname = "$($clientcode)-srv-rg" # resource group where the Application Gateway is located
$appgwname = "$clientcode AppGw" # name of the application gateway
$httpsettingname = @("Test","Prod")
$probename = "Probe1"
$subscriptionid = "549d4d62" # Client Azure subscription
 
$appsvcname = "AppGw Monitor"
$appsvcFQDN = "prod-appsvc.azurewebsites.net"
$functionName = "Get-AppGw-Health"
$functionKey = "secret function key for PRTG"
$tenantid = "f5f7b07a" # Azure tenant id

Then I use the PrtgAPI module – install if not already, and connect to a PRTG Core:

# PrtgAPI is being used: https://github.com/lordmilko/PrtgAPI
#Check if module is installed, and install it if not
$moduleinstalled = get-module prtgapi -listavailable
if ($moduleinstalled) {
    Write-Host "Pre-requisite Module is installed, will continue"
}
else {
    Install-Package PrtgAPI -Source PSGallery -Force
    Write-Host "Installing PrtgApi from the PSGallery"
}
 
# Check and see if we're already connected to PRTG Core
$prtgconnection = Get-PrtgClient
if (!$prtgconnection) {
    # If not, make the connection
    Write-Host "You will now be prompted for your PRTG credentials"
    Connect-PrtgServer prtgserver.domain.com
}
Write-Host "Connected to PRTG. Proceeding with setup."

Next I test for existence of a device, which will be used to branch whether I am creating a sensor under the device, or need to create the device and the sensor together:

# Using our defined group structure, check for the device existence
$device = Get-Probe $probename | Get-Group "Services" | Get-Group "Application Gateways" | Get-Device $appsvcname

Because I have one Application Gateway with multple http settings serving multiple back-end pools, I need to do a foreach loop around each object in the httpsetting array. Inside that loop, I build the JSON body that will be passed in the POST request to the Azure Function:

$Body = @"
{
    "httpsettingname": "$setting",
    "resourcegroupname": "$resourcegroupname",
    "appgwname": "$appgwname",
    "subscriptionid": "$subscriptionid",
    "tenantid": "$tenantid"
}
"@

Now I check for the device and sensor (fairly self-explanatory) and finally get to the meat and potatoes of the sensor creation.

Up first is defining the parameters for the sensor that will be created. The wiki for PrtgAPI recommends the use of Dynamic Parameters and to start by constructing a set of DynamicSensorParameters from the raw sensor type identifier.

Once I have that in a PowerShell object, I begin to apply my own values for various parameter attributes:

# Gather a default set of parameters for the type of sensor that we want to create
            $params = Get-Device $device | New-SensorParameters -RawType restcustom | Select-object -First 1 # selecting first because PrtgApi seems to find multiple devices with same name
            # For some reason, above command creates two objects in Params, so we only target the first one by getting -First 1
 
            # Populate the sensor parameters with our desired values
            $params.query = "/api/$($functionName)?code=$functionKey"
            $params.jsonfile = "azureappgwhealth.template" # use the standard template that was built
            $params.protocol = 1 # sets as HTTPS
            $params.requestbody = $body
            $params.Interval = "00:5:00" # 5 minute interval, deviates from the default
            $params.requesttype = 1 # this makes it a POST instead of GET
            if ($setting -like "*prod*") {
                # Set some Tags on the sensor
                $params.Tags = @("restcustomsensor", "restsensor", "Tier2", "$($ClientCode.toUpper())", "ApplicationGateway", "PRTGMaintenance", "Production")
            }
            else {
                # Assume Test if not prod, set a different set of Tags
                $params.Tags = @("restcustomsensor", "restsensor", "Tier2", "$($ClientCode.toUpper())", "ApplicationGateway", "PRTGMaintenance", "NonProduction")
            }
            $params.Name = "$($appgwname) $($setting)"

Finally, I can create the sensor by using this one line:

$sensor = $device | Add-Sensor $params # Create the sensor

That’s pretty much it! For each of the different http settings and health probe back-ends I modify the variables at the top of this script, and then run it again; obviously there are much better ways to make this reproducible, however I haven’t been able to commit that time.