Azure Function learning

I’m playing around with an Azure Function that I’m going to eventually call from an Azure Automation runbook (post to come in the near future).

During this process, I learned some pretty key things as I was testing and going along. I’m a little embarrassed to post them publicly, but eventually a non-coder like myself somewhere is going to be trying the same thing and maybe this will help.

Function error-ing out during testing

In my function, I used a ForEach loop to add a string to a List<string> for each instances of a collection. My function would compile just fine but would always error out on this one line, with a really generic error. I only knew it was erroring out on this line because I placed a log output on the next line and it would never reach it.

[Error] Executed 'Functions.HttpTriggerCSharp2'

This was my poor coding skills, not beginning the list properly. I was starting it like this:

List<string> collectedIP = null;
But it really needed to be this to initialize it properly:
List<string> collectedIP = new List<string>();
Without this, adding to the collection isn’t possible. I’m sure that anyone who actually knows C# is shaking their head reading this, but I guess that’s what you get when you learn organically without real training.

Building the query string

I want to pass in a parameter to my function, using the query string. At the same time, I also want to use a function key so that this can’t be run anonymously.

Originally, I was trying this, with the ampersand delineating the second query parameter (after the function key):

Invoke-WebRequest https://appname.azurewebsites.net/api/functionName?code=functionKey&amp;name=www.microsoft.com

In PowerShell, this returned the error:

The ampersand (&amp;) character is not allowed. The &amp; operator is reserved for future use; wrap an ampersand in double quotation marks ("&amp;") to pass it as part of a string.

So I tried this string:

Invoke-WebRequest 'https://appname.azurewebsites.net/api/functionName?code=functionKey"&amp;"name=www.microsoft.com'

But then I received the error:

Invoke-WebRequest : The remote server returned an error: (401) Unauthorized.

Well, I knew it wasn’t unauthorized because it ran properly in the browser. The actual fix was stupidly easy, I hadn’t put any quotes around the whole string – either single or double quotes was fine:

Invoke-WebRequest "https://appname.azurewebsites.net/api/functionName?code=functionKey&amp;name=www.microsoft.com"

TLS Support in PowerShell

When I got to actually testing my function, I tried to call it from PowerShell in this format:

Invoke-WebRequest 'https://appname.azurewebsites.net/api/functionName?code=functionKey'

However, upon doing so I received this error:

iwr : The underlying connection was closed: An unexpected error occurred on a send.

A google search led me to discover that PowerShell by default will attempt to use TLS 1.0 for Invoke-WebRequest, unless you’re using PowerShell Core 6.

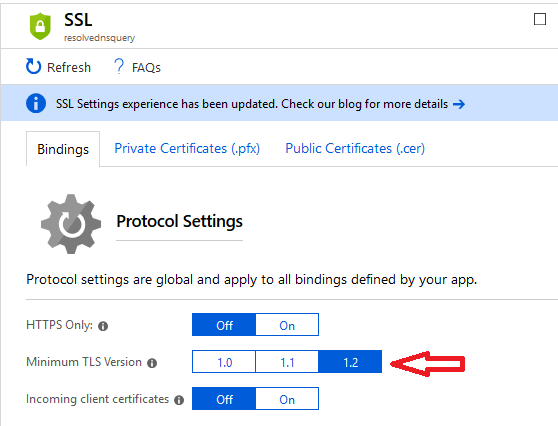
My Azure Function uses TLS 1.2 by default and as a minimum. This can be found on the “Platform Settings” page of the Function, under “SSL”:

The solution (at least as a workaround) is to force that session to use TLS 1.2 like this:

[System.Net.ServicePointManager]::SecurityProtocol = [System.Net.SecurityProtocolType]::Tls12

Primary source for this information was here.


Azure Multiple NICs or Static IPs through Terraform and DSC

A situation came up where I needed to have two HTTP bindings on port 80 on a web server residing in Azure. This would be 1 binding each on two different IIS sites within a single VM. The creation of this configuration isn’t as simple as one would initially expect, due to some Azure limitations.

There are two options in order to achieve this:

  • Add a secondary virtual network interface to the VM
  • Add a second static IP configuration on the primary virtual network interface of the VM.

For each of these, I wanted to deploy the necessary configuration through Terraform and Desired State Configuration (DSC).

Second IP Configuration

In this scenario, its quite simple to add a second static IP configuration in terraform:

resource "azurerm_network_interface" "testnic" {
  name                = "testnic"
  location            = "${var.location}"
  resource_group_name = "${azurerm_resource_group.test.name}"
  ip_configuration {
    name                          = "ipconfig1"
    subnet_id                     = "${azurerm_subnet.test.id}"
    private_ip_address_allocation = "static"
    private_ip_address            = "10.2.0.5"
    primary                       = true
  }
  ip_configuration {
    name                          = "ipconfig2"
    subnet_id                     = "${azurerm_subnet.test.id}"
    private_ip_address_allocation = "static"
    private_ip_address            = "10.2.0.6"
  }
}

However, when using static IP addresses like this, Azure requires you to perform configuration within the VM as well. This is necessary for both the primary IP configuration, as well as the secondary.

Here’s how you can configure it within DSC:

Configuration dsctest 
{ 
    Import-DscResource -ModuleName PSDesiredStateConfiguration 
    Import-DscResource -ModuleName xPSDesiredStateConfiguration 
    Import-DscResource -moduleName NetworkingDSC
 
    Node localhost {
        ## Rename VMNic
        NetAdapterName RenameNetAdapter 
        { 
            NewName = "PrimaryNIC"  
            Status = "Up" 
            InterfaceNumber = 1 
        }
 
        DhcpClient DisabledDhcpClient
        {
            State          = 'Disabled'
            InterfaceAlias = 'PrimaryNIC'
            AddressFamily  = 'IPv4'
            DependsOn = "[NetAdapterName]RenameNetAdapter "
        }
 
        IPAddress NewIPv4Address
        {
            #Multiple IPs can be comma delimited like this
            IPAddress      = '10.2.0.5/24','10.2.0.6/24'
            InterfaceAlias = 'PrimaryNIC'
            AddressFamily  = 'IPV4'
            DependsOn = "[NetAdapterName]RenameNetAdapter "
        }
 
        # Skip as source on secondary IP address, in order to prevent DNS registration of this second IP
        IPAddressOption SetSkipAsSource
        {
            IPAddress    = '10.2.0.6'
            SkipAsSource = $true
            DependsOn = "[IPAddress]NewIPv4Address"
        }
        DefaultGatewayAddress SetDefaultGateway 
        { 
            Address = '10.2.0.1' 
            InterfaceAlias = 'PrimaryNIC' 
            AddressFamily = 'IPv4' 
        }  
 
    }
 
}

Both the disable DHCP and DefaultGateway resources are required, otherwise you will lose connectivity to your VM.

Once the “SkipAsSource” runs, this sets the proper priority for the IP addresses, matching the Azure configuration.


Second NIC

When adding a second NIC in Terraform, you have to add a property (“primary_network_interface_id”) on the VM resource for specifying the primary NIC.

resource "azurerm_network_interface" "testnic1" {
  name                = "testnic"
  location            = "${var.location}"
  resource_group_name = "${azurerm_resource_group.test.name}"
  ip_configuration {
    name                          = "ipconfig1"
    subnet_id                     = "${azurerm_subnet.test.id}"
    private_ip_address_allocation = "static"
    private_ip_address            = "10.2.0.5"
  }
 
}
resource "azurerm_network_interface" "testnic2" {
  name                = "testnic"
  location            = "${var.location}"
  resource_group_name = "${azurerm_resource_group.test.name}"
  ip_configuration {
    name                          = "ipconfig1"
    subnet_id                     = "${azurerm_subnet.test.id}"
    private_ip_address_allocation = "static"
    private_ip_address            = "10.2.0.6"
  }
 
}
 
resource "azurerm_virtual_machine" "test" {
  name                  = "helloworld"
  location              = "${var.location}"
  resource_group_name   = "${azurerm_resource_group.test.name}"
  network_interface_ids = ["${azurerm_network_interface.testnic1.id}","${azurerm_network_interface.testnic2.id}"]
  primary_network_interface_id = "${azurerm_network_interface.test.id}"
  vm_size               = "Standard_A1"
 
  storage_image_reference {
    publisher = "MicrosoftWindowsServer"
    offer     = "WindowsServer"
    sku       = "2016-Datacenter"
    version   = "latest"
  }
 
  storage_os_disk {
    name          = "myosdisk1"
    vhd_uri       = "${azurerm_storage_account.test.primary_blob_endpoint}${azurerm_storage_container.test.name}/myosdisk1.vhd"
    caching       = "ReadWrite"
    create_option = "FromImage"
  }
 
  os_profile {
    computer_name  = "helloworld"
    admin_username = "${var.username}"
    admin_password = "${var.password}"
  }
 
  os_profile_windows_config {
    provision_vm_agent = true
    enable_automatic_upgrades = true
  }
 
}

In this scenario, once again Azure requires additional configuration for this to work. The secondary NIC does not get a default gateway and cannot communicate out of it’s subnet.

One way to solve this with DSC is to apply a default route for that interface, with a higher metric than the primary interface. In this case, we don’t need to specify static IP addresses inside the OS through DSC, since there’s only one per virtual NIC.

Configuration dsctest 
{ 
    Import-DscResource -ModuleName PSDesiredStateConfiguration 
    Import-DscResource -ModuleName xPSDesiredStateConfiguration 
    Import-DscResource -moduleName NetworkingDSC
 
    Node localhost {
        ## Rename VMNic(s) 
        NetAdapterName RenameNetAdapter 
        { 
            NewName = "PrimaryNIC" 
            Status = "Up" 
            InterfaceNumber = 1 
            Name = "Ethernet 2"
        }
        NetAdapterName RenameNetAdapter_apps
        { 
            NewName = "SecondaryNIC"  
            Status = "Up" 
            InterfaceNumber = 2
            Name = "Ethernet 3"
        }
 
        Route NetRoute1
        {
            Ensure = 'Present'
            InterfaceAlias = 'SecondaryNIC'
            AddressFamily = 'IPv4'
            DestinationPrefix = '0.0.0.0'
            NextHop = '10.2.0.1'
            RouteMetric = 200
        }
 
    }
 
}

You could also add a Default Gateway resource to the second NIC, although I haven’t specifically tested that.

Generally speaking, I’d rather add a second IP to a single NIC – having two NICs on the same subnet with the same effective default gateway might function, but doesn’t seem to be best practice to me.

Windows 10 insider preview failed to install

I’m running Windows 10 insider preview on my basement computer at home, and sometime in the middle of summer it started failing to update to the latest release. I finally made some time to troubleshoot this last night and got it working.

During the install, it would get about 40% of the way through, and then fail with this error:

Windows could not configure one or more system components

After some sleuthing I discovered the log file for the upgrade could be found here: C:\Windows\Panther\NewOs\Panther, and I looked at the “setuperror.log” file.

In this, there were a couple of key errors noted:

0xd0000034 Failed to add user mode driver [%SystemRoot%\system32\DRIVERS\UMDF\uicciso.dll]

Failure while calling IPreApply->PreApply for Plugin={ServerPath="Microsoft-Windows-IIS-RM\iismig.dll"

Generic Command ErrorCode: 80004005 Executable: iissetup.exe ExitCode: 13 Phase: 38 Mode: Install (first install) Component: Microsoft-Windows-IIS-SharedLibraries-GC

I did come across a search hit when looking for the “uicciso.dll” error that spoke about IIS install failing with a Windows 10 update, and those two things seemed to correlate with the errors I was seeing in the logs.

I ran this DISM command to see the additional Win10 features that were installed, and noted a whole bunch that I don’t ever recall having put on manually, and certainly weren’t needed:

 dism /online /get-features /format:table

I collected a bunch, turned it into a removal command, ran them and restarted:

dism /online /disable-feature /FeatureName:SMB1Protocol-Server
dism /online /disable-feature /FeatureName:SMB1Protocol
dism /online /disable-feature /FeatureName:MSMQ-Server
dism /online /disable-feature /FeatureName:MSMQ-Container
dism /online /disable-feature /FeatureName:WCF-Services45
dism /online /disable-feature /FeatureName:WCF-TCP-Activation45 
dism /online /disable-feature /FeatureName:WCF-Pipe-Activation45 
dism /online /disable-feature /FeatureName:WCF-MSMQ-Activation45 
dism /online /disable-feature /FeatureName:WCF-TCP-PortSharing45 
dism /online /disable-feature /FeatureName:WAS-ConfigurationAPI
dism /online /disable-feature /FeatureName:WAS-WindowsActivationService 
dism /online /disable-feature /FeatureName:WAS-ProcessModel 
dism /online /disable-feature /FeatureName:IIS-RequestFiltering
dism /online /disable-feature /FeatureName:IIS-Security
dism /online /disable-feature /FeatureName:IIS-ApplicationDevelopment 
dism /online /disable-feature /FeatureName:IIS-NetFxExtensibility45
dism /online /disable-feature /FeatureName:IIS-WebServerRole 
dism /online /disable-feature /FeatureName:IIS-WebServer 
dism /online /disable-feature /FeatureName:NetFx4-AdvSrvs 
dism /online /disable-feature /FeatureName:NetFx4Extended-ASPNET45

After the restart I let the upgrade run, and it completed successfully!


DSC IIS bindings and SSL certificates

This was a tricky one that really didn’t leave me with an ideal solution.

In using DSC, I want my compiled node configurations to be generic, like “webserver” instead of “webserver01”, in order for them to be re-used by VMs sharing the same characteristics, and to avoid duplicating information like IP addressing and VM names which has already been specified in the Terraform configuration for deployment.

At the same time, I want to be able to deploy a web server with a site on port 443 and a self-signed certificate which is created by DSC.

Combining these two ideas was not something I found I could accomplish with pre-existing modules.

I first looked to the xWebsiteAdministration DSC module, which contains the functions xWebsite among others. With this, I could use the following syntax:

xWebSite Admin { 
            Name = "Admin"
            PhysicalPath = "E:\inetpub\AdminSite"
            State = "Started"
            ApplicationPool = "Admin"
            Ensure = "Present"
            BindingInfo     = @(
                MSFT_xWebBindingInformation
                {
                    Protocol              = "HTTPS"
                    Port                  = 443
                    CertificateThumbprint = ""
                    CertificateStore      = "MY"
                })
            LogPath = "E:\inetpub\logs\AdminSite"
            DependsOn = "[File]E_AdminSite"
         }

Here, I want to pass in the thumbprint of my previously generated self-signed certificate. However, I don’t know it’s thumbprint, and it will be unique when I deploy this node configuration between a Web01 and a Web02 VM.

I tried resolving the thumbprint like this: CertificateThumbprint = (Get-ChildItem Cert::\LocalMachine\My | where {$_.Subject -like “*$($Node.ClientCode).com*”}), however that continued to give me DSC errors when it was attempting to apply, about a null reference.

When I came across this StackOverflow question it was clear why this wasn’t working. Since the compilation happens on Azure servers, of course they won’t have a certificate matching my subject name, and thus it can’t generate a thumbprint.

So instead I thought, I can just create a script that applies the certificate after the website has been created. Here is where I ran into additional problems:

  • If I create the xWebsite with HTTPS and 443 with no certificate, it errors
  • If I create the xWebsite with no binding information, it default assigns HTTP with port 80 (conflicting with another website that I have)
  • If I create the xWebsite with HTTP and port 8080 as a placeholder value, now I have IIS listening on ports I don’t actually want open
  • If I create the xWebsite with HTTP and port 8080 and then cleanup that binding afterwards with a Script, on the next run DSC is going to try and re-apply that binding, since I’ve effectively said it is my desired state

Ultimately what I was left with was creating a script that deployed the whole website, and not using xWebsite at all. Like I said, not ideal but it does work to meet my requirements.

Here’s the script that I’ve worked out:

Script WebsiteApps          
        {            
            # Must return a hashtable with at least one key            
            # named 'Result' of type String            
            GetScript = {            
                Return @{            
                    Result = [string]$(Get-ChildItem "Cert:\LocalMachine\My")            
                }            
            }            
 
            # Must return a boolean: $true or $false            
            TestScript = {            
                Import-Module WebAdministration
                # Grab the IP based on the interface name, which is previously set in DSC
                $ip1  = (get-netipaddress -addressfamily ipv4 -InterfaceAlias $($Using:Node.VLAN)).IPAddress
                # Find out if we've got anything bound on this IP for port 443
                $bindcheck = get-webbinding -name "Apps" -IPAddress $ip1 -Port 443
                $bindcheckwildcard = get-webbinding -name "Apps" | where-object { $_.BindingInformation -eq "*:80:"}
                # If site exists
                    if (Test-Path "IIS:\Sites\Apps")
                    { 
                        Write-Verbose "Apps site exists."
                        # if log file setting correct
                        if ((get-itemproperty "IIS:\Sites\Apps" -name logfile).directory -ieq "E:\inetpub\logs\AppsSite")
                           {
                               Write-Verbose "Log file is set correctly."
                                   # if IP bound on port 443
                                   if ($bindcheckhttps)
                                   { 
                                       Write-Verbose "443 is bound for Apps."
                                       #if SSL certificate bound
                                       if (Test-path "IIS:\SslBindings\$ip1!443")
                                       {
                                            Write-Verbose "SSL Certificate is bound for Apps"
                                            # wildcard binding check for Apps
                                            if (-not ($bindcheckwildcard)) {
                                                Write-Verbose "* binding does not exist for Apps."
                                                Return $true
                                            }
                                            else
                                            {
                                                Write-Verbose "* binding exists for Apps."
                                                Return $false
                                            }
                                       }
                                       else
                                       {
                                           Write-Verbose "SSL Certificate is NOT bound for Apps"
                                           Return $false
                                       }
                                   }
                                   else
                                   {
                                       Write-Verbose "IP not bound on 443 for Apps."
                                       Return $false
                                   }
                           }
                            else 
                            {
                               Write-Verbose "Log file path is not set correctly"
                               Return $false
                            } 
                   }
                   else
                   {
                       Write-Verbose "Apps site does not exist"
                       Return $false
                   }
                }    
 
            # Returns nothing            
            SetScript = {
                $computerName = $Env:Computername
                $domainName = $Env:UserDnsDomain
 
                $apps = Get-Item "IIS:\Sites\Apps"
                $ip1  = (get-netipaddress -addressfamily ipv4 -InterfaceAlias $($Using:Node.VLAN)).IPAddress
                $bindcheckhttps = get-webbinding -name "Apps"  -IPAddress $ip1 -Port 443
                $bindcheckwildcard = get-webbinding -name "Apps" | where-object { $_.BindingInformation -eq "*:80:"}
 
                 # If site not exists
                    if (-not (Test-Path "IIS:\Sites\Apps"))
                    { 
                        Write-Verbose "Creating Apps site"
                        New-Website -Name "Apps" -PhysicalPath E:\inetpub\AppsSite -ApplicationPool "Apps"
                    }
 
                    # if port 443 not bound
                    if (-not ($bindcheckhttps))
                    { 
                        Write-Verbose "Binding port 443"
                        $apps = Get-Item "IIS:\Sites\Apps"
                        New-WebBinding -Name $apps.Name -protocol "https" -Port 443 -IPAddress $ip1
                    }
                    if ($bindcheckwildcard)
                    {
                        Write-Verbose "Removing wildcard binding for Apps"
                        get-webbinding -name "Apps" | where-object { $_.BindingInformation -eq "*:80:"} | Remove-Webbinding
                    } 
 
                    #if SSL certificate not bound        
                    if (-not (Test-path "IIS:\SslBindings\$ip1!443"))
                        {
                            Write-Verbose "Binding SSL certificate"
                            Get-ChildItem cert:\LocalMachine\My | where-object { $_.Subject -match "CN\=$Computername\.$DomainName" } | select -First 1 | New-Item IIS:\SslBindings\$ip1!443
                        }
 
                    # if log file setting correct
                    if (-not ((get-itemproperty "IIS:\Sites\Apps" -name logfile).directory -ieq "E:\inetpub\logs\AppsSite"))
                        {
                            Write-Verbose "Setting log file to the proper directory"
                            Set-ItemProperty "IIS:\Sites\Apps" -name logFile -value @{directory="E:\inetpub\logs\AppsSite"}
                        }
                } 
            DependsOn = "[xWebAppPool]Apps","[Script]GenerateSelfSignedCert"
        }