Microsoft TechEd 2014 recorded sessions

Image from http://channel9.msdn.com

I have never attended Microsoft TechEd, but I REALLY want to, especially after seeing the sheer number of sessions that are relevant to me in 2013.

I’ve been keeping an eye on the TechEd website for some time after the event closed, watching for the posting of the recorded sessions, and now they are up, all 60 something pages of them.

http://channel9.msdn.com/Events/TechEd/NorthAmerica/2014#fbid=


I’ve gone through the list of every session, and collected a link list of 59 of them I want to watch, with some standouts like:

  • Windows PowerShell unplugged
  • How many coffee’s can you drink while your PC starts
  • DFSR 2012 R2 enhancements
  • Storage Efficiency with Dell and Storage Spaces
  • Mark Russinovich on Cloud Computing
  • Upgrade your IT skills and Infrastructure: Cloud Computing
  • Performance Optimize your ASP.NET
  • O365 Identity Management
  • What’s new in Windows 8.1 Deployment
  • Hyper-V Recovery Manager
  • Backup Strategy for Private Cloud

And so much more…


Autodesk 2014 deployment

One of the other major deployments I’ve done recently has been a refresh of all our Autodesk products to the 2014 version. In scope this was smaller than my Office 2013 deployment, however it was much more complicated.


First, I created Active Directory groups to contain the computer accounts of workstations needing a product. For example, a group for AutoCAD 2014 Network license containing computer accounts that required it for installation.

These groups were then targeted with Group Policy Objects which set a scheduled task to run the installation script at 3:00am. Due to the size of the installation, I don’t want to have this run as a startup script.
Next I needed to create the installation script.

To start, I created an Autodesk deployment through Setup.exe. This is typically how standardized installations of Autodesk products are performed, but usually aren’t enough to have a user fully set up.

I began with a deployment of Infrastructure Design Suite Premium (IDSP) since it was 40GB and contained the install files for every ‘lower-tier’ product we were going to install. This way you can use a single source of installation files but multiple configured deployments.

Once the deployment package was created, I put it into a VBS script with a WHOLE lot of other logic.

My installation script can be downloaded here: AutoCAD_2014_Network_Install(rename to .vbs)

The Uninstall Products script can be downloaded here: UninstallProducts(rename to .vbs)

The Copy Fonts script can be downloaded here: CopyFonts(rename to .vbs)


The script can be summarized as follows:

  • Check default gateway on the NIC, and if matching branch offices change the install source
  • Check for the acad.exe file in the installation directory, and proceed if it doesn’t exist yet
  • Run the UninstallProducts script to remove previous versions of software
  • Run the Autodesk deployment through the .lnk file created from Autodesk setup.exe
  • Begin a loop which checks for setup.exe in the running processes.
    • Wait 2 minutes before proceeding with the loop
  • Once setup.exe is no longer running, continue by deleting unnecessary shortcuts
  • Add extra shortcuts that point to a specific ARG file for customizations
  • Install additional programs (AcroPlot PDF software in this case)
  • Run the CopyFonts script, passing in the Fonts path for this particular product
    • This copies required fonts to C:\Windows\Fonts and the installation directory
  • Check again for acad.exe, and if it now exists then log success, otherwise log failure.


Office 2013 Deployment

office_logoMy company is now utilizing Office 365 for it’s email and Office products, and for a variety of reasons there was a need to mass upgrade to Office 2013.

Our parent company from a recent acquisition handles it’s deployment in a way that doesn’t meet our requirements, since it is user-based rather than computer based which we require.


There were a few things we had to define for this to be a successful project:

  • Installation must run under admin privileges (which our users do not have)
  • Ideally, installation should not interrupt or delay a user, but if necessary it is acceptable
  • Install source should be dynamic to allow for different branch locations
  • Success or failure should be logged to a central file


Based on the above, I came up with a combination of scripts which are reproduced below.

Overall the project was a success, with the only major issue being users not reading instructions (even openly admitting this fact) which caused a huge increase in IT Support requests.


1. Group Policy Objects

I set up two GPO’s to perform two separate functions:

  • One to create a Scheduled Task that runs once at 3:00am, executing the install script
  • One to execute the install script as a Startup Script under the Computer Configuration settings for all workstations in our area of AD

Using this method, any computer powered on at deployment date would receive Office 2013 at 3:00am without user interruption, and any other computer after that would receive it at startup. The majority of our staff working in an office were not interrupted, and our field staff would all receive the software eventually.


2. Installation Script

My commented installation script can be downloaded here: Office2013InstallStatus (rename to .bat)

In essence, here is what it does:

  • Begin by defining location variables that will apply to all PCs by default
  • Check matching NIC gateway addresses for offices without an Apps repository and overwrite the location variables if necessary
    • This will ensure that all installation files come from a local source
    • Note that the LogFile variable is not changed; central to all installations
  • Next a check occurs for Office 2013 installation
    • If this returns true, the script will exit without further action
  • If Office 2013 isn’t already installed, installation will begin
    • First write a registry entry on the PC which can be referenced by the Install Status Script (see below) if the user happens to log on during installation
    • Uninstall Office 2010 (a straight upgrade has been known to cause problems)
    • Uninstall Office 2013 (this will apply to PCs which had ONLY Lync installed)
    • Install Office 2013
    • Write result to a Log File
    • Reset the registry entry of installation status to signify end of installation
    • Exit script


3. Install Status Script

Because many of our installations would take place at computer Startup (the second GPO) and it would be possible for users to log onto the computer before the installation is completed (because Windows 7 doesn’t run startup scripts synchronously), I needed a way to tell the user not to open Office products while the installation was running.

My status script can be downloaded here: Office2013StartupScript (rename to .vbs)

This script is placed within all users Startup folder in the start menu, and performs the following:

  • Read the InstallingStatus value from the registry which would be set by the Office2013StartupScript.bat script
  • If the Status = 0, exit the script. If it = 1, begin a Do loop
  • While in the loop, check for the status of the registry key again
    • If Status = 1, display the HTA application. This has a timeout of 5 minutes, after which the loop will resume
    • If Status = 0, the loop ends and a final message is displayed to the user

One problem we did encounter (which isn’t really resolved yet) is that occasionally the Office 2013 installer would auto-reboot. When this occurred, it interrupted this status script, causing the “installingStatus” flag to remain active. On the next reboot, the Status window would re-appear even though no installation was taking place.


4. Install Status Window (HTA)

The HTA file I’m using to display to the user, called from the Status Script, can be downloaded here: Office2013_message(rename to .hta)


Hyper-V 2012 migration to R2

Myself and a co-worker just completed an upgrade of our 2-node Server 2012 Hyper-V cluster to a 3-node Server 2012 R2 cluster, and it went very smoothly.

I’ve been looking forward to some of the improvements in Hyper-V 2012 R2, in addition to a 3rd node which is going to be the basis for our Citrix XenApp implementation (with an nVIDIA GRID K1 GPU).

I’ve posted before about my Hyper-V implementation which was done using iSCSI as the protocol but direct connections rather than through switching, since I only had 2 hosts.

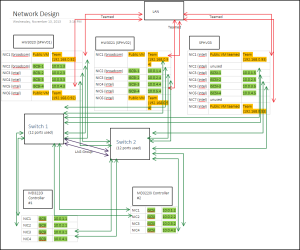
For this most recent upgrade I needed to add a 3rd host, which meant a real iSCSI SAN. Here’s the network design I moved forward with:

Server 2012 R2 Network Design
click for big


This time I actually checked compatibility of my hardware before proceeding, and found no issues to be concerned about.

The process for the upgrade is described below, which includes the various steps required when 1) renaming hosts in use with MD3220i, and 2) converting to iSCSI SAN instead of direct connect:

Before maintenance window

  • Install redundant switches in the rack (I used PowerConnect 5548’s)
  • Live Migrate VMs from Server1 to Server2
  • Remove Server1 from Cluster membership (Evict Node)
  • Wipe and reinstall Windows Server 2012 R2 on Server1
  • Configure Server1 with new iSCSI configuration as documented
  • Re-cable iSCSI NIC ports to redundant switches
  • Create new Failover Cluster on Server1
  • From Server1 run “Copy Cluster Roles” wizard (previously known as “Cluster Migration Wizard”)
    • This will copy VM configuration, CSV info and cluster networks to the new cluster

Within maintenance window

  • When ready to cut over:
    • Power down VM’s on Server2.
    • Make CSVs on original cluster Offline
    • Power down Server2
  • Remap host mappings for each server in Modular Disk Storage Manager (MDSM) to “unused iSCSI initiator” after rename of host, otherwise you won’t find any available iSCSI disks
  • Reconfigure iSCSI port IP addresses for MD3220i controllers
  • Add host to MDSM (for new 3rd node)
  • Configure iSCSI Storage on Server1 (followed this helpful guide)
  • On Server1, make CSV’s online
  • Start VMs on Server1, ensure they’re online and working properly


At this point I had a fully functioning, single-node cluster within Server 2012 R2. With the right planning you can do this with 5-15 minutes of downtime for your VMs.

Next I added the second node:

  • Evict Server2 from Old Cluster, effectively killing it.
  • Wipe and reinstall Windows Server 2012 on Server2
  • Configure Server2 with new iSCSI configuration as documented
  • Recable iSCSI NICs to redundant switches
  • Join Server2 to cluster membership
  • Re-allocate VMs to Server2 to share the load

I still had to reset the preferred node and failover options on each VM.

Adding the 3rd node followed the exact same process. The Cluster Validation Wizard gave a few errors about the processors not being the exact same model, however I had no concerns there as it is simply a newer generation Intel Xeon.


The tasks remaining for me are to upgrade the Integration Services for each of my VMs, which will require a reboot so I’m holding off for now.

Telerik ASP.NET Radcontrols

When I first began developing web applications, it was with .net 4.0, gridviews, formviews and the Microsoft Ajaxtoolkit. Since I was learning on the job, Google was my first resource when stuck on a problem and I would consistently come across unhelpful articles for RadGrid and other Telerik tools.

Now, I have Telerik ASP.NET AJAX controls at my disposal, purchased for the current web application I’m building and I’m finding them to be such an amazing resource.

Being able to quickly build something like the RadPivotGrid from scratch is an empowering experience. In some circles I’ve seen the Telerik tools get a bad rap for being buggy or heavy unnecessary code, but as a part-time developer they are quite amazing. These two screenshots show grids of information that took less than a day to build.

grid1
RadGrid with grouping
grid2
RadPivotGrid

Writing code for all these features based on the Ajax GridMenu would have been horrible and taken a drastically long time.

The Telerik support and forums are fantastic as well. A couple of times I’ve had an issue trying to build something and submitted a support ticket. I had a response a few hours later, and it actually was a helpful response!

Overall, if you’re a web developer and are building ASP.NET applications, check out the Telerik tools, they’re worth the investment.