Over Christmas I deployed a two node Hyper-V Failover Cluster with a Dell MD3220i SAN back end. Its been running for almost a month with no issues, and I’m finally finishing the documentation.
My apologies if the documentation appears “jumpy” or incomplete, as half was done during the setup, and the other half after the fact. If you’d like clarification or have any questions, just leave a comment.
Infrastructure information
I have implemented this using the following:
- 2 x Dell PowerEdge R410 servers with 2xGigE NICs onboard, and one 4 port GigE expansion card
- Dell MD3220i with 24 x 300 GB 15krpm 2.5″ SAS drives + High performance option
- Dell MD1200 with 7 x 300 GB 15krpm 3.5″ SAS drives and 5 x 2 TB 7200 near-line 3.5″ SAS drives
- No switch – since this is only two nodes, we are direct-connecting. Once we add a 3rd node, we will implement redundant switches
- Microsoft Hyper-V Server 2008 R2 (basically Server 2008 R2 Core, but free)
- Hyper-V Manager and Failover Cluster Manager (free tools from RSAT). We may eventually use System Center Virtual Machine Manager, but for an environment this small, its not necessary.
Network Design
The only hardware related information I’m going to post is in regards to the network design. Everyone’s power and physical install is going to be different, so I’ve left that out.
Only connect one LAN port from each server until you have NIC teaming set up.
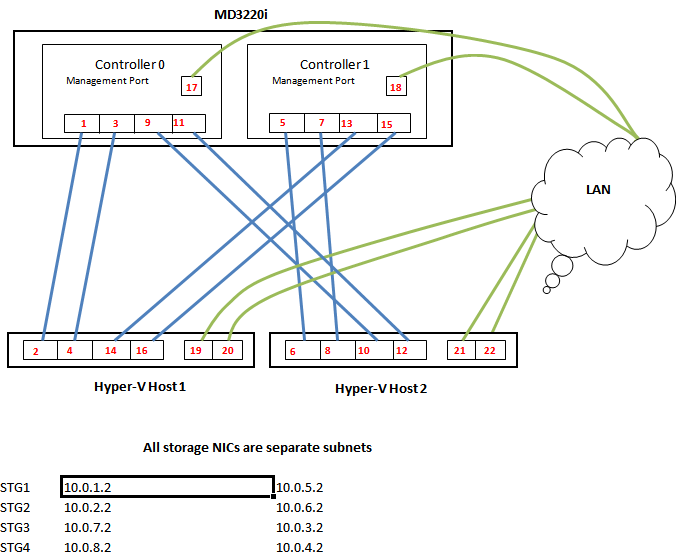
With this setup, the two onboard NICs for each host will be NIC Teamed and used as LAN connections. The 4 other NICs will be iscsi NICs, with two ports going to each controller on the MD3220i.
As you can see, each NIC has its own subnet; there is a total of 8 subnets for the iscsi storage, with 2 devices (Host NIC and Controller NIC) in each.
I tried this at one point with 3 NICs per host for iSCSI, so that the 4th would be dedicated for Hyper-V management, but I ran into nothing but problems.
Software Setup
Install OS
- Burn the latest version of Hyper-V Server 2008 R2 to two DVD’s
- Insert DVDs into each Hyper-V host, and turn on the servers. Enter the BIOS Config
- Ensure that within the BIOS, all virtualization options are enabled.
- Restart the server and ensure the two 146GB hard drives are configured in a RAID1 array. If not, correct that.
- Boot to the Hyper-V Server DVD (use F11 for Boot Manager)
- Proceed through the setup accepting defaults.
- When asked about Installation type, choose “Custom (Advanced)”
- You will need to provide a USB stick with the S300 RAID controller drivers before you can continue with setup.
- On the next screen, choose “Drive Options (advanced)”, and delete all existing partitions, unless there is a recovery partition.
- Click Next and the install will proceed.
- When the install is finished, you will need to specify an admin password.
- Then you will be presented with the following screen:
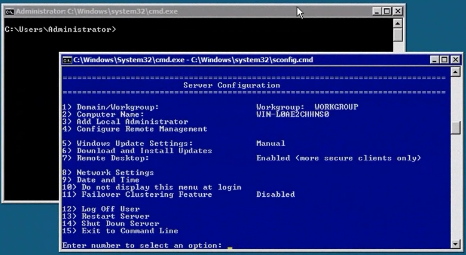
- Press 2 to change the computer name to the documented server name.
- Choose option 4 to configure Remote Management.
- Choose option 1 – Allow MMC Remote management
- Choose option 2 – Enable Windows PowerShell, then return to main menu.
- Choose option 8 – Network Settings; configure a single LAN port according to your design, so that you can remote in.
- Go back to main menu.
- Choose option 11 – Failover Clustering Feature – choose to add this. When complete, restart.
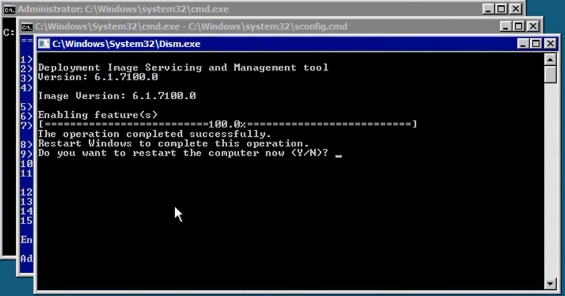
- Then we need to add the server to the domain. Press 1 and push enter.
- Choose D for domain, and press enter
- Type your domain name and press enter
- Allow installer to restart the computer.
- Choose option 6 – Download Updates to get the server up to date. (Windows Update will managed by WSUS)
- Choose All items to update.
- When complete, restart the server.
Remote Management Setup & Tools
From settings done previously, you should be able to use Remote Desktop to remote into the servers now. However, additional changes need to be made to allow device and disk management remotely.
- Start an MMC and add two Group Policy snap-in. Choose the two Hyper-V Hosts instead of local computer.
- Then on each host, navigate to:
Computer Configuration > Administrative Templates > System > Device Installation > Allow Remote access to plug and play interface (set as enabled). - Restart each Hyper-V host
The best way to manage a Hyper-V environment without SCVMM is to use the MMC snap-ins provided by the Windows 7 Remote Server Administration Tools. (Vista instructions below).
Windows 7 RSAT tools
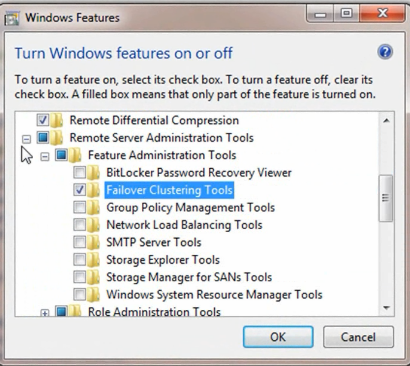
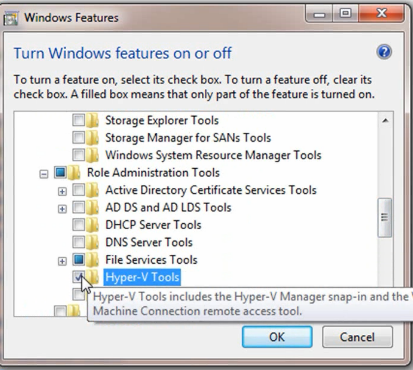
Once installed, you need to enable certain features from the package. In the Start Menu, type “Programs”, and open “Programs & Features” > “Turn Windows Features on or off”.
When you reach that window, use these screenshots to check off the appropriate options:
Hyper-V Management can be done from Windows Vista, with this update:
Install this KB: http://support.microsoft.com/kb/952627
However, the Failover Cluster Manager is only available within Windows Server 2008 R2 or Windows 7 RSAT tools.
You may also need to enable firewall rules to allow Remote Volume Management, using this command from an elevated command prompt on your client:
netsh advfirewall firewall set rule group="Remote Volume Management" new enable=yes
This command needs to be run on the CLIENT you’re accessing from as well.
NIC Setup
The IP Addresses of the storage network cards on the Hyper-V hosts needs to be configured, which is easier once you can remote into the Hyper-V Host.
NIC Teaming
With the Dell R410’s, the two onboard NICs are Broadcom. To install the teaming software, we first need to enable the dot net framework within each Hyper-V host.
Start /w ocsetup NetFx2-ServerCore
Start /w ocsetup NetFx2-ServerCore-WOW64
Start /w ocsetup NetFx3-ServerCore-WOW64
Copy the install package to the Hyper-V host, and run setup.exe from the driver install, and install BACS.
When setting up the NIC Team, we chose 802.3ad protocol for LACP, which works with our 3COM 3848 switch.
For ease of use you’ll want to use the command line to rename the network connections, and set their IP addresses. To see all the interfaces, use this command:
netsh int show interface
This will display the interfaces that are connected. You can work one by one to rename them as you plug them in and see the connected state change.
This is the rename command:
netsh int set int "Local Area Connection" newname="Servername-STG-1"
And this is the IP address set command:
netsh interface ip set address name="Servername-STG-1" static 10.0.2.3 255.255.255.0
Do this for all four storage LAN NIC’s on each server. To verify config:
netsh in ip show ipaddresses
If the installation of BACS didn’t update the drivers, copy the folder containing the INF file, and then use this command from that folder:
pnputil -i -a *.inf
If you can’t access the .inf files, you can also run the setup.exe from the command line. This was successful for the Broadcom driver update and Intel NICs.
Server Monitoring
We use a combination of SNMP through Cacti, and Dell OpenManage Server Administrator for monitoring. These Hyper-V Hosts are no exception and should be set up accordingly.
SNMP
To set up SNMP, on the server in the command line type
start /w ocsetup SNMP-SC
You’ll then need to configure the snmp. The easiest way to do this is to make a snmp.reg file from this text:
Windows Registry Editor Version 5.00

[HKEY_LOCAL_MACHINE\SYSTEM\CurrentControlSet\Services\SNMP\Parameters]
"NameResolutionRetries"=dword:00000010
"EnableAuthenticationTraps"=dword:00000001

[HKEY_LOCAL_MACHINE\SYSTEM\CurrentControlSet\Services\SNMP\Parameters\PermittedManagers]
"1"="localhost"
"2"="192.168.0.25"

[HKEY_LOCAL_MACHINE\SYSTEM\CurrentControlSet\Services\SNMP\Parameters\RFC1156Agent]
"sysContact"="IT Team"
"sysLocation"="Sherwood Park"
"sysServices"=dword:0000004f

[HKEY_LOCAL_MACHINE\SYSTEM\CurrentControlSet\Services\SNMP\Parameters\TrapConfiguration]

[HKEY_LOCAL_MACHINE\SYSTEM\CurrentControlSet\Services\SNMP\Parameters\TrapConfiguration\swmon]
"1"="192.168.0.25"

[HKEY_LOCAL_MACHINE\SYSTEM\CurrentControlSet\Services\SNMP\Parameters\ValidCommunities]
"swmon"=dword:00000004
Copy it to the server, and then in the command line type:
regedit /s snmp.reg
Then add the server as a device in Cacti and begin monitoring.
Dell OMSA
To install OMSA on Hyper-V Server 2008 R2, copy the files to the server, and then from the command line, navigate to the folder that contains sysmgmt.msi, and run this:
msiexec /i sysmgmt.msi
The install will complete, and then you can follow the instructions for setting up the email notifications which I have found from this awesome post:
http://absoblogginlutely.net/2008/11/dell-open-manage-server-administrator-omsa-alert-setup-updated/
MD3220i Configuration
The MD3220i needs to be configured with appropriate access and network information.
Before powering on the MD3220i, see if you can find the MAC Addresses for the managment ports. If so, create a static DHCP assignment for those MAC’s aligning with the IP configuration you have designed.
Otherwise, the default IP’s are 192.168.128.101 and 192.168.128.102
Remote management
The MD Storage Manager software needs to be installed to manage the array. You can download the latest version from Dell.
Once installed, do an automatic search for the array so configuration can begin.
Ensure that email notifications are set up to the appropriate personnel.
Premium Feature Enable
We have purchased the High Performance premium feature. To enable:
- In the MD Storage Manager, click Storage Array > Premium Features
- Select the High Performance feature and click Enable
- Navigate to where the key file is saved, and choose it.
Disk Group/Virtual Disk Creation
Below is an image of our disk group, virtual disk, and CSV design. What works for us may not be most suitable for everyone else.

Each virtual disk maps to a virtual machine’s drive letter.
My only concern with this setup is the 2 TB limit for a VHD. By putting our DFS shares into a VHD, we will eventually approach that limit and need to find some resolution. At the moment I decided this was still a better solution than direct iscsi disks.
MD3220i ISCSI Configuration
Configure iSCSI Host ports
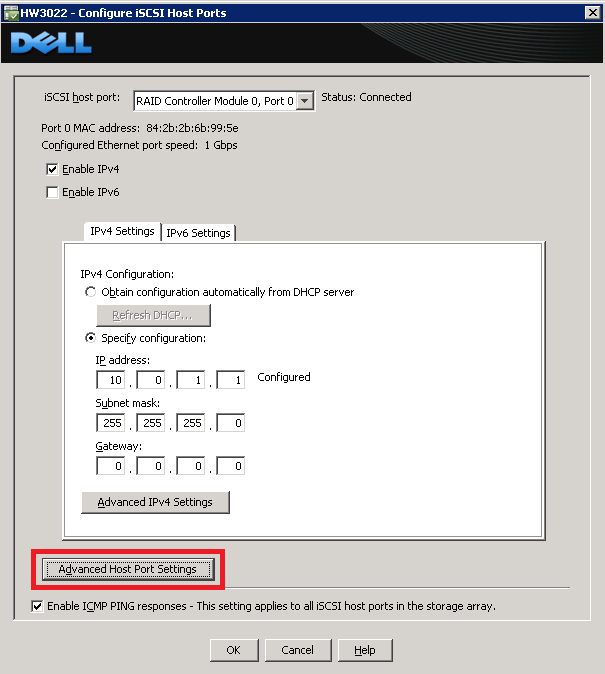
- In the Array Manager, click “Storage Array” > iSCSI > Configure Host Ports…

- In the iSCSI host port list, select the RAID controller and host port, and assign IP addresses according to your design
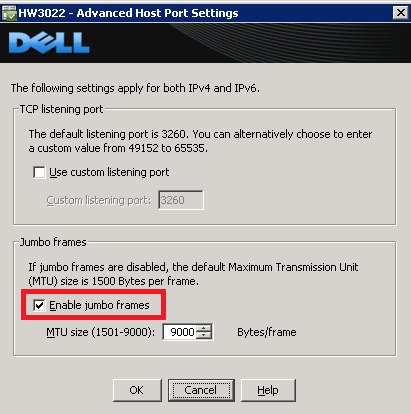
- For every port, choose “Advanced Port Settings”
- Turn Jumbo Frames on for every iSCSI port
Create Host Mappings for Disk access
- In the Array Manager, choose the “Mappings” tab
- Click “Default Group” and select Define > New Group
- Name this: Hyper-V-Cluster
- Within that group, add two new hosts. Here’s how to get the Host initiator ID:
- Log into hyper-v host, go to command prompt, type: iscsicpl
- On the Configuration tab, copy and paste “initiator name” within the MD Storage software.
Hyper-V ISCSI Configuration
- Remote into the Hyper-V hosts.
- In the command line, type and press enter (case sensitive):
start /w ocsetup MultipathIo
- Type mpiocpl
- On the second tab, check to enable iscsi support.
- Follow the MPIO driver install instructions I previously wrote about here: https://faultbucket.ca/2010/12/md3220i-mpio-driver-install-on-hyper-v/
- Reboot the server after that.
- Again on each Hyper-V host, from the command line, type iscsicpl. If prompted to start service, choose yes.
- When the iSCSI window appears, enter any IP address of the MD3220i controller, and click QuickConnect.
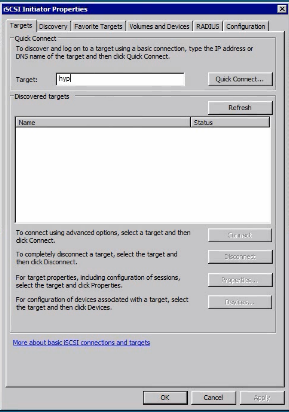
- A discovered target should appear there, with a status of “Connected”.
- Highlight that target, and select “properties”. The “Sessions” window will appear, with one session listed (I know the screenshot is wrong).
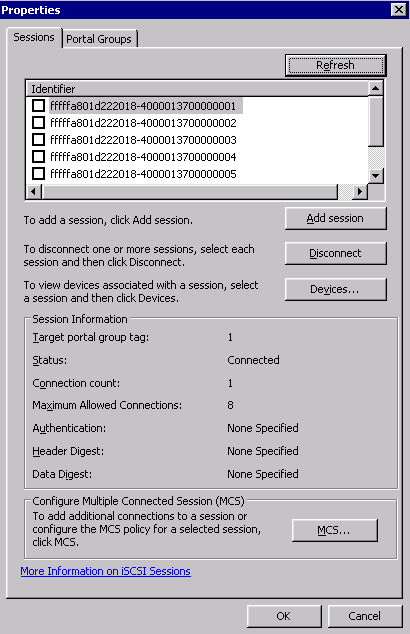
- Check that session, and click “Disconnect”, then click OK.
- On the main ISCSI window (where you clicked QuickConnect), select “Connect”
- Then check off “enable multipath”, and click Advanced
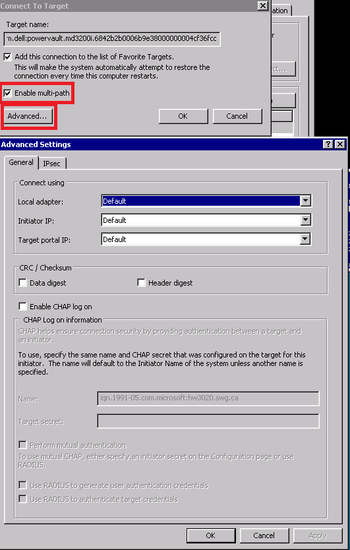
- Select the Microsoft iSCSI initiator, and then set up the appropriate source and target IP, according to the iscsi config here:
- Do this for each storage NIC on each server. There should be 4 connections per server.
- Then click the “Volumes and devices” tab, and select Auto-Configure”. You should see one entry for each disk group you made.
Now we should be able to go to disk management of a single server, create quorum witness disk and your simple volumes.
Disk Management
If you haven’t performed the steps in the Remote Management & Tools section, do so now.
- Create an mmc with Disk Management control for one Hyper-V host
- You will see your 3 disks within this control, as offline and unallocated.
- You want to initialize them as GPT devices, and create a simple volume with all the space used.
- Name the 2GB one (which was created during disk group setup on the MD3220i) as Quorum.
Those steps only need to be applied to a single server, since its shared storage.
Further disk setup happens after the Failover Cluster has been created.
Storage Network Config and Performance changes
Jumbo Frames
To enable jumbo frames, I followed the instructions found here:
http://blog.allanglesit.com/2010/03/enabling-jumbo-frames-on-hyper-v-2008-r2-virtual-switches/
Use the powershell script from there, for each network card. This MUST be done after IP addresses have been assigned.
To use the powershell script, copy it to the server, and from the command line run:
./Set-JumboFrame.ps1 enable 10.0.0.1
Where the IP address is correct for the interface you want.
Virtual Network Setup
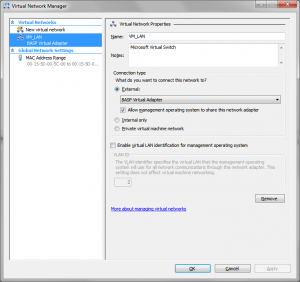
On each host, configure using Hyper-V Manager.
Create new virtual network of external type, bond it to NIC’s dedicated to external LAN access. Ensure that you enable management on this interface.
Virtual Network names must match between Hyper-V hosts.
You may need to rename your virtual network adapters on each Hyper-V host afterwards, but IP addresses should be applied correctly.
Failover Clustering Setup
- Start Failover Cluster Manager
- “validate a configuration”
- Enter the names of your Hyper-V hosts
- Run all tests
- Deal with any issues that arise.
- Choose “Create a cluster”
- Add Hyper-V host names
- Name the Cluster, click next.
- Creation will complete
Network Creation
- Go to Networks, and you’ll see the storage and Virtual NICs that you have configured.
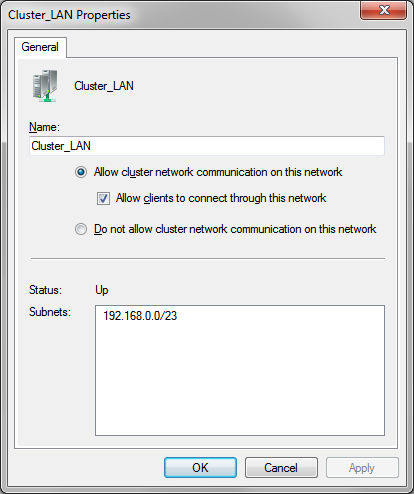
- Modify the properties of the storage NICs to be named logically, and select “Do not allow cluster network communication on this network”.
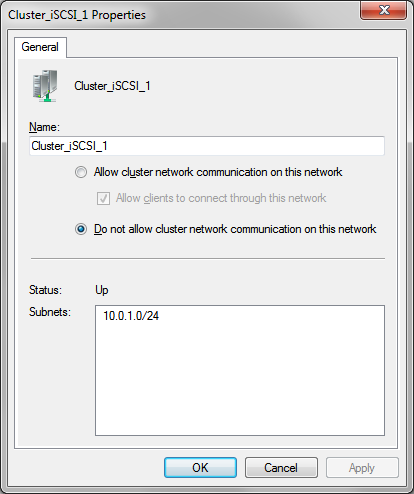
- Modify the properties of the virtual LAN NIC to be named logically, and select “Allow clients to connect through this network”.
Cluster Shared Volumes
- Right click Cluster, “Enable cluster shared volumes”.
- Choose “Cluster Shared Volumes”, click “add storage” and check off existing disks.
Other Settings
Within Hyper-V Manager, change default store for virtual machine to the cluster storage volumes (CSV) for each host.
- This path will be something like: C:\ClusterStorage\Volume1\…
To test a highly available VM:
- Right click Services and Applications > New Virtual Machine,
- Ensure it’s stored in the CSV.
- Finish the install, it will finish the High Availability Wizard.
Can set a specific network to use for Live Migration within each VM properties.
Enable heartbeat monitor within the VM properties after the OS Integration tools are installed.
Videos and Microsoft Documentation
Hyper-V Bare Metal to Live Migration in about an hour
Hyper-V Failover & Live Migration
http://technet.microsoft.com/en-us/edge/6-hyper-v-r2-failover–live-migration.aspx?query=1
Technet Hyper-V Failover Clustering Guide
http://technet.microsoft.com/en-us/library/cc732181(WS.10).aspx
Issues I’ve experienced
Other than what I discovered through the setup process and have included in the documentation, there were no real issues found.
Oddly enough, as I was gathering screenshots for this post, remoting into the servers and using the MMC control, one of the Hyper-V hosts restarted itself. I haven’t looked into why yet, but the live migration of the VM’s to the other host was successful, without interrupting the OS or client access at all!
Nothing like trial by fire to get the blood pumping.
