ARM Template – reference existing resources

Despite being a rather organized person in my professional life, I begin learning new topics and technologies in quite the opposite manner.

As I begin to dive into Azure automation, today I wanted to understand the proper syntax to deploy small resources with an ARM template while referencing existing resources, rather than what is declared and built within the JSON file itself.

This Azure Quickstart template was very valuable as I spent some time exploring this.

The basic idea:

  • Virtual Network and Subnet already exist
  • Add Network Interface through ARM template

Once I wrapped my head around the proper way to input the names of existing resource group, virtual network, and subnet, it all kind of clicked for me.

Resource Group is defined during the PowerShell command that calls the JSON file (I’ll show this at the bottom of this post). Parameters are built to accept simple text strings of the virtual network name and subnet name that I’m targeting. Then I used these parameters to build a variable for the subnet, and used that variable in the resource declaration for the network interface.

Here’s the JSON:

{
    "$schema": "https://schema.management.azure.com/schemas/2015-01-01/deploymentTemplate.json#",
    "contentVersion": "1.0.0.0",
    "parameters": {
        "virtualNetworkName": {
            "type": "string",
            "metadata": {
                "description": "Type existing virtual network name"
            }
        }
        ,"subnetName": {
            "type": "string",
            "metadata": {
                "description": "Type existing Subnet name"
            }
        }
    },
    "variables": {
        ,"subnetRef": "[resourceID('Microsoft.Network/virtualNetworks/subnets', parameters('virtualNetworkName'), parameters('subnetName'))]"
    },
    "resources": [
        {
            "apiVersion": "2015-06-15",
            "type": "Microsoft.Network/networkInterfaces",
            "name": "WindowsVM1-NetworkInterface",
            "location": "[resourceGroup().location]",
            "tags": {
                "displayName": "WindowsVM1 Network Interface"
            },
            "properties": {
                "ipConfigurations": [
                    {
                        "name": "ipconfig1",
                        "properties": {
                            "privateIPAllocationMethod": "Dynamic",
                            "subnet": {
                                "id": "[variables('subnetRef')]"
                            }
                        }
                    }
                ]
            }
        }

    ],
    "outputs": {}
}
To deploy this, I make a connection to Azure PowerShell, and ran:
New-AzureRmResourceGroupDeployment -ResourceGroupName "Group1" -TemplateFile "C:\Azure\Templates\NewSubnet.json"
This prompts me for my two parameters, which I could set defaults for in the JSON or provide a parameter file and use that in the deployment command as well.
Next up – deploy a full VM with managed disks attaching to existing resources, and then working into Desired State Config.

Terraform – Import Azure Resources

One of the first uses I’ll have for Terraform in my work will be adding resources to an existing environment – an environment for which Terraform has no state information. This means when I’m declaring the new VMs and want to tie it to a Resource Group, Terraform won’t have a matching resource for that.

Today I’ve been playing around with Terraform import in my sandbox to become familiar with the process. In my sandbox I have an existing Resource Group, Virtual Network, and Subnet. I intended to add a simple network interface, tied to an already-existing subnet.

To begin, I declared my existing resources in my .TF file as I would want them to exist (technically matching how they exist right now):

resource "azurerm_resource_group" "Client_1" {  
 name = "Client_1"
 location = "${var.location}"
 }

resource "azurerm_virtual_network" "Client1Network" {
 name = "Client1Network"
 address_space = ["10.1.0.0/16"]
 location = "${var.location}"
 resource_group_name = "${azurerm_resource_group.Client_1.name}"
 }

resource "azurerm_subnet" "Web" {
 name = "Web"
 resource_group_name = "${azurerm_resource_group.Client_1.name}"
 virtual_network_name = "${azurerm_virtual_network.Client1Network.name}"
 address_prefix = "10.1.10.0/24"
 }

Then for each of them I gathered the Resource ID in Azure. For the resource group and virtual network this was simple enough; find the Properties pane and copy the string that was there:

For the Subnet, there wasn’t an easy GUI reference that I could find, so I turned to Azure PowerShell, which output the ID I needed:

$vmnet = get-azurermVirtualnetwork | where {$_.Name -eq "Client1Network" }

get-azurermvirtualnetworksubnetconfig -virtualnetwork $vmnet

Then I used the Terraform “import” command along with the resource declaration and name in my file, and the resource ID from Azure:

terraform import azurerm_resource_group.Client_1 /subscriptions/f745d13d/resourceGroups/Client_1/providers/Microsoft.Network/virtualNetworks/Client1Network

I repeated the process for the resource group, virtual network, and subnet.

Then I added the resource declartaion in my .TF file for the network interface I wanted to add:

resource "azurerm_network_interface" "testNIC" {
 name = "testNIC"
 location = "${var.location}"
 resource_group_name = "${azurerm_resource_group.Client_1.name}"
 ip_configuration {
 name = "testconfiguration1"
 subnet_id = "${azurerm_subnet.Web.id}"
 private_ip_address_allocation = "dynamic"
 }
}

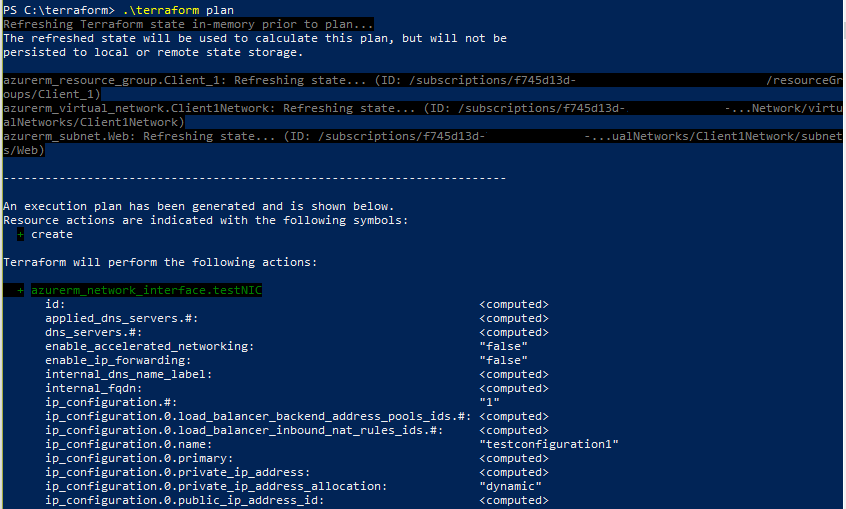
Then I performed a “terraform plan”, which showed me the resource it detected needing to be created:


Once I completed the “terraform apply”, the resource was created and visible within my Azure portal.


Azure SkuNotAvailable during Terraform apply

I ran into some issues when actually attempting to apply my first Terraform template, specifically errors related to the location I had chosen:

* azurerm_virtual_machine.test: compute.VirtualMachinesClient#CreateOrUpdate:
Failure sending request: StatusCode=409 -- 
Original Error: failed request: autorest/azure: Service returned an error. 
Status=<nil> Code="SkuNotAvailable" 
Message="The requested size for resource '/subscriptions/f745d13d/resourceGroups/HelloWorld/providers/Microsoft.Compute/virtualMachines/helloworld' is currently not available in location 'WestUS' zones '' for subscription 'f745d13d'. 
Please try another size or deploy to a different location or zones. 
See https://aka.ms/azureskunotavailable for details."

This didn’t make much sense to me, because I was using a very normal VM size (like Standard_A2 or something) and it was definitely available in WestUS.

The key to solving was when I use the Azure Shell (powershell) to run this:

Get-AzureRmComputeResourceSku | where {$_.Locations.Contains("WestUS")}

The output of this command:

Displays azure locations for my subscription

Turns out for my Subscription (Visual Studio Enterprise – MPN), WestUS is restricted to very few VM sizes (note the “NotAvailableForSubscription” items). When I target WestUS2 or EastUS, then there’s quite a bit more choice.

Terraform – first experience

Having access to an Azure credit through my workplace, I’ve begun training and testing various things within Azure, and recently I was looking at ARM templates for VM deployment. This research led me to stumble across Terraform as an infrastructure-as-code deployment tool.

I started messing around with Terraform to deploy a basic set of Azure resources using these two guides:

Using Peter’s example was great, although I had to make a few tweaks since the module syntax has changed. In the near future I’ll post a full example of what I used recently for my first template. Terraform documentation has been excellent as I’ve worked through syntax and various examples, which is a great surprise.

I’ve found that I appreciate building a template in Terraform much more than an ARM template. Part of this is the easier syntax and readability, and the logical manner that I’ve seen others use Terraform .tf files for segregating resource deployment.

I think that the other primary factor is because declarative Terraform is what I’ve seen referred to as “idempotent” – a new word for me I’ve only ever seen used in this context. The answer on this StackOverflow question gives a great description of this context, and its clearly descriptive of how Terraform operates.

If I build an ARM template and apply it, it will deploy the resource as I’ve described it. And then if I apply that template again, it will attempt to build another of that resource. And if I modify the template and apply it again, it will attempt to create that slightly modified resource, leaving me with 3 different resources.

Terraform instead gives the ability to declare “what I want it to look like”, and ensures that the actual state matches the declared state. There are genuinely good reasons to use both approaches but right now this idempotent-style of deployment is new and attractive to me.

Soon on the horizon in my sandbox is to utilize remote state in an Azure blob storage to facilitate team work within one environment.

Update Quest RapidRecovery Agents silently

I’m in the process of upgrading AppAssure 5.4.3 agents to the latest version of Rapid Recovery, 6.1.3. This is done following the Core upgrade.

So far my progress has been pretty seamless. In testing I confirmed that I could push the install with a “No Reboot” force, and the agent would continue to operate normally until the next system reboot (which will occur as part of monthly Windows Updates).

This script is in no way ‘complete’, as in it could be made much better. Additional logging on success or failure, parallel processing, etc could all be done -however for simple purposes it worked quite well.

# begin a transcript to log the output to file
Start-Transcript C:\Temp\AgentUpgradeLog.txt
# Define the list of systems to update
# Gather list of older version from Rapid Recovery Licensing Portal
$systems = Get-Content -Path C:\Temp\AgentServers.txt

foreach($system in $systems) {
#Write-Host "Testing connectivity to $system"
$rtn = Test-Connection -CN $system -Count 1 -BufferSize 16 -Quiet

IF($rtn -match 'True'){
 Write-Host "ALIVE - $System"
 copy C:\Temp\Agent-X64-6.1.3.100.exe \\$system\c$\temp -confirm:$false
 $executable = "C:\temp\Agent-X64-6.1.3.100.exe"
 $session = New-PSSession -ComputerName $system 
 # Key here is the /silent and reboot=never switches
Invoke-Command -Session $session -ScriptBlock {Start-Process $using:executable -ArgumentList "/silent reboot=never" -Wait}
 remove-pssession $session
 Write-Host "$System - upgrade steps completed"
 sleep 5
# Found that we had agent services not starting following the upgrade
 get-service -name "RapidRecoveryAgent" -computername $system | Start-Service
 }

else
 {
 Write-Host "DOWN - $System"
 }

}

Stop-Transcript