Azure KMS and NSGs

A co-worker recently posed a question to me regarding virtual machines in Azure – “how do they activate Windows?”

The short answer is through KMS – using a KMS key and “kms.core.windows.net:1688”. You can see this on an Azure VM by typing:

slmgr /dlv

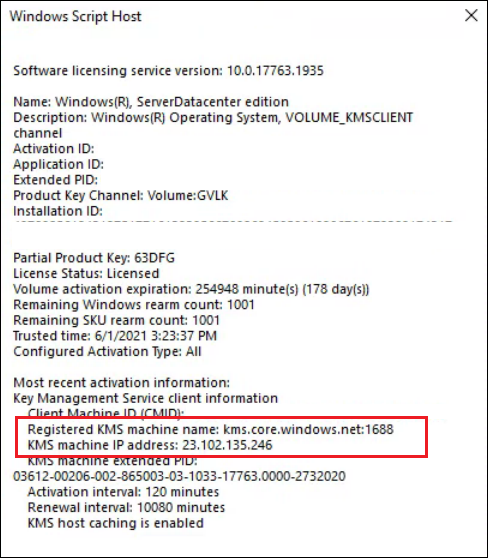
The functionality of KMS within Azure isn’t well documented, but there are buried references to things like:

The IP address of the KMS server for the Azure Global cloud is 23.102.135.246. Its DNS name is kms.core.windows.net.

This is a singular IP used globally, and from that same doc, “requires that the activation request come from an Azure public IP address.”


This leads to another question – “In an environment with deny-by-default outbound rules, how does KMS communicate?”

The short answer here is, “Magic?”

Lets say I have an NSG attached to a subnet, with the following outbound rules:

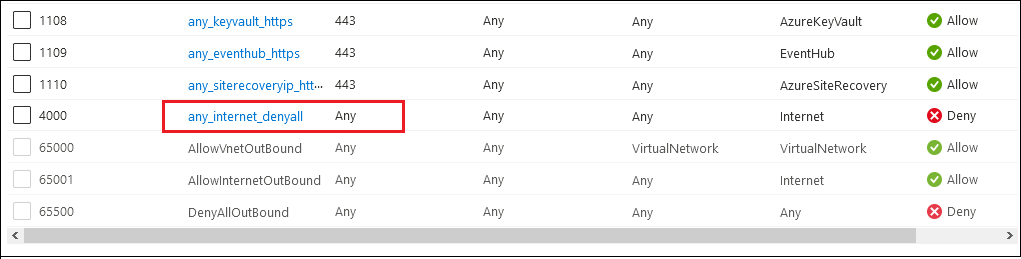
There is nothing specifically allowing access to the “kms.core.windows.net” IP address, but there IS a deny rule to the Internet Service Tag, so I would expect this traffic to be denied.

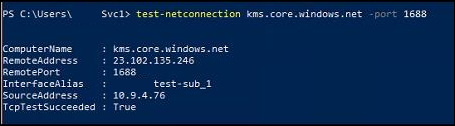
But a Test-NetConnection succeeds!

I check Network Watcher, with the IP Flow Verify tool. It says that this traffic will be denied by my Internet deny rule.

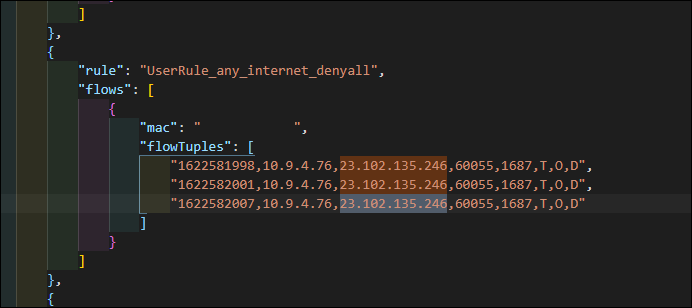
I check the NSG Flow Logs, and surprisingly I see zero references to my traffic on ANY rules! But, if I change my Test-NetConnection to a different port (say 1687), then it does appear as denied:


What is happening here?

I have yet to find anything authoritative in Microsoft’s documentation or any related GitHub issue. But based on what has been tested and the existing documents, I think that there is a hidden default NSG rule (likely below priority 100) which is configured to not be visible or logged (even from Network Watcher!) but allows traffic despite my own best efforts to block it.

This is operating effectively the same way that Azure DNS does, I believe – the IP address 168.63.129.16 is always reachable, regardless of the NSG rules you put in place.

There can be exceptions to that statement – there is a Service Tag named AzurePlatformLKM, which can be used to “disable the defaults for licensing” – I believe (but haven’t yet tested) that using this Service Tag in a deny rule would effectively block this traffic on 1688.

Add Maintenance Configuration to Azure Dedicated Host issue

When using Azure Dedicated Hosts, Microsoft offers a way to have more control over maintenance events that occur on the host. This is done through “Maintenance Control” configuration objects.

I’m attempting to test this, and have been receiving failures that I need to investigate.

To start, I created a host group and a host in the Azure Portal. Then I created a maintenance configuration.

Now when I go into the Maintenance Configuration and try to assign my Host, the activity fails:


After a few minutes, this shows up in the Hosts activity log:


With this detail:


I have two assumptions to test at this point:

  1. Maybe something is broken in the portal, because the error indicates it is trying to create an assignment with “dummyname” which doesn’t look right
  2. Perhaps a VM must be assigned to the Dedicated Host before a Maintenance Configuration can be assigned to it

I wanted to test #1 before #2 to reduce the number of variables, and I used Az PowerShell to do so.

First, I Get-AzMaintenanceConfiguration:

Then I create an assignment, using PowerShell splatting:

$AssignmentParams = @{
	ResourceGroupName 			= $resourcegroupname
	ResourceParentType 			= "hostGroups"
	ResourceParentName 			= "eastus2-hostgroup"
	ResourceType 				= "hosts"
	ResourceName 				= "eastus2-host1"
	ProviderName				= "Microsoft.Compute"
	ConfigurationAssignmentName             = "$($config.name)-host1"
	MaintenanceConfigurationId 	        = $config.Id
	Location 				= $config.location
}

New-AzConfigurationAssignment @AssignmentParams

Surprisingly this seemed to work, with no errors output. I say surprisingly, because I’m sure I tested this with errors last week before I decided to sit down and write a blog post about it!

Performing a Get-AzConfigurationAssignment with a smaller set of parameters in a hashtable returns the assignment that I expect to see:

$GetAssignmentParams = @{
	ResourceGroupName 			= $resourcegroupname
	ResourceParentType 			= "hostGroups"
	ResourceParentName 			= "eastus2-hostgroup"
	ResourceType 				= "hosts"
	ResourceName 				= "eastus2-host1"
	ProviderName				= "Microsoft.Compute"
}
Get-AzConfigurationAssignment @GetAssignmentParams


When I look in the Portal, I can see the assignment on the Host:


And it also appears when looking at the Maintenance Configuration too:


Azure Availability Zones and latency testing

While working on a design for virtual machine placement in Azure, I got to wondering about specifics of Availability Zones and the potential performance impacts of not actually choosing one. My findings below are a little bit conjecture at this point, not having found direct confirmation from Microsoft on the topic.

Availability Zones are a method within Azure to provide resiliency for resources by using multiple datacenters within a region.

Resources within Azure can be one of 3 types related to these zones:

  • Zonal services – where a resource is pinned to a specific zone (for example, virtual machines, managed disks, Standard IP addresses), or
  • Zone-redundant services – when the Azure platform replicates automatically across zones (for example, zone-redundant storage, SQL Database).
  • None – not actually documented (yet?) but this is the type when you have a Zonal service but do not select a zone.

The last item there is of particular interest – if you don’t select a zone for a Zonal service, where does it go? This issue from Microsoft Docs has a description of an “allocator” that works behind the scenes to make a decision on zone placement, but that is never surfaces to you; not even available in the Azure Resource Explorer.

For example, here’s a snipped of the metadata available for a VM with a specific Zone placement:

And here’s one without any at all:

This led to some questions for me:

  1. Am I losing performance (higher latency) by not setting my VMs in the same zone (if they happen to be placed in separate zones by the “allocator”)?
  2. Will I be charged for bandwidth between zones when billing begins on July 1, 2021 for it, if my VMs don’t have a zone selected but get placed in separate zones?

I’ve asked #2 in an Issue on the doc, and hopefully will receive an answer. I set out to test #1 within EastUS2.

Starting with Microsoft’s recommendation for latency testing on a virtual network, I downloaded the “latte.exe” tool and spun up some VMs.

The advantage of this tool, according to Microsoft, is:

latte.exe (for Windows) can isolate and measure network latency while excluding other types of latency, such as application latency.

Other common connectivity tools, such as Ping … employ the Internet Control Message Protocol (ICMP), which can be treated differently from application traffic and whose results might not apply to workloads that use TCP and UDP.

The output of this tool looks like this, and it is the Latency value we’re after:

While running multiple tests on idle VMs, I found a discrepancy of ~20-30 us between tests, so take that into account when viewing the results below.

Here’s some of the results that I found:

Test Result (us)
2 VMs, same availability zone, accelerated networking is false: 340
2 VMs, same availability zone, accelerated networking is true: 169
2 VMs, different availability zone, accelerated networking is false: 397
2 VMs, different availability zone, accelerated networking is true: 150
2 VMs, no availability zone selected, accelerated networking is false: 427
2 VMs, no availability zone selected, accelerated networking is true: 144
2 VMs, same availability zone, accelerated networking is true, proximity placement group aligned: 158


It doesn’t seem right, but the conclusion that I draw from this is that the latency between availability zones (at least in EastUS2) is functionally equivalent to within a zone, and even within a proximity placement group, which is supposed to improve even more.

I don’t have a good explanation for these results yet – perhaps my testing is flawed in some way, or perhaps this is specific to EastUS2 and the differences are more varied in other Regions where the datacenters are further apart, or consist of more datacenters within each zone itself.


VMM stuck logical network on NIC

I ran into an issue while setting up a new Hyper-V server in System Center VMM yesterday. I’m using a Switch Independent team on the server, and while I configured it on the host first, I started going down the path of setting up the networking using VMM components, like uplink port profiles and logical switches. At one point I decided to revert back to my original configuration, but I found that my new logical switch had a dependency on my host, despite removing all visible configuration.

The only thing odd about this host that I could see was that on the NIC used for the Hyper-V virtual switch, it was pinned to a logical network and greyed out; I couldn’t remove it:

This is a server in a cluster, and the second host didn’t exhibit the same problem. I decided to check off a logical network on a different NIC, and then hit the “View Script” button to see the PowerShell that VMM generated, to try and reverse engineer what was happening.

The PowerShell used the cmdlets “Get-SCVMHost”, “Get-SCVMHostNetworkAdapter”, and “Set-SCVMHostNetworkAdapter”. After following those through, I ended up with a command to remove the logical network from my NIC:

Set-SCVMHostNetworkAdapter -VMHostNetworkAdapter $vmhostnetworkadapter -RemoveLogicalNetwork $logicalNetwork

However, this produced an error:

Set-SCVMHostNetworkAdapter : The selected host adapter ‘Intel(R) Ethernet 10G 4P X520/I350 rNDC #2$$$Microsoft:{F17CF86F-A125-4EE7-9DB3-0777D9935BA4}’ has an uplink
port profile set configured with network sites, so logical networks, IP subnets, or VLANs cannot be directly modified on the host network adapter. (Error ID: 25234)

When I viewed the dependency on the Uplink Port Profile, it displayed my server name; but I couldn’t see this uplink port profile anywhere in the GUI for the server.

Reviewing the docs on the “Set-SCVMHostNetworkAdapter” led me to another switch: RemoveUplinkPortProfileSet

Here’s the full PowerShell I used to remove this, which allowed me to remove my logical switch and uplink port profile.

$vmHost = Get-SCVMHost -Computername "hostname"
#Get-SCVMHostNetworkAdapter -VMHost $vmHost | select name, connectionName # Find the NIC by connectionName, so I can use the real name in the next command
$vmHostNetworkAdapter = Get-SCVMHostNetworkAdapter -VMHost $vmHost -name "Intel(R) Ethernet 10G 2P X520 Adapter"
$logicalNetwork = Get-SCLogicalNetwork -Name "logical network name"
Set-SCVMHostNetworkAdapter -VMHostNetworkAdapter $vmhostnetworkadapter -RemoveUplinkPortProfileSet


Migrate Azure Managed Disk between regions

This post is a reference for needing to move an Azure Managed Disk between regions. It is based on this Microsoft Docs article.

There are legacy posts containing information to use Az PowerShell to basically do a disk export to blob storage (with a vhd file) and then import that.

This procedure skips those intermediate steps, and uses AzCopy to do it directly.

If there’s no active data changing on the disk, you could consider taking a snapshot and then producing a new Managed Disk from your snapshot to perform the steps below – this way you wouldn’t need to turn off the VM using the Disk. However, the situations where this might be viable are probably rare.

You will need to:

First, shut down and deallocate your VM.

Then open a PowerShell terminal and connect to your Azure subscription.

Then populate this script, and execute each command in sequence.

# Name of the Managed Disk you are starting with
$sourceDiskName = "testweb1_c"
# Name of the resource group the source disk resides in
$sourceRG = "test-centralus-rg"
# Name you want the destination disk to have
$targetDiskName = "testweb1_c"
# Name of the resource group to create the destination disk in
$targetRG = "test-eastus2-rg"
# Azure region the target disk will be in
$targetLocate = "EastUS2"

# Gather properties of the source disk
$sourceDisk = Get-AzDisk -ResourceGroupName $sourceRG -DiskName $sourceDiskName

# Create the target disk config, adding the sizeInBytes with the 512 offset, and the -Upload flag
# If this is an OS disk, add this property: -OsType $sourceDisk.OsType
$targetDiskconfig = New-AzDiskConfig -SkuName 'Premium_LRS' -UploadSizeInBytes $($sourceDisk.DiskSizeBytes+512) -Location $targetLocate -CreateOption 'Upload'

# Create the target disk (empty)
$targetDisk = New-AzDisk -ResourceGroupName $targetRG -DiskName $targetDiskName -Disk $targetDiskconfig

# Get a SAS token for the source disk, so that AzCopy can read it
$sourceDiskSas = Grant-AzDiskAccess -ResourceGroupName $sourceRG -DiskName $sourceDiskName -DurationInSecond 86400 -Access 'Read'

# Get a SAS token for the target disk, so that AzCopy can write to it
$targetDiskSas = Grant-AzDiskAccess -ResourceGroupName $targetRG -DiskName $targetDiskName -DurationInSecond 86400 -Access 'Write'

# Begin the copy!
.\azcopy copy $sourceDiskSas.AccessSAS $targetDiskSas.AccessSAS --blob-type PageBlob

# Revoke the SAS so that the disk can be used by a VM
Revoke-AzDiskAccess -ResourceGroupName $sourceRG -DiskName $sourceDiskName

# Revoke the SAS so that the disk can be used by a VM
Revoke-AzDiskAccess -ResourceGroupName $targetRG -DiskName $targetDiskName


When you get to the AzCopy step, you should see results something like this:

In my experience, the transfer will go as fast as the slowest rated speed for your managed disk – the screenshot above was from a Premium P15 disk (256 GB) rated at 125 MBps (or ~ 1 Gbps).