Replace Network Printers

I recently went through a Print Server replacement, and wanted to simplify the process for my staff. Our printer connections are quite variable, so we do not push them out through Group Policy but instead let staff connect to printers they have permission for on an as-needed basis.

I wanted a method of re-assigning connections from the old print server to the new one, and I found such a method here:

http://chris-nullpayload.rhcloud.com/2014/06/powershell-login-script-to-update-printer-mappings-and-keep-the-default-printer

Chris (above) in turn had sourced his script from Boe here and added a line for retaining the default printer.

https://learn-powershell.net/2012/11/15/use-powershell-logon-script-to-update-printer-mappings/


However, I ran into a problem with Chris’ script where it would keep reporting and error that the SetDefaultPrinter vbscript couldn’t find a printer with the specified name.

A few quick tests showed that the result produced in the $default variable can’t be referenced by ShareName, but must rather use the “Name” of the printer to set the default.

Thus, I modified the last line to look like this:

(New-Object -ComObject WScript.Network).SetDefaultPrinter("\\$($newPrintServer)\" + $($default.ShareName))

I see now that the second comment on Chris’ post by Andy produces this same result.
Azure Application Proxy permission requirement

My current role has recently expanded to include interaction with Azure, and in this process I came across a permission issue in being able to fully manage Azure AD Application Proxy components.

My administrative account was granted “Co-Administrator” permissions across the Azure subscription by our global team, which was thought to be all that is required to fully managed the components I needed access to.

However, in attempting to set up a new Azure AD Application Proxy, I found that some things were out of place.

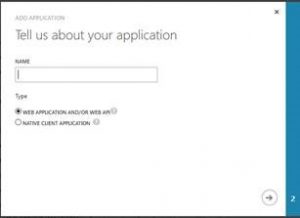
Using the Classic portal, I navigated to the Azure AD application list, and clicked Add. Based on documentation and other’s experience, I expected to see a window posing the “What do you want to do?” question. Instead, I was only give the very next screen for a standard application, “Tell us about your application”:

application

In troubleshooting this issue, I eventually found that I could not use the new portal (portal.azure.com) to view Enterprise Applications, with an error of “You don’t have access to this data. Please contact your global administrator to get access.”

A bit further research eventually led me to this Azure article regarding user roles within AD: https://azure.microsoft.com/en-us/documentation/articles/active-directory-assign-admin-roles/

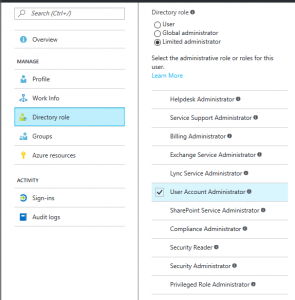
This seemed to be the root of the problem, as when I viewed my administrative user account within Azure AD, it’s Directory Role was listed as a Limited Administrator, with “User Account Administrator” as the granted role:

application_role

My global team Changed this to “Global Administrator”, which has opened up the Enterprise Applications blade to me and allowed me to configure Application Proxy. I’m not sure which individual role would also grant the same privileges; perhaps none of them.

Commvault Network Throttle

I’ve been struggling for a while trying to get my configuration set properly to avoid WAN saturation with Commvault. There are two key areas I’ve been focusing on:

  1. Aux Copies between media agents
  2. Client to Media Agent backups

I wasn’t fully thinking about the conflict between these two goals which was the root of my problem.

MediaAgent_1 and MediaAgent_2 are geographically separate across the WAN, with a 30Mbps effective connectivity.

Client_1 and Client_2 are geographically separate, and back up to MediaAgent_1. Each has a 6Mbps link.

In my previous configuration, I applied absolute Send/Receive throttling on the Media Agents to accomodate the Aux Copy, at 20Mbps limit, and similar throttling on the Client configuration at 3Mbps.

As much as it doesn’t make sense, I believe what was causing the problem is that the MediaAgent was set to receive at 20Mbps which overrode the “send” setting on the Client.

So here’s what I have successfully configured now:

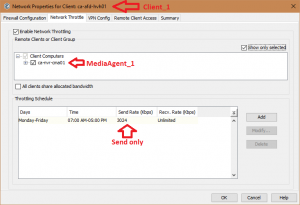
MediaAgent_1: Select MediaAgent_2 as “remote client”, with absolute SEND throttling of 20Mbps

MediaAgent_2: Select MediaAgent_1 as “remote client”, with absolute SEND throttling of 20Mbps

Client_1: Select MediaAgent_1 as “remote client”, with absolute SEND throttling of 3Mbps

Client_2: Select MediaAgent_1 as “remote client”, with absolute SEND throttling of 3Mbps

Commvault Network Throttle settings

Now running backups during the day isn’t causing extreme saturation of my WAN links!

DWG icon in Windows Explorer missing

I finally resolved a long-standing issue for one user that was minor but quite annoying.

At some point the icon within Windows Explorer for DWG files stopped appearing; instead it gave the odd image when an icon is assigned but not found.

There had been many attempts to reset this using the “Open With” dialog, and the File Associations within Windows, to no avail.

Next I turned to the FileTypesMan program to see if I could reset the association. I could see that the .dwg file type was associated with AutoCAD.Drawing.20 and had an appropriate icon assigned, however the UserChoice setting was stuck on AutoCAD.Drawing.19 and whenever I tried to change this, it would provide an “Access is denied” error.

Eventually I discovered the UserChoice setting is stored in the registry here:

HKCU\Software\Microsoft\Windows\CurrentVersion\Explorer\FileExt\.dwg\UserChoice

The permissions on that key had a special entry to Deny access for my user account; when removed I was able to use the FileTypesMan to re-associate the UserChoice with AutoCAD.Drawing.20 and the icon re-appeared.

Deploy VPN connection remotely

Here’s what I’ve developed to push a VPN client connection within Windows networking to remote PCs. One flaw is that this is user-based; I’m not sure if it could be applied to all users.

  1. Create a VPN connection with your desired settings on a template workstation
  2. Navigate to %appdata%\Microsoft\Network\Connections\Pbk
  3. Copy “rasphone.pbk” to a central source
  4. Either distribute that .pbk file directly to users to double-click on, or drop it into the same folder on their profile as it was originally retrieved from.

This .pbk file doesn’t store user credentials, so you will need to inform your user of those in advance.