Azure Monitor Alert rule not stopping

I discovered something interesting while working with Azure Monitor alert rules recently.

If you have an alert that is firing based on a condition, it will continue to fire until the condition is cleared, even if the alert rule itself is modified, disabled, or even deleted.

Here’s the example:

I have a B-Series VM, and want to alert on the “CPU Credits Remaining” metric, to pro-actively catch intervals when CPU usage is causing credit exhaustion and thus reduced compute capacity.

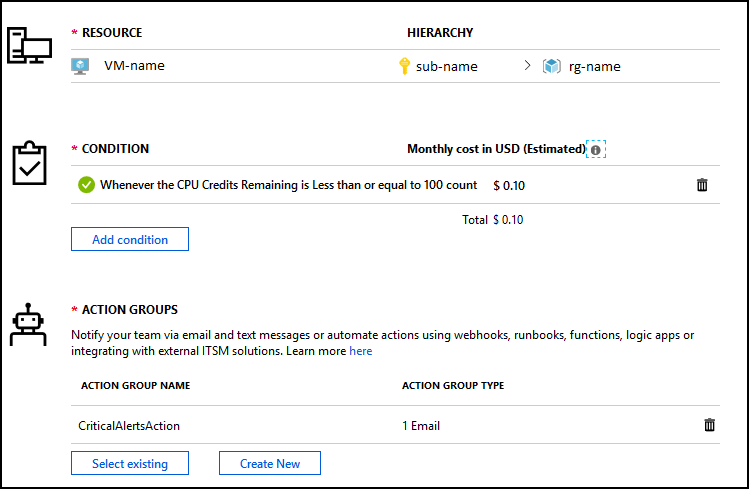
I created an Alert Rule to fire when the “CPU Credits Remaining” to fire when the value is 100 or less. It was configured with a frequency of 1 minute and a period of 5 minutes (because I wasn’t thinking of the implications at the time).

This worked just great for a while! And then a rogue Windows Update process got stuck consuming 60% of the CPU for a period of time, and the credit count dropped all the way to zero.

The alert began to fire as expected, once per minute, which quickly became excessive and drowned a bunch of mailboxes in alert-overload.

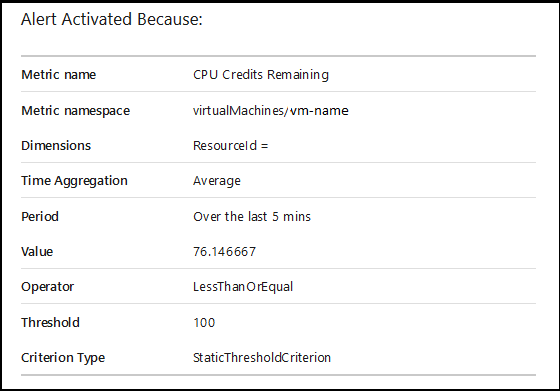
“Ok, lets just disable the alert” – nope, it continued to fire. I modified the rule so that the frequency and period were much greater. However, the email alerts received continued to reflect the original values:

Even deleting the rule did not stop the alerts from triggering.

Interestingly, if I modified the action group to use a different target email address, that was immediately effective. This allowed me to black-hole the emails until I had resolved the CPU utilization problem and waiting until the credits built back up.


Asp.net Website to run PowerShell Script

Now that I have a reliable and programmatic way of adding a one-time maintenance window in PRTG, I wanted to be able to provide this functionality to end users responsible over their specific set of sensors. Since I have experience with C# Asp.net, and didn’t have the luxury of time learning something new (Asp.net Core, doing it entirely in Javascript, etc) I continued down that path.

Going through my requirements as I built and fine-tuned it, this is what I ended up with:

  • Must use Windows Authentication
  • Provide functionality to select a “logical group” that is a pre-defined set of objects for applying the maintenance window
  • Be able to edit these “logical groups” outside of the code base, preferably in a simple static file
  • Be able to restrict from view and selection certain “logical groups” depending on Active Directory group membership of the user viewing the site.
  • Allow user to supply 2 datetime values, with validation that they exist, and end datetime is later than start datetime
  • Allow user to supply conditional parameters for additional objects to include
  • Display results of the operation for the user
  • Email results of the operation to specific recipients

I started with this post from Jeff Murr, which detailed how to use asp.net to call a PowerShell script, and return some output. This really formed the basis of what I built.

I started by trying to use Jeff’s code as-is, as a proof-of-concept. One of the immediate problems I ran into was getting my project to recognize the system.automation reference. It kept throwing this error:

The type or namespace name 'Automation' does not exist in the namespace 'System.Management' (are you missing an assembly reference?)

I eventually came across this blog post that contained a comment with the resolution for me:

You have to add:
Microsoft PowerShell version (5/4/3/..) Reference Assembly.

You can search for "PowerShell" in NuGet Packages Manager search bar

Once I had done this, the project could be built and I had a functional method of executing PowerShell from my site.

Building out the framework of the site was simple, and I utilized some new learning on CSS FlexBox to layout my conditional panels as I wanted to.

I decided to use an XML file as the data source for my “logical grouping” of information; intending that team members will be able to simply modify and push changes without having to understand anything related to the code. The XML file looks like this:

<?xml version="1.0" standalone="yes"?>
<types>
<type Id ="0" Code ="None">
</type>
<type Id ="1" Code ="Client1">
<TimeZone>MST</TimeZone>
<emailaddress>notificationlist@domain.com,notificationlist2@domain.com</emailaddress>
</type>
<type Id ="2" Code ="Client2">
<TimeZone>MST</TimeZone>
<emailaddress>notificationlist@domain.com,notificationlist2@domain.com</emailaddress>
</type>
<type Id ="3" Code ="Client3">
<TimeZone>MST</TimeZone>
<emailaddress>notificationlist@domain.com,notificationlist2@domain.com</emailaddress>
</type>
</types>

Another issue I had was with choosing a good date/time control. The out-of-the-box ones are clearly inadequate, so I decided to use a jQuery timepicker. jQuery and client-side scripts are a little unfamiliar to me, so I spent quite a bit of time tinkering to get it just right, when in reality it should have only been a brief effort.

In order to get my PowerShell script to run, and return Out-String values back to the page, I had to add: UnobtrusiveValidationMode=”None”. I did this at the top of page declaration, but it could have been done in web.config as well. Without this, when the page attempted to run the PowerShell Invoke-WebRequest, it did so under the user context of my IIS Application Pool, and it tried to run the Internet Explorer first-run wizard. Adding UnobtrusiveValidationMode bypassed this requirement.

Another unique thing I wanted to do was be able to manipulate the location of the PowerShell script and other things like disabling email notifications if I was testing during debug on my local machine. To do that, I used an IF statement to test for HttpContext.Current.Request.IsLocal.

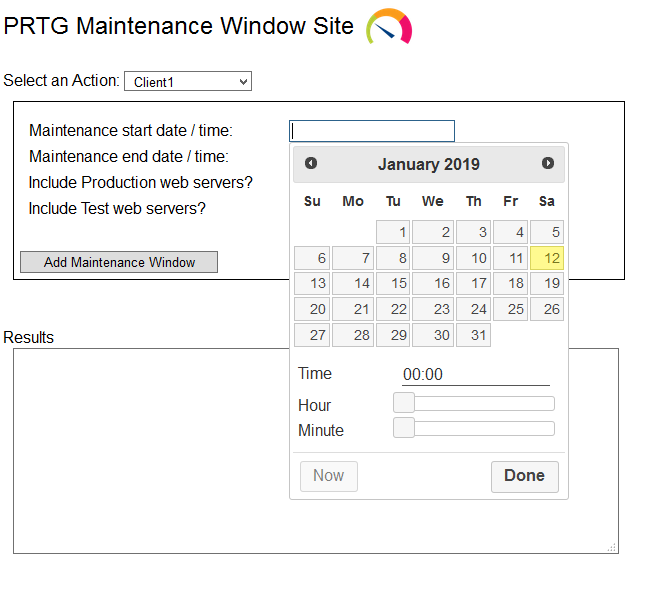
Here’s what the site looks like:
 

You can find the GitHub repository of this code here: https://github.com/jeffwmiles/PrtgMaintenanceWindow
PRTG API to add maintenance window

I recently had a need to provide capability for adding one-time maintenance windows in PRTG for a specific set of objects.

I found this post on the PRTG forums as a starting point. I also needed to learn how to authenticate an API request in PowerShell, which Paessler has provided a KB article on.

Part of my requirements were conditional logic, to say “Pause these sensors, and maybe pause these other ones too if desired”. I used a Switch parameter in my PowerShell script to accomplish this.

One of the remaining downsides of this script is that it requires pre-knowledge of the exact object IDs from PRTG. These are easy to find, by navigating to the object you desire, and looking at the URL which will display it.

I also want to be able to call this script from a website with user-specified parameters, but that will be for a future post.

Here’s my script, which can be called like this:

$start = get-date
$end = (get-date).AddMinutes(5)
.\PrtgMaintenanceWindow.ps1 -MaintStartTime $start -MaintEndTime $end -IncludProdWebServers -IncludeTestWebServers

Full Script:

param(
    [Parameter(Mandatory = $true)] [datetime]$MaintStartTime,
    [Parameter(Mandatory = $true)] [datetime]$MaintEndTime,
    [Switch]$IncludeProdWebServers,
    [Switch]$IncludeTestWebServers
)
 
# Use $Global parameters so they can be used inside the Function without repeating
$Global:prtgAuth = 'username=PRTGUSERNAME&passhash=GENERATEDHASHVALUE'
$Global:prtgServer = 'https://FQDN.OF.PRTG'
$Global:MaintStart = '{0:yyyy-MM-dd-HH-mm-ss}' -f $MaintStartTime
$Global:MaintEnd = '{0:yyyy-MM-dd-HH-mm-ss}' -f $MaintEndTime
 
$ServicesID = @("OBJECTID") # Group containing devices &amp; sensors that I want to control
$ProdWebServersID = @("13152", "13153", "13149", "13150") # Individual Devices to conditionally apply a maintenance window to
$TestWebServersID = @("13219", "13221", "13220", "13222")
 
# Function that can be called multiple times, after passing in an ObjectID.
function ApplyMaintenanceWindow {
    param(
        [int]$objectid
    )
    # Apply Start Time of Maintenance Window
    $startattempt = Invoke-WebRequest "$prtgServer/api/setobjectproperty.htm?id=$objectid&name=maintstart&value=$MaintStart&$prtgAuth" -UseBasicParsing
 
    # Display the output as successful if HTTP200 response code received. Using Out-String for future integration purposes with website. 
    if ($startattempt.StatusCode -eq "200") {
        $message = "Object ID: $objectid - Maintenance window set to start at $MaintStart"
        $message | out-string
    }
    # Apply End Time of Maintenance Window
    $endattempt = Invoke-WebRequest "$prtgServer/api/setobjectproperty.htm?id=$objectid&name=maintend&value=$MaintEnd&$prtgAuth" -UseBasicParsing
    if ($endattempt.StatusCode -eq "200") {
        $message = "Object ID: $objectid - Maintenance window set to end at $MaintEnd"
        $message | out-string
    }
    # Enable Maintenance Window for the object
    $enableattempt = Invoke-WebRequest "$prtgServer/api/setobjectproperty.htm?id=$objectid&name=maintenable&value=1&$prtgAuth" -UseBasicParsing
    if ($enableattempt.StatusCode -eq "200") {
        $message = "Object ID: $objectid - Maintenance window enabled"
        $message | out-string
    }
}
 
# Add maintenance Window for Client Services
# Do this always, with the parameters supplied
foreach ($id in $ClientServicesID) {
    ApplyMaintenanceWindow -objectid $id
}
 
#If necessary, add maintenance window for ProdWebServers
# Do this conditionally, if the switch is provided
if ($IncludeProdWebServers.IsPresent) {
    foreach ($id in $ClientProdWebServersID) {
        ApplyMaintenanceWindow -objectid $id
    }
}
 
#If necessary, add maintenance window for TestWebServers
# Do this conditionally, if the switch is provided
if ($IncludeTestWebServers.IsPresent) {
    foreach ($id in $ClientTestWebServersID) {
        ApplyMaintenanceWindow -objectid $id
    }
}


Hyper-V replica health notifications

I set up Hyper-V replica between two clusters in two offices, and needed a way of keeping track of replica health. I used a PowerShell script running from a utility server on a scheduled task to accomplish this.

This script runs a “get-vmreplication” command on each cluster node, and sends an email if any is found in warning or critical state.

One issue I needed to solve was the permissions required to run this from a utility server. I’m sure there are many other (and better) ways to accomplish this such as group managed service accounts, but there are certain limitations in my environment.

First I created an account in AD to act as a service account, as a standard user. I used the “ConvertFrom-SecureString” cmdlet as demonstrated in this article, as the SYSTEM account on my utility server, to produce a file for building a credential object in my PowerShell script. To run this as SYSTEM I used “psexec -s -i powershell.exe”.

Then I created a scheduled task, set to run as SYSTEM when not logged on, at 12 hour intervals, with the action of running the script below:


$password = Get-Content C:\scripts\MaintenanceChecks\SecureString.txt | ConvertTo-SecureString
$Credential = New-Object System.Management.Automation.PSCredential("svc.clusterhealth@domain.com",$password)	
 
$Servers = @("ClusterHost1","ClusterHost2","ClusterHost3","ClusterHost4")
 
Foreach ($server in $Servers)
{
	Invoke-Command -credential $credential -computername $server -scriptblock {
 
		$resultsWarn = get-vmreplication | where-object {$_.Health -like "Warning"} 
		if ($resultsWarn)
		{
			$smtpServer = "relay.domain.com"
			$port = "25"
			$message = New-Object System.Net.Mail.MailMessage
			$message.From = "fromaddress@domain.com"
			$message.Sender = "fromaddress@domain.com"
			$message.To.Add( "toaddress@domain.com" )
			$message.Subject = "Replication Health Warning - $($Using:server)"
			$message.IsBodyHtml = $true
			$message.Body = "Replication health was found to be in warning state for the following VMs:  $($resultsWarn.Name)"
			$Client = New-Object System.Net.Mail.SmtpClient( $smtpServer , $port )
			$Client.Send( $message )
		}
 
		$resultsCrit = get-vmreplication | where-object {$_.Health -like "Critical"} 
		if ($resultsCrit)
		{
			$smtpServer = "relay.domain.com"
			$port = "25"
			$message = New-Object System.Net.Mail.MailMessage
			$message.From = "fromaddress@domain.com"
			$message.Sender = "fromaddress@domain.com"
			$message.To.Add( "toaddress@domain.com" )
			$message.Subject = "Replication Health Critical - $($Using:server)"
			$message.IsBodyHtml = $true
			$message.Body = "Replication health was found to be in CRITICAL state for the following VMs: $($resultsCrit.Name)"
			$Client = New-Object System.Net.Mail.SmtpClient( $smtpServer , $port )
			$Client.Send( $message )
		}
	}
}


Azure update configuration – dynamic group workaround

I put my Azure Update Management into full testing recently, using the deployment script I shared last week.

I quickly encountered a problem where despite the VMs communicating with Azure Automation properly, and showing as “ready” for Update Management, they would no longer appear as selected when using Dynamic Groups.

I suspect this may have something to do with the proxy setup in this particular environment, but I didn’t have time to troubleshoot and needed to have my scheduled update configurations statically select my VMs instead of relying upon dynamic groups (they are after all still in preview).

However, I still wanted to use Tags in order to select my VMs. In order to do this, I removed the “Targets” object from my JSON body entirely, and used the “azureVirtualMachines” object instead. I needed to put the logic of VM selection based on tags into this object.

I recognize that this removes the “dynamic” nature, in that it would only be updated when I re-run the PowerShell script to update the scheduled update configuration, but since this is going to be run once-per-month in order to change the date (Microsoft, add day offset support!) that isn’t a large problem.

The only real change is that selection of the VMs by tag can be done like this:

$selectedvms = Get-AzureRmVM | Where-Object {$_.Tags['MaintenanceWindow'] -eq $MaintenanceWindow} | select-object id
$virtualmachines = $selectedvms.id | ConvertTo-JSON

Multiple Tag definitions can be added into the “Where-Object” logic of that command.

Full Example

 
# API Reference: https://docs.microsoft.com/en-us/rest/api/automation/softwareupdateconfigurations/create#updateconfiguration
 
### Monthly Parameters ###
  $deploymentName = "SUG_Thurs-2am-MST-4hours"
  $MaintenanceWindow = "Thurs-2am-MST-4hours"
  $starttime = "2018-11-15T02:00:00+00:00"
 
# Scope Parameters
  $clientsubscription = "<subscription_id_to_target>"
  Select-AzureRmSubscription -Subscription $clientsubscription
  ## Schedule Parameters
  # Populate an array with the full ID of all VMs to apply this schedule to:
  $selectedvms = Get-AzureRmVM | Where-Object {$_.Tags['MaintenanceWindow'] -eq $MaintenanceWindow} | select-object id
  $virtualmachines = $selectedvms.id | ConvertTo-JSON
 
# Static Schedule Parameters
  $AutomationRG = "test-rg" # Resource Group the Automation Account resides in
  $automationAccountName = "test-automation"
  $automationSubscription = "<subscriptionId>" # Subscription that the Automation Account resides in
 
  $duration = "PT4H0M" # This equals maintenance window - Put in the format PT2H0M, changing the numbers for hours and minutes
  $rebootSetting = "IfRequired" # Options are Never, IfRequired
  $includedUpdateClassifications = "Critical,UpdateRollup,Security,Updates" # List of options here: https://docs.microsoft.com/en-us/rest/api/automation/softwareupdateconfigurations/create#windowsupdateclasses
  $timeZone = "America/Edmonton" # List from ??
  $frequency = "OneTime" # Valid values: https://docs.microsoft.com/en-us/rest/api/automation/softwareupdateconfigurations/create#schedulefrequency
  #$interval = "1" # How often to recur based on the frequency (i.e. if frequency = hourly, and interval = 2, then its every 2 hours)
 
 
### These values below shouldn't need to change
  Select-AzureRmSubscription -Subscription "$automationSubscription"
  # Get the access token from a cached PowerShell session
  . .\Get-AzureRmCachedAccessToken.ps1 # Source = https://gallery.technet.microsoft.com/scriptcenter/Easily-obtain-AccessToken-3ba6e593
  $BearerToken = ('Bearer {0}' -f (Get-AzureRmCachedAccessToken))
  $RequestHeader = @{
    "Content-Type" = "application/json";
    "Authorization" = "$BearerToken"
  }
 
# JSON formatting to define our required settings
$Body = @"
{
  "properties": {
    "updateConfiguration": {
	  "operatingSystem": "Windows",
      "duration": "$duration",
      "windows": {
        "excludedKbNumbers": [],
        "includedUpdateClassifications": "$includedUpdateClassifications",
        "rebootSetting": "$rebootSetting"
      },
      "azureVirtualMachines": $virtualmachines,
    },
    "scheduleInfo": {
      "frequency": "$frequency",
      "startTime": "$starttime",
      "timeZone": "$timeZone",
      "interval": $interval,
	  "isEnabled": true
    }
  }
}
"@
 
# Build the URI string to call with a PUT
$URI = "https://management.azure.com/subscriptions/$($automationSubscription)/" `
     +"resourceGroups/$($AutomationRG)/providers/Microsoft.Automation/" `
     +"automationAccounts/$($automationaccountname)/softwareUpdateConfigurations/$($deploymentName)?api-version=2017-05-15-preview"
 
# use the API to add the deployment
$Response = Invoke-RestMethod -Uri $URI -Method Put -body $body -header $RequestHeader