As I delve further into working with some new technologies, like docker and Blazor, I keep adding new use-cases that I want to address.
Today’s is Azure AD Oauth authentication for single-sign-on. But in order to do this properly, I want to add HTTPS support.
This post will go over what I found I had to do to run a local docker container with HTTPs and Azure AD login.
I’m assuming that the basics of Docker and working with dotnet core are understood.
dotnet Blazor test project
We start with a dotnet Blazor project. We can pull a template from the dotnet templates using a command like this:
dotnet new blazorserver -o BlazorApp --no-https -f netcoreapp3.1
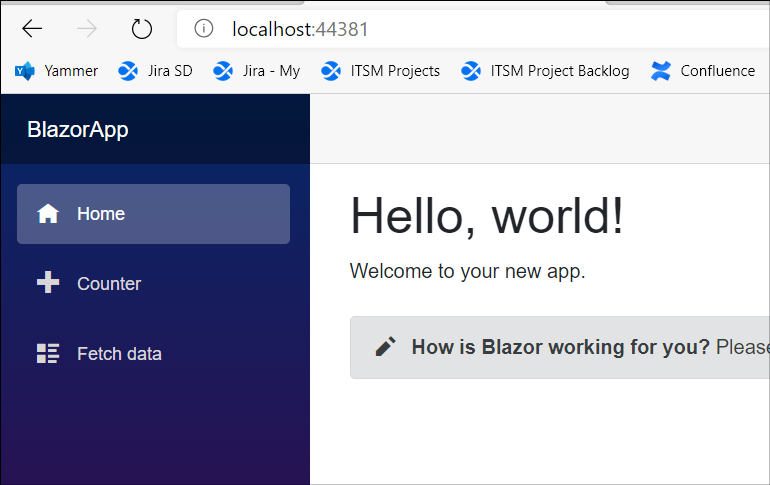
We can see that it has produced an application from the template for us:

After moving into the BlazorApp directory, you can perform a “dotnet run” and hit the presented URL in the browser to confirm the site is working.
Now we’re going to build a dockerfile, based on an example provided by Microsoft. You will need Docker Desktop as a prerequisite.
This dockerfile below was from a different Microsoft example that I found, but cannot find a reference to any longer. Place this dockerfile inside the BlazorApp directory.
### ------ Base ------ ###
# Base contains only the .NET Core runtime
FROM mcr.microsoft.com/dotnet/core/aspnet:3.1 AS base
WORKDIR /app
EXPOSE 80

### ------ Build ------ ###
# Build stage uses an image with the .NET Core SDK
FROM mcr.microsoft.com/dotnet/core/sdk:3.1 AS build

# Sets the working directory, so any actions taken are relative to here
WORKDIR /src

# Copy the csproj file, is source then destination; use . because we want it in our WORKDIR
COPY BlazorApp.csproj .

# dotnet restore uses nuget to install the dependencies and tools specified in the project
RUN dotnet restore "BlazorApp.csproj"

# Now we copy everything from source (where this dockerfile is) to the WORKDIR
COPY . .

# dotnet build - builds the project and it's dependencies into a set of binaries
RUN dotnet build "BlazorApp.csproj" -c Release -o /app/build
    # Here we're using "release" configuration - can specify multiple in the dotnet project
    # We don't technically need to do this, because dotnet publish will do the same


### ------ Publish ------ ###
FROM build AS publish
# dotnet publish will compile the application, and put the resulting set of files into a directory
RUN dotnet publish "BlazorApp.csproj" -c Release -o /app/publish


### ------ Final ------ ###
# Take the original lightweight base image as our source
FROM base AS final
WORKDIR /app
# Specify the context of our source, which is the Publish stage of the docker build, and the folder /app/publish, and put it in the WORKDIR
COPY --from=publish /app/publish .

# This is the instruction that tells the image how to start the process it will run for us
ENTRYPOINT ["dotnet", "BlazorApp.dll"] |
### ------ Base ------ ###
# Base contains only the .NET Core runtime
FROM mcr.microsoft.com/dotnet/core/aspnet:3.1 AS base
WORKDIR /app
EXPOSE 80
### ------ Build ------ ###
# Build stage uses an image with the .NET Core SDK
FROM mcr.microsoft.com/dotnet/core/sdk:3.1 AS build
# Sets the working directory, so any actions taken are relative to here
WORKDIR /src
# Copy the csproj file, is source then destination; use . because we want it in our WORKDIR
COPY BlazorApp.csproj .
# dotnet restore uses nuget to install the dependencies and tools specified in the project
RUN dotnet restore "BlazorApp.csproj"
# Now we copy everything from source (where this dockerfile is) to the WORKDIR
COPY . .
# dotnet build - builds the project and it's dependencies into a set of binaries
RUN dotnet build "BlazorApp.csproj" -c Release -o /app/build
# Here we're using "release" configuration - can specify multiple in the dotnet project
# We don't technically need to do this, because dotnet publish will do the same
### ------ Publish ------ ###
FROM build AS publish
# dotnet publish will compile the application, and put the resulting set of files into a directory
RUN dotnet publish "BlazorApp.csproj" -c Release -o /app/publish
### ------ Final ------ ###
# Take the original lightweight base image as our source
FROM base AS final
WORKDIR /app
# Specify the context of our source, which is the Publish stage of the docker build, and the folder /app/publish, and put it in the WORKDIR
COPY --from=publish /app/publish .
# This is the instruction that tells the image how to start the process it will run for us
ENTRYPOINT ["dotnet", "BlazorApp.dll"]
Now we build the dockerfile with this:
docker build -t "blazorapp" .
    # -t is the tag we give the image name
# The . tells docker to look for the dockerfile in the current directory |
docker build -t "blazorapp" .
# -t is the tag we give the image name
# The . tells docker to look for the dockerfile in the current directory
This produces a docker image, which we can see from the docker cli with “docker image ls”:

To run the container, we’ll use:
docker run --rm -p 44381:80 blazorapp |
docker run --rm -p 44381:80 blazorapp
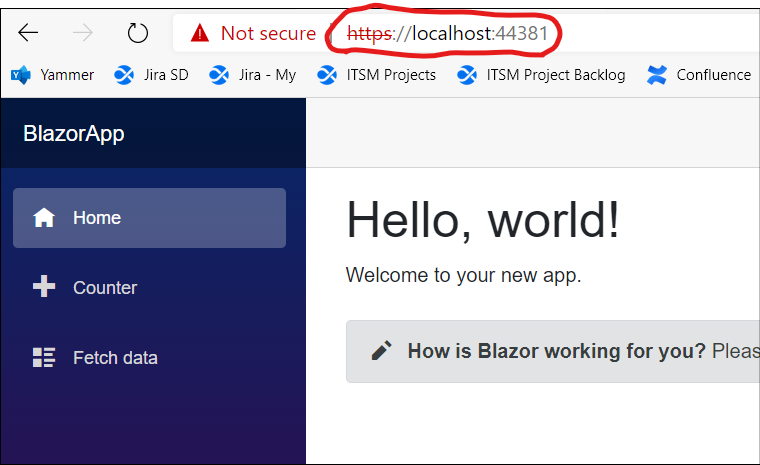
We expose port 80 from the container (in the docker file) and link it to the host port 44381 and then test that we can hit this from a browser on my local workstation:
Add Azure AD authentication
I haven’t found an easy 100-level intro to integrating Azure AD authentication to an existing project. Instead, we can create a new application from a template supplying additional command line switches to pre-create a project with this enabled.
Before we do that, you will need to create an App Registration in your Azure AD. This guide is simple to follow to do so. Note that on step 6, where you supply the redirect URIs, they must use the port that your “docker run” command is using (i.e. 44381). Also note that the URL entered there is HTTPS – we’ll get to that.
Once your app registration is created, you can use properties from it (on the Overview page) to create a new blazor app:
dotnet new blazorserver -o BlazorApp --no-https -f netcoreapp3.1 --auth SingleOrg --client-id "Enter_the_Application_Id_here" --tenant-id "yourTenantId"
Make sure you modify the appsettings.json file to include your domain name from Azure AD.
Now when you try and run your application using Docker Run, you’ll get an error:
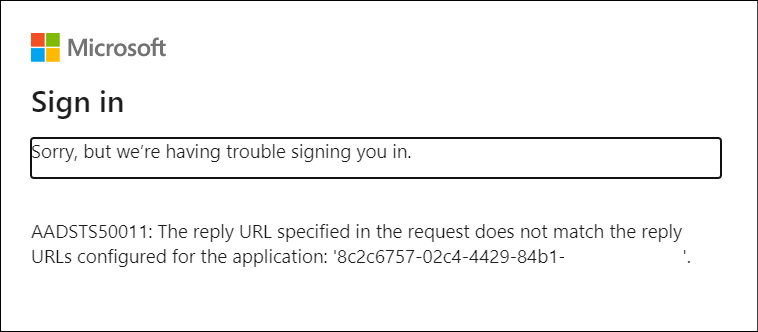
This is because the reply url is HTTP but your App Registration is configured for only HTTPS.
So lets add in TLS to get that HTTPS URL.
TLS support
There is a way to get HTTPS enabled within the container, using certificate references and configuration in the application. But in my mind this seems to make the application less portable between environments and hosting methods (local development, running in a container, in Azure App Service, etc).
Instead, I’m looking at using the sidecar profile instead. This uses a paired container that serves up the HTTPs, and reverse proxies web requests to the application. Here’s an example describing the process (although this is for Azure Container Instances).
To work with this locally, we will use Docker Compose, to coordinate multiple containers that can talk to each other.
There’s a few things to prepare. First step, we need to generate a certificate, which will be then injected into the sidecar container at runtime. For this we follow the instructions from that Azure Container Instance linked above.
openssl req -new -newkey rsa:2048 -nodes -keyout ssl.key -out ssl.csr
# Follow the prompts to add the identification information. For Common Name, enter the hostname associated with the certificate. When prompted for a password, press Enter without typing, to skip adding a password.
openssl x509 -req -days 365 -in ssl.csr -signkey ssl.key -out ssl.crt
I placed these certificate files in a subfolder named “tls_sidecar”.
Next we need a configuration file for nginx, which we will use as the application inside our sidecar container.
# nginx Configuration File
# https://wiki.nginx.org/Configuration

# Run as a less privileged user for security reasons.
user nginx;

worker_processes auto;

events {
    worker_connections 1024;
}

pid        /var/run/nginx.pid;

http {
    proxy_buffer_size   128k;
    proxy_buffers   4 256k;
    proxy_busy_buffers_size   256k;
    large_client_header_buffers 4 16k;
    #Redirect to https, using 307 instead of 301 to preserve post data

    server {
        listen [::]:443 ssl;
        listen 443 ssl;

        server_name localhost;

        # Protect against the BEAST attack by not using SSLv3 at all. If you need to support older browsers (IE6) you may need to add
        # SSLv3 to the list of protocols below.
        ssl_protocols              TLSv1.2;

        # Ciphers set to best allow protection from Beast, while providing forwarding secrecy, as defined by Mozilla - https://wiki.mozilla.org/Security/Server_Side_TLS#Nginx
        ssl_ciphers                ECDHE-RSA-AES128-GCM-SHA256:ECDHE-ECDSA-AES128-GCM-SHA256:ECDHE-RSA-AES256-GCM-SHA384:ECDHE-ECDSA-AES256-GCM-SHA384:DHE-RSA-AES128-GCM-SHA256:DHE-DSS-AES128-GCM-SHA256:kEDH+AESGCM:ECDHE-RSA-AES128-SHA256:ECDHE-ECDSA-AES128-SHA256:ECDHE-RSA-AES128-SHA:ECDHE-ECDSA-AES128-SHA:ECDHE-RSA-AES256-SHA384:ECDHE-ECDSA-AES256-SHA384:ECDHE-RSA-AES256-SHA:ECDHE-ECDSA-AES256-SHA:DHE-RSA-AES128-SHA256:DHE-RSA-AES128-SHA:DHE-DSS-AES128-SHA256:DHE-RSA-AES256-SHA256:DHE-DSS-AES256-SHA:DHE-RSA-AES256-SHA:AES128-GCM-SHA256:AES256-GCM-SHA384:ECDHE-RSA-RC4-SHA:ECDHE-ECDSA-RC4-SHA:AES128:AES256:RC4-SHA:HIGH:!aNULL:!eNULL:!EXPORT:!DES:!3DES:!MD5:!PSK;
        ssl_prefer_server_ciphers  on;

        # Optimize TLS/SSL by caching session parameters for 10 minutes. This cuts down on the number of expensive TLS/SSL handshakes.
        # The handshake is the most CPU-intensive operation, and by default it is re-negotiated on every new/parallel connection.
        # By enabling a cache (of type "shared between all Nginx workers"), we tell the client to re-use the already negotiated state.
        # Further optimization can be achieved by raising keepalive_timeout, but that shouldn't be done unless you serve primarily HTTPS.
        ssl_session_cache    shared:SSL:10m; # a 1mb cache can hold about 4000 sessions, so we can hold 40000 sessions
        ssl_session_timeout  24h;


        # Use a higher keepalive timeout to reduce the need for repeated handshakes
        keepalive_timeout 300; # up from 75 secs default

        # remember the certificate for a year and automatically connect to HTTPS
        add_header Strict-Transport-Security 'max-age=31536000; includeSubDomains';

        ssl_certificate      /etc/nginx/ssl.crt;
        ssl_certificate_key  /etc/nginx/ssl.key;

        location / {
            proxy_pass http://web:80; # this uses the service name from docker compose

            proxy_set_header Upgrade $http_upgrade;
            proxy_set_header Connection keep-alive;
            proxy_set_header Host $http_host;
            proxy_cache_bypass $http_upgrade;
            proxy_set_header   X-Forwarded-For $proxy_add_x_forwarded_for;
            proxy_set_header   X-Forwarded-Proto $scheme;
        }
    }
} |
# nginx Configuration File
# https://wiki.nginx.org/Configuration
# Run as a less privileged user for security reasons.
user nginx;
worker_processes auto;
events {
worker_connections 1024;
}
pid /var/run/nginx.pid;
http {
proxy_buffer_size 128k;
proxy_buffers 4 256k;
proxy_busy_buffers_size 256k;
large_client_header_buffers 4 16k;
#Redirect to https, using 307 instead of 301 to preserve post data
server {
listen [::]:443 ssl;
listen 443 ssl;
server_name localhost;
# Protect against the BEAST attack by not using SSLv3 at all. If you need to support older browsers (IE6) you may need to add
# SSLv3 to the list of protocols below.
ssl_protocols TLSv1.2;
# Ciphers set to best allow protection from Beast, while providing forwarding secrecy, as defined by Mozilla - https://wiki.mozilla.org/Security/Server_Side_TLS#Nginx
ssl_ciphers ECDHE-RSA-AES128-GCM-SHA256:ECDHE-ECDSA-AES128-GCM-SHA256:ECDHE-RSA-AES256-GCM-SHA384:ECDHE-ECDSA-AES256-GCM-SHA384:DHE-RSA-AES128-GCM-SHA256:DHE-DSS-AES128-GCM-SHA256:kEDH+AESGCM:ECDHE-RSA-AES128-SHA256:ECDHE-ECDSA-AES128-SHA256:ECDHE-RSA-AES128-SHA:ECDHE-ECDSA-AES128-SHA:ECDHE-RSA-AES256-SHA384:ECDHE-ECDSA-AES256-SHA384:ECDHE-RSA-AES256-SHA:ECDHE-ECDSA-AES256-SHA:DHE-RSA-AES128-SHA256:DHE-RSA-AES128-SHA:DHE-DSS-AES128-SHA256:DHE-RSA-AES256-SHA256:DHE-DSS-AES256-SHA:DHE-RSA-AES256-SHA:AES128-GCM-SHA256:AES256-GCM-SHA384:ECDHE-RSA-RC4-SHA:ECDHE-ECDSA-RC4-SHA:AES128:AES256:RC4-SHA:HIGH:!aNULL:!eNULL:!EXPORT:!DES:!3DES:!MD5:!PSK;
ssl_prefer_server_ciphers on;
# Optimize TLS/SSL by caching session parameters for 10 minutes. This cuts down on the number of expensive TLS/SSL handshakes.
# The handshake is the most CPU-intensive operation, and by default it is re-negotiated on every new/parallel connection.
# By enabling a cache (of type "shared between all Nginx workers"), we tell the client to re-use the already negotiated state.
# Further optimization can be achieved by raising keepalive_timeout, but that shouldn't be done unless you serve primarily HTTPS.
ssl_session_cache shared:SSL:10m; # a 1mb cache can hold about 4000 sessions, so we can hold 40000 sessions
ssl_session_timeout 24h;
# Use a higher keepalive timeout to reduce the need for repeated handshakes
keepalive_timeout 300; # up from 75 secs default
# remember the certificate for a year and automatically connect to HTTPS
add_header Strict-Transport-Security 'max-age=31536000; includeSubDomains';
ssl_certificate /etc/nginx/ssl.crt;
ssl_certificate_key /etc/nginx/ssl.key;
location / {
proxy_pass http://web:80; # this uses the service name from docker compose
proxy_set_header Upgrade $http_upgrade;
proxy_set_header Connection keep-alive;
proxy_set_header Host $http_host;
proxy_cache_bypass $http_upgrade;
proxy_set_header X-Forwarded-For $proxy_add_x_forwarded_for;
proxy_set_header X-Forwarded-Proto $scheme;
}
}
}
I found that there were some specific nginx settings I needed to set in order to get this fully working which are included in my conf above (but I didn’t need the fastcgi entries from that link).
You can also see that the proxy_pass directive is referencing a name of “web” – this maps to the service name that we’ll be using in docker-compose.
This nginx.conf file is also placed into the “tls_sidecar” container.
There are a couple of changes required to be made to the dotnet Core application itself as well, based on this link for placing it behind a reverse proxy.
In Startup.cs, I added 2 new namespaces at the top of the file:
using System.Net;
using Microsoft.AspNetCore.HttpOverrides;
Then within the “ConfigureServices” method, we add options for dealing with the ForwardedFor headers:
services.Configure(options =>
            {
                options.ForwardedHeaders =
                    ForwardedHeaders.XForwardedFor | ForwardedHeaders.XForwardedProto;
                options.KnownNetworks.Add(new IPNetwork(IPAddress.Parse("10.0.0.0"), 8));
                options.KnownNetworks.Add(new IPNetwork(IPAddress.Parse("172.16.0.0"), 12));
                options.KnownNetworks.Add(new IPNetwork(IPAddress.Parse("192.168.0.0"), 16));
}); |
services.Configure(options =>
{
options.ForwardedHeaders =
ForwardedHeaders.XForwardedFor | ForwardedHeaders.XForwardedProto;
options.KnownNetworks.Add(new IPNetwork(IPAddress.Parse("10.0.0.0"), 8));
options.KnownNetworks.Add(new IPNetwork(IPAddress.Parse("172.16.0.0"), 12));
options.KnownNetworks.Add(new IPNetwork(IPAddress.Parse("192.168.0.0"), 16));
});
So that it looks like this:
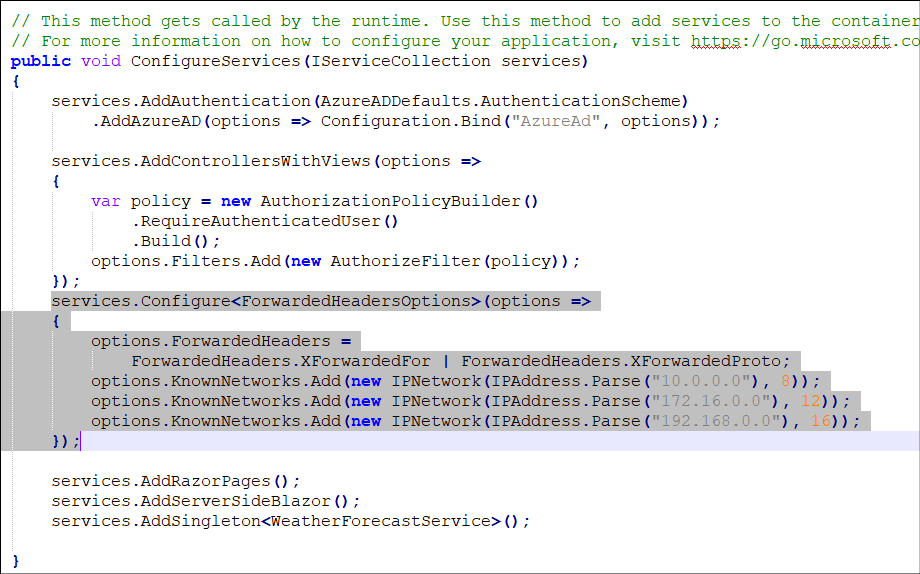
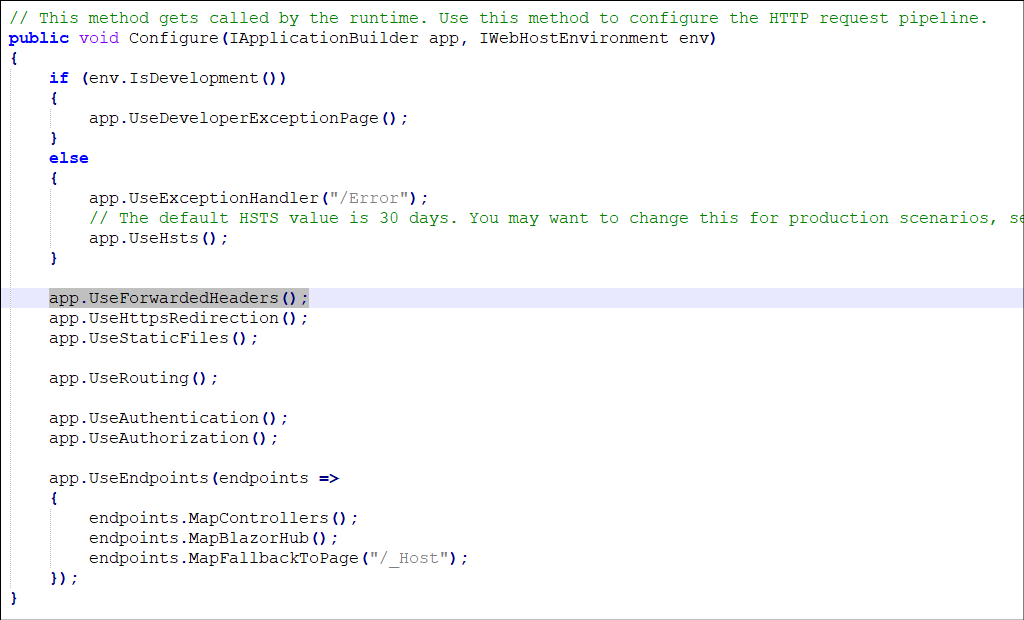
We also add another line in the “Configure” method: app.UseForwardedHeaders();
Lastly, we create a docker-compose file – this will define 2 services, and allow Docker to build private networking between them.
version: "3.8"

services:
  web:
    image: blazorapp:latest
  nginx:
    image: nginx:latest
    container_name: nginx_with_ssl
    volumes:
      - ./tls_sidecar/nginx.conf:/etc/nginx/nginx.conf
      - ./tls_sidecar/ssl.crt:/etc/nginx/ssl.crt
      - ./tls_sidecar/ssl.key:/etc/nginx/ssl.key
    ports:
- 44381:443 |
version: "3.8"
services:
web:
image: blazorapp:latest
nginx:
image: nginx:latest
container_name: nginx_with_ssl
volumes:
- ./tls_sidecar/nginx.conf:/etc/nginx/nginx.conf
- ./tls_sidecar/ssl.crt:/etc/nginx/ssl.crt
- ./tls_sidecar/ssl.key:/etc/nginx/ssl.key
ports:
- 44381:443
Here in this YAML file we are mounting our nginx.conf and SSL certificate files as volumes, in a one-to-one fashion (rather than directories). This will allow the nginx container to use these files from source control without having to build a custom container image with them inside.
Now that we’re prepared, the final steps are to re-run our “docker build” step from above (since we made application changes) and then run Docker Compose, with this:
docker-compose up
Then try to hit your application at https://localhost:44381 (you’ll likely get a cert warning for a name mis-match)
We did it!