SCVMM VM Network dependency for Hyper-V replica

Encountered a weird issue today with SCVMM. I can’t provide screenshots since I’d have to white out object names, making it without purpose.

I wanted to delete a VM Network, however when I looked at the dependencies on it, I saw a Virtual Machine.

Looking at the Virtual Machine itself, all of its network configuration was tied to a different VM Network. For a while I really couldn’t figure out where this reference was coming from.

Then I realized that this VM has a Hyper-V Replica. SCVMM will show that replica, but you cannot open the properties of it in the GUI. However, you can query it with PowerShell. I was able to do so with this:


$VmName = "vm1"
$VM = Get-SCVirtualMachine -Name $VMName -VMHost "destination hyper-v host"
$NIC = Get-SCVirtualNetworkAdapter -VM $VM | Out-Gridview -PassThru -Title 'Select VMs vNIC'

This allowed me to view the properties of the NIC that was attached to my replica. SCVMM stores network information (not Hyper-V network info) in it’s database, and it appears that the original config was changed on my source VM, but that never made its way into the replica.

I was able to update this by adding the following two PowerShell lines:

# Pop up an OutGrid to choose the VM network you want to attach the NIC to
$VMNetwork = Get-SCVMNetwork | Out-Gridview -PassThru -Title 'Select VM Network'
Set-SCVirtualNetworkAdapter -VirtualNetworkAdapter $VM.VirtualNetworkAdapters[($NIC.SlotID)] -VMNetwork $VMNetwork

Now, I did receive an error from this last Set command, that “VMM failed to allocate a MAC address to network adapter”. However, after re-runnining the “Get-SCVirtualNetworkAdapter” I could confirm the Logical Network and VM Network were updated appropriately, and my dependency was no longer there.

I validated that this did not appear to affect the health of Hyper-V replication either.

Update – after performing the actions above, the dependency on the VMNetwork was still there when I tried to delete (but didn’t appear in the GUI). At the risk of breaking replication, I decided to try updating the VMM database directly, rather than try to figure out the best method.

I figured my Hyper-V replica VM nic was still tied to the VMNetwork in the database, despite the command I used above. So I used SQL Server Management Studio to query the tables like this:

-- Find VM Network ID
declare @var varchar(max)
SELECT @var = id FROM [VirtualManagerDB].[dbo].[tbl_NetMan_VMNetwork] where Name = 'vm network name'
-- Use output from previous command to find matching VM nics
SELECT * FROM tbl_WLC_VNetworkAdapter WHERE (vmnetworkid = @var)

This produced two rows, one for my source VM and the other for my replica. I updated the VMSubnetID and VMNetworkID columns on my replica to match the source VM.

This allowed me to successfully delete the VM Network.
 

VMM Service Fails to start after DB Migration

I migrated a System Center Virtual Machine Manager (VMM) installation to a new virtual machine today. I used this TechGenix article as a guide.

Most things went quite smoothly, however when I completed the VMM installation, the VMMService.exe didn’t start.

System Event logs displayed: “The System Center Virtual Machine Manager service terminated unexpectedly. It has done this 3 time(s).”

Application Event logs displayed:

Faulting application name: vmmservice.exe, version: 4.1.3223.0, time stamp: 0x5a566055
Faulting module name: KERNELBASE.dll, version: 10.0.17763.292, time stamp: 0xb51bba8e
Exception code: 0xe0434352

I found the VMM log located in “C:\ProgramData\VMMLogs\SCVMM<guid>\report.txt“, which had the following error buried in it:

System.Data.SqlClient.SqlException (0x80131904): Cannot execute as the database principal because the principal "dbo" does not exist, this type of principal cannot be impersonated, or you do not have permission.

This SQL error let me to poking around in SQL Server Management Studio, and to the google, where I found this relevant post on Stackoverflow.

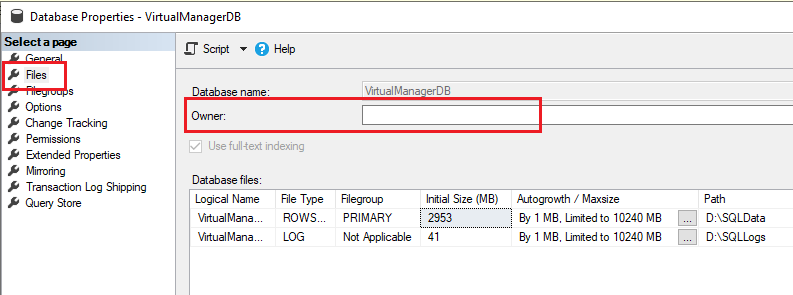
The second answer led me to look at the “Owner” property on the “Files” page of the properties of the VirtualManagerDB database. In my case, it was empty. I suspect somehow this happened while restoring the database backup from the original VM.

I attempted to fill this in with my domain VMM service account, however SQL provided an error that this account was already assigned a role for this database. So instead I ran this statement:

USE VirtualManagerDB
GO
SP_DROPUSER ‘domain VMM service account’ 
GO
SP_CHANGEDBOWNER ‘domain VMM service account’

This updated the Owner property, and allowed me to start the VMM service.


Asp.net Website to run PowerShell Script

Now that I have a reliable and programmatic way of adding a one-time maintenance window in PRTG, I wanted to be able to provide this functionality to end users responsible over their specific set of sensors. Since I have experience with C# Asp.net, and didn’t have the luxury of time learning something new (Asp.net Core, doing it entirely in Javascript, etc) I continued down that path.

Going through my requirements as I built and fine-tuned it, this is what I ended up with:

  • Must use Windows Authentication
  • Provide functionality to select a “logical group” that is a pre-defined set of objects for applying the maintenance window
  • Be able to edit these “logical groups” outside of the code base, preferably in a simple static file
  • Be able to restrict from view and selection certain “logical groups” depending on Active Directory group membership of the user viewing the site.
  • Allow user to supply 2 datetime values, with validation that they exist, and end datetime is later than start datetime
  • Allow user to supply conditional parameters for additional objects to include
  • Display results of the operation for the user
  • Email results of the operation to specific recipients

I started with this post from Jeff Murr, which detailed how to use asp.net to call a PowerShell script, and return some output. This really formed the basis of what I built.

I started by trying to use Jeff’s code as-is, as a proof-of-concept. One of the immediate problems I ran into was getting my project to recognize the system.automation reference. It kept throwing this error:

The type or namespace name 'Automation' does not exist in the namespace 'System.Management' (are you missing an assembly reference?)

I eventually came across this blog post that contained a comment with the resolution for me:

You have to add:
Microsoft PowerShell version (5/4/3/..) Reference Assembly.

You can search for "PowerShell" in NuGet Packages Manager search bar

Once I had done this, the project could be built and I had a functional method of executing PowerShell from my site.

Building out the framework of the site was simple, and I utilized some new learning on CSS FlexBox to layout my conditional panels as I wanted to.

I decided to use an XML file as the data source for my “logical grouping” of information; intending that team members will be able to simply modify and push changes without having to understand anything related to the code. The XML file looks like this:

<?xml version="1.0" standalone="yes"?>
<types>
<type Id ="0" Code ="None">
</type>
<type Id ="1" Code ="Client1">
<TimeZone>MST</TimeZone>
<emailaddress>notificationlist@domain.com,notificationlist2@domain.com</emailaddress>
</type>
<type Id ="2" Code ="Client2">
<TimeZone>MST</TimeZone>
<emailaddress>notificationlist@domain.com,notificationlist2@domain.com</emailaddress>
</type>
<type Id ="3" Code ="Client3">
<TimeZone>MST</TimeZone>
<emailaddress>notificationlist@domain.com,notificationlist2@domain.com</emailaddress>
</type>
</types>

Another issue I had was with choosing a good date/time control. The out-of-the-box ones are clearly inadequate, so I decided to use a jQuery timepicker. jQuery and client-side scripts are a little unfamiliar to me, so I spent quite a bit of time tinkering to get it just right, when in reality it should have only been a brief effort.

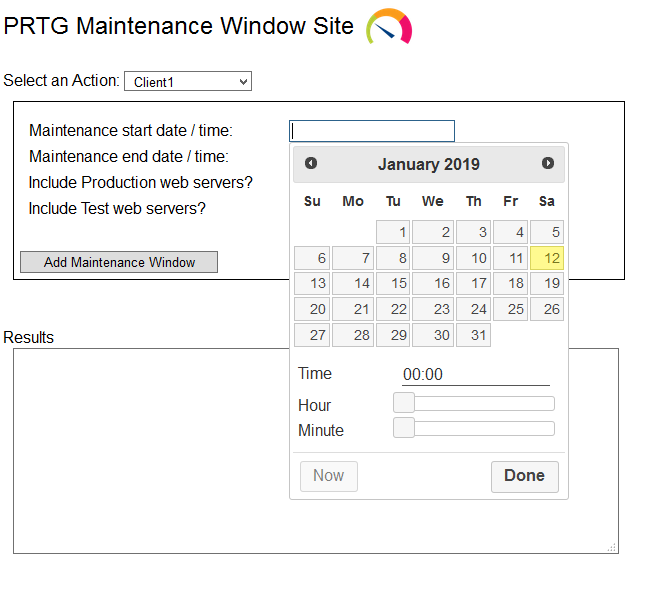
In order to get my PowerShell script to run, and return Out-String values back to the page, I had to add: UnobtrusiveValidationMode=”None”. I did this at the top of page declaration, but it could have been done in web.config as well. Without this, when the page attempted to run the PowerShell Invoke-WebRequest, it did so under the user context of my IIS Application Pool, and it tried to run the Internet Explorer first-run wizard. Adding UnobtrusiveValidationMode bypassed this requirement.

Another unique thing I wanted to do was be able to manipulate the location of the PowerShell script and other things like disabling email notifications if I was testing during debug on my local machine. To do that, I used an IF statement to test for HttpContext.Current.Request.IsLocal.

Here’s what the site looks like:


You can find the GitHub repository of this code here: https://github.com/jeffwmiles/PrtgMaintenanceWindow

PRTG API to add maintenance window

I recently had a need to provide capability for adding one-time maintenance windows in PRTG for a specific set of objects.

I found this post on the PRTG forums as a starting point. I also needed to learn how to authenticate an API request in PowerShell, which Paessler has provided a KB article on.

Part of my requirements were conditional logic, to say “Pause these sensors, and maybe pause these other ones too if desired”. I used a Switch parameter in my PowerShell script to accomplish this.

One of the remaining downsides of this script is that it requires pre-knowledge of the exact object IDs from PRTG. These are easy to find, by navigating to the object you desire, and looking at the URL which will display it.

I also want to be able to call this script from a website with user-specified parameters, but that will be for a future post.

Here’s my script, which can be called like this:

$start = get-date
$end = (get-date).AddMinutes(5)
.\PrtgMaintenanceWindow.ps1 -MaintStartTime $start -MaintEndTime $end -IncludProdWebServers -IncludeTestWebServers

Full Script:

param(
    [Parameter(Mandatory = $true)] [datetime]$MaintStartTime,
    [Parameter(Mandatory = $true)] [datetime]$MaintEndTime,
    [Switch]$IncludeProdWebServers,
    [Switch]$IncludeTestWebServers
)

# Use $Global parameters so they can be used inside the Function without repeating
$Global:prtgAuth = 'username=PRTGUSERNAME&passhash=GENERATEDHASHVALUE'
$Global:prtgServer = 'https://FQDN.OF.PRTG'
$Global:MaintStart = '{0:yyyy-MM-dd-HH-mm-ss}' -f $MaintStartTime
$Global:MaintEnd = '{0:yyyy-MM-dd-HH-mm-ss}' -f $MaintEndTime

$ServicesID = @("OBJECTID") # Group containing devices & sensors that I want to control
$ProdWebServersID = @("13152", "13153", "13149", "13150") # Individual Devices to conditionally apply a maintenance window to
$TestWebServersID = @("13219", "13221", "13220", "13222")

# Function that can be called multiple times, after passing in an ObjectID.
function ApplyMaintenanceWindow {
    param(
        [int]$objectid
    )
    # Apply Start Time of Maintenance Window
    $startattempt = Invoke-WebRequest "$prtgServer/api/setobjectproperty.htm?id=$objectid&name=maintstart&value=$MaintStart&$prtgAuth" -UseBasicParsing
    
    # Display the output as successful if HTTP200 response code received. Using Out-String for future integration purposes with website. 
    if ($startattempt.StatusCode -eq "200") {
        $message = "Object ID: $objectid - Maintenance window set to start at $MaintStart"
        $message | out-string
    }
    # Apply End Time of Maintenance Window
    $endattempt = Invoke-WebRequest "$prtgServer/api/setobjectproperty.htm?id=$objectid&name=maintend&value=$MaintEnd&$prtgAuth" -UseBasicParsing
    if ($endattempt.StatusCode -eq "200") {
        $message = "Object ID: $objectid - Maintenance window set to end at $MaintEnd"
        $message | out-string
    }
    # Enable Maintenance Window for the object
    $enableattempt = Invoke-WebRequest "$prtgServer/api/setobjectproperty.htm?id=$objectid&name=maintenable&value=1&$prtgAuth" -UseBasicParsing
    if ($enableattempt.StatusCode -eq "200") {
        $message = "Object ID: $objectid - Maintenance window enabled"
        $message | out-string
    }
}

# Add maintenance Window for Client Services
# Do this always, with the parameters supplied
foreach ($id in $ClientServicesID) {
    ApplyMaintenanceWindow -objectid $id
}

#If necessary, add maintenance window for ProdWebServers
# Do this conditionally, if the switch is provided
if ($IncludeProdWebServers.IsPresent) {
    foreach ($id in $ClientProdWebServersID) {
        ApplyMaintenanceWindow -objectid $id
    }
}

#If necessary, add maintenance window for TestWebServers
# Do this conditionally, if the switch is provided
if ($IncludeTestWebServers.IsPresent) {
    foreach ($id in $ClientTestWebServersID) {
        ApplyMaintenanceWindow -objectid $id
    }
}


Windows 10 insider preview failed to install

I’m running Windows 10 insider preview on my basement computer at home, and sometime in the middle of summer it started failing to update to the latest release. I finally made some time to troubleshoot this last night and got it working.

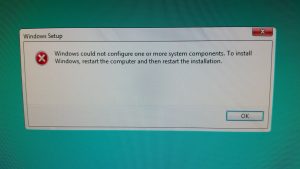
During the install, it would get about 40% of the way through, and then fail with this error:

Windows could not configure one or more system components

After some sleuthing I discovered the log file for the upgrade could be found here: C:\Windows\Panther\NewOs\Panther, and I looked at the “setuperror.log” file.

In this, there were a couple of key errors noted:

0xd0000034 Failed to add user mode driver [%SystemRoot%\system32\DRIVERS\UMDF\uicciso.dll]

Failure while calling IPreApply->PreApply for Plugin={ServerPath="Microsoft-Windows-IIS-RM\iismig.dll"

Generic Command ErrorCode: 80004005 Executable: iissetup.exe ExitCode: 13 Phase: 38 Mode: Install (first install) Component: Microsoft-Windows-IIS-SharedLibraries-GC

I did come across a search hit when looking for the “uicciso.dll” error that spoke about IIS install failing with a Windows 10 update, and those two things seemed to correlate with the errors I was seeing in the logs.

I ran this DISM command to see the additional Win10 features that were installed, and noted a whole bunch that I don’t ever recall having put on manually, and certainly weren’t needed:

 dism /online /get-features /format:table

I collected a bunch, turned it into a removal command, ran them and restarted:

dism /online /disable-feature /FeatureName:SMB1Protocol-Server
dism /online /disable-feature /FeatureName:SMB1Protocol
dism /online /disable-feature /FeatureName:MSMQ-Server
dism /online /disable-feature /FeatureName:MSMQ-Container
dism /online /disable-feature /FeatureName:WCF-Services45
dism /online /disable-feature /FeatureName:WCF-TCP-Activation45 
dism /online /disable-feature /FeatureName:WCF-Pipe-Activation45 
dism /online /disable-feature /FeatureName:WCF-MSMQ-Activation45 
dism /online /disable-feature /FeatureName:WCF-TCP-PortSharing45 
dism /online /disable-feature /FeatureName:WAS-ConfigurationAPI
dism /online /disable-feature /FeatureName:WAS-WindowsActivationService 
dism /online /disable-feature /FeatureName:WAS-ProcessModel 
dism /online /disable-feature /FeatureName:IIS-RequestFiltering
dism /online /disable-feature /FeatureName:IIS-Security
dism /online /disable-feature /FeatureName:IIS-ApplicationDevelopment 
dism /online /disable-feature /FeatureName:IIS-NetFxExtensibility45
dism /online /disable-feature /FeatureName:IIS-WebServerRole 
dism /online /disable-feature /FeatureName:IIS-WebServer 
dism /online /disable-feature /FeatureName:NetFx4-AdvSrvs 
dism /online /disable-feature /FeatureName:NetFx4Extended-ASPNET45

After the restart I let the upgrade run, and it completed successfully!