BigBlueButton

BigBlueButtonA quick review of BigBlueButton, and how I customized it for our corporate purposes.


I’ve been looking for a good web conference and desktop sharing application for a while now. We used to use DimDim, until it got bought out by Salesforce and shutdown.

I briefly used Mikogo, and really liked its scheduling features. However, the performance was poor and it was limited to 10 attendees. Also, it didn’t provide audio or video functionality. This wasn’t a deal breaker, however it sucks to have to use multiple tools for related purposes.

I finally stumbled upon BigBlueButton. This is an open source project originally designed for Academia; it is very feature rich and was relatively easy to set up (for an open source project). One of its most attractive features to me is the fact that it sits in my LAN, instead of a provided service. Since we’ll be using this to communicate between departments and branch offices, the latency is MUCH lower across our VPN’s rather than to an outside service. This gives much better performance than anything we’ve tried yet.

Some of the things it does, and we’ll be using it for:

  • Multiple meeting rooms for separate groups of users
  • Document sharing and whiteboard
  • Audio & video conferencing
  • Public and private chat
  • Desktop sharing (full screen or region)

I set up my environment from the VMware image, but I’ll be trying to convert that vmdk to a VHD for Hyper-V soon so it can run in my Hyper-V cluster.

I only ran into a couple problems (audio application freeswitch didn’t install correctly) but the documentation wiki was very helpful in getting those problems resolved. Overall the support resources are excellent.


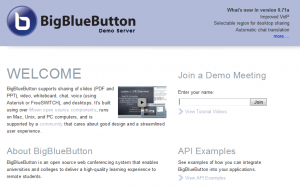
My first real issue with BigBlueButton (and the ultimate reason for this blog post) was that the default installation is very “demo” oriented. This is what the default screen appears like:

DemoScreen

The obvious problem with this screen is that it seems “temporary”, unfinished and unsuited for our organization. It is targeted at someone like myself, who is interested in the latest features and the API examples.

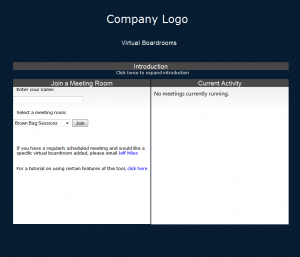
However, I needed a default interface that made it simple for my users to join a meeting room, with a clean looking page and helpful information. Here’s what I’ve ended up with:

Customized company portal for virtual boardrooms

Other than the obvious cosmetic changes, the primary changes I’ve made showing a list of meeting rooms available, and displaying those currently in a meeting. The code for these two features comes from two of the demo.jsp pages provided with BigBlueButton.
On your site you can find them by navigating to http://yoursite/bigbluebutton/demo/demo2.jsp.

These jsp files are located at var/lib/tomcat6/webapps/bigbluebutton/demo

These are the demo page purposes:

  • Demo2.jsp – Join a selected course from a list
  • Demo3.jsp – Join a course from a list with a password
  • Demo4.jsp – Activity monitor

The index page that needs to be modified is located here: /var/www/bigbluebutton-default/index.html

To redesign my index.html page I took the form from demo2.jsp, and inserted it into the “Join” div; I then copied the demo4.jsp page, stripped out the header and extra content, and then made an iframe on my index.html to point to this new .jsp page.

I then added a bit of text as a description for my users, in an collapsible div for a clean look, and modified the design of the page to fit our company design.

Update: here’s the actual code behind the index.html file:

<!DOCTYPE html PUBLIC "-//W3C//DTD XHTML 1.0 Transitional//EN" "http://www.w3.org/TR/xhtml1/DTD/xhtml1-transitional.dtd">
<html xmlns="http://www.w3.org/1999/xhtml">
<head>
<meta http-equiv="Content-Type" content="text/html; charset=UTF-8" />
<title>BigBlueButton -- Open Source Web Conferencing</title>
<link rel="stylesheet" href="css/style.css" type="text/css" />
</head>
 
<script type="text/javascript">
        function autoFocus() {
                document.getElementById("username").focus();
        }
</script>
<script language="javascript">
             function toggleDiv(divid) {
                 if (document.getElementById(divid).style.display == 'none') {
                     document.getElementById(divid).style.display = 'block';
                 } else {
                     document.getElementById(divid).style.display = 'none';
                 }
             }
</script>
 
<body onload="autoFocus();" class="nobackground">
 
        <div id="login"> 
 
        	<h1 class="logo"> 
            	<a href="">Login Page</a> 
            </h1> 
            <h1 class="loginheading">Virtual Boardrooms</h2> 
             <div id="login-form">
                    <h2>Introduction</h2>
                    <p><a class="speciallink" href="javascript:;" onmousedown="toggleDiv('description');">Click twice to expand introduction</a></p>
                    <div id="description">
                        <p>Using BigBlueButton, we have set up a central site to provide web conferencing access.  This is primarily used for:</p>
                            <p> - Document & whiteboard sharing<br />
                             - Presenting what is on the screen to attendees<br />
                             - One-to-many audio conference (ie: a single presenter with limited audience interaction)</p>
                        <p>This tool is not as effective for video and audio conferencing together, as they typically aren't synchronized together. A future version of BigBlueButton is addressing this problem, so in the future this may be the only tool we need.</p>
                        <p>To facilitate video conferencing, we recommend you use the video conferencing information on the wiki <a href="http://wiki/resources/virtual_boardrooms">here</a>.</p>
 
                    </div>
					<div id="join">
					    <h2>Join a Meeting Room</h2>
                            <FORM NAME="form1" METHOD="GET" action="/bigbluebutton/demo/demo2.jsp">
                                <p>Enter your name:</p>
                                <input type="text" id="username"  name="username" size="29" /><br /><br />
						        <p>Select a meeting room:</p>
						        <select name="meetingID">
				                    <option value="BrownBag">Brown Bag Sessions</option>
				                    <option value="BusDev">Business Development</option>
				                    <option value="Geomatics">Engineering</option>
				                    <option value="Geomatics">Geomatics</option>
				                    <option value="General">General</option>
			                    </select>	
						        <input type="submit" value="Join"/> 
                                <input TYPE="hidden" NAME="action" VALUE="create">
 
                            </form>
				        <br /><br />
						<p>For <b>multi-party video conferencing</b>, you can use this <a href="http://vbr/mpvideo.html">virtual boardroom</a>.
					    <p>If you have a regularly scheduled meeting and would like a specific virtual boardroom added, please email <a href="mailto:"> Jeff Miles</a></p>
					    <br />
					    <p>For a tutorial on using certain features of this tool, <a href="http://www.bigbluebutton.org/overview">click here</a></p>
				   </div>
		           <div id="currentactivity">
                        <h2>Current Activity</h2>
                        <iframe src="http://vbr/bigbluebutton/demo/activity.jsp" width="490" height="400" frameborder="0" scrolling="no" />		
                   </div>				      
            </div>
        <div id="footer">
                        <div id="footCenter">
                        <p>Copyright © 2010 <a href="http://bigbluebutton.org/">BigBlueButton Inc.</a></p></div>
 
                </div><!--end footer-->
</body>
</html>

I haven’t modified the actual BBB client, as this requires recompiling the swf files. It’s pretty brand neutral as it is, so I don’t think I’ll be doing anything there.


Overall the performance of BigBlueButton has been great. Document and screen sharing is crisp and smooth, and the video looks great. This is something we’re going to begin using immediately, especially since it is leagues ahead of other tools in features and performance.

My only complaint, and it is a deal breaker for certain uses, is that the audio and video don’t sync up. The audio is typically 2-3 seconds behind the video, which makes it unusable for video conferencing. For now we will be using the opentok basic embed to facilitate video conferencing.

I have heard from the mailing list that version .80 will have a different method of providing audio, one that doesn’t have the lag the current version does. Once this is released we will be trying that out and hopefully dumping opentok and use BigBlueButton exclusively.
Reset AutoCAD in a Windows profile to default

Occasionally I’ll come across an obscure AutoCAD problem that is only occurring for one particular user. I would have narrowed down the issue to conclude:

  • It doesn’t occur on a different computer with the same drawing
  • It doesn’t occur on the same computer with a different user and the same drawing
  • It does occur with the same user and a different drawing
  • It also continues to occur after changing profiles within AutoCAD

First some definitions just for clarification (perhaps there is better terminology out there, but I can’t think of it):

AutoCAD Profile: Profiles within AutoCAD that are accessible through the OPTIONS command

AutoCAD Windows Profile: Set of files, folders and registry entries for a single Windows user that contain all AutoCAD settings for that particular user


Based on the conclusions and definitions above, it is much easier to reset the AutoCAD Windows Profile back to defaults rather than try to find a solution, unless you know the command/variable that is causing your problem.

It should go without saying, this will remove any customizations you have made, including additional CUI files, PC3 files and tool palettes.
To do so:

  1. Navigate to: “%appdata%\Autodesk”
  2. For the Autodesk product with which you are having a problem, append the word “OLD” to that folder
  3. Navigate to “%localappdata%\Autodesk”
  4. For the Autodesk product with which you are having a problem, append the word “OLD” to that folder
  5. Open Regedit
  6. Navigate to HKCU\Software\Autodesk\AutoCAD\
  7. If you have more than one AutoCAD product, you’ll see a variety of R1x.x numbers. These correspond to different AutoCAD releases, with the major number incrementing when a new DWG format is released. For a specific list, see here: http://en.wikipedia.org/wiki/AutoCAD
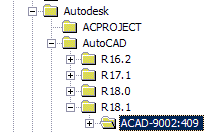
  8. Expand the version you’re concerned with, and you will see a key for each product within that release. For example:
  9. Right click on that key, and choose Export. Save this as a backup in case something goes wrong.
  10. Now delete that key that you just exported.


Now when you start AutoCAD as that user, it will rebuild the AutoCAD Windows Profile from default.


Deploy AutoCAD Map 3D 2011

One of our branch offices has decided to roll out AutoCAD Map 3D 2011 to take advantage of some of the new features and bug fixes. I guess the wait until 2012 is out (a few months) is too long.

I didn’t use GPO for this deployment, due to the amount of add-in’s required, and the amount of time it would take to install at start up.

Instead, I used a combination of scheduled tasks and msi files. This will work for any version of AutoCAD as far as I’m aware. I’ve used it for vanilla AutoCAD, Map 3D and Civil 3D.

I gladly welcome any suggestions on making this better. If you have one, drop me a comment.

First steps

To begin, you need to create deployments on a network share of your product. Ensure that you include the service pack in the configuration.

You’ll also need to extract the supporting programs, Raster Design Object Enabler, and Visual Basic enabler.

To get an .msi out of these programs:

  • For the Raster Design OE, run it, and then look in the %temp% location for an .msi file with a name similar to:
    9.tmp_AutoCAD_Map_3D_2011_-_English_(United_States)
  • For Visual Basic enabler, start the install but cancel it after you get to the settings screen. Then look in C:\Autodesk for the folder containing the msi file.

Copy both the Raster Design msi and the whole folder for the VBA enabler to your network share.

Scheduled Task

Using a scheduled task, you can get your users to log off their computers at the end of the day, and have the deployment run overnight.

There are separate scheduled tasks for Windows 7 x64 and Windows XP, due to the command differences.

Windows XP

schtasks.exe /create /tn map2011install /tr "\\server\apps\Private\Map3D\Map2011-x86-Standalone\mapdeploy.cmd" /sc once /ST 14:25:00 /s computername /ru "domain\administrator" /rp "password" /V1 /F

Windows 7

schtasks.exe /create /tn map2011install /tr "'\\server\apps\Private\Map3D\Map2011-x64-Standalone\mapdeploy.cmd'" /sc once /ST 10:01:00 /s computername /ru "domain\administrator" /rp "password" /F /RL Highest

These commands will create a named task that runs once at the time specified. It will run your batch file from the network share with the supplied credentials.

  • The /V1 makes the task visible to pre-Vista platforms.
  • The /F forces creation of the task overwriting if it exists.
  • The /RL is the run level of the task, which I’ve set to Highest.

Put a bunch of these in a batch file, replacing the computer names from your pre-defined list, and then run it.

Deploy Commands

These are the commands that run when the scheduled task is executed:

::Run the Map2011 deployment, using the .ini file that was created during your deployment creation
start /wait "Installing Map 3D 2011" \\server\apps\Private\Map3D\Map2011-x86-Standalone\AdminImage\Setup.exe /qb /norestart \\server\apps\private\Map3D\Map2011-x86-Standalone\AdminImage\Map2011-x86-Standalone.ini /language en-us

:: Wait for 33 minutes before proceeding. This is necessary because the /wait of the previous command only affects the "setup" phase of the deployment. 
\\server\apps\Private\Map3D\Map2011-x86-Standalone\timeout.exe 2500

:: Push the Raster Design Object enabler to the client
start /wait \\server.ca\apps\Private\Map3D\Map2011-x86-Standalone\Raster_Design_2011_OE_32.msi /qn /norestart

:: Push the VBA object enabler to the client 
start /wait \\server.ca\apps\Private\Map3D\Map2011-x86-Standalone\AutoCAD_2011_VBA_Enabler_Install_Image\AcVbaInstaller.msi /qn /norestart

:: Copy this support folder, as it causes an issue with other programs; see note below.
xcopy "C:\Documents and Settings\All Users\Application Data\Autodesk\Geospatial Coordinate Systems" "C:\Documents and Settings\All Users\Application Data\Autodesk\Geospatial Coordinate Systems Temp" /E /C /I /Q /Y

You can find timeout.exe from any of the Windows Resource Kits, or built into Windows 7.

Regarding the xcopy command, see this bug. This affects Map3D 2010 and 2011.

http://usa.autodesk.com/adsk/servlet/ps/dl/item?siteID=123112&id=14174241&linkID=9240857

Additional Features

Enterprise CUIX and Customized Profiles

You may wish to control the interface and settings of your AutoCAD deployment, or provide a standardized layout for all your users. Its possible to work some of this directly into the deployment, but I find its easier to separate it out. You can do this using Enterprise CUIX files, and customized profiles.

Here’s what you do:

  • Create a “Deployment” folder somewhere on a network share that all your users can access
  • Make a clean install of Map 3D 2011 as your setup system.
  • Copy acmap.cuix from the user profile of the account you’re currently on, to your deployment folder.
    This is usually found in a location like this: %userprofile%\Application Data\Autodesk\AutoCAD Map 3D 2011\R18.1\enu\support
  • Open AutoCAD, type op, and go to the Profiles page. Copy the existing profile, and name your copy “Enterprise Setup” or something similar. Set that new profile as current.
  • Go to the Support File Paths section of options, and under menu files, set your main menu file as the acmap.cuix file in your network share.
  • Make all the modifications you like to AutoCAD. Menu loads, toolbar placements, options and customizations.
  • In the CUI customization, make sure CUSTOM.cuix is not loaded as a partial cui.
  • When you’re done, create a copy of your “Enterprise Setup” profile, and name the copy something relevant for your users. Set this new profile as current.
  • Now go back into the Support File Paths section, and change the network share acmap.cuix to the Enterprise menu file.
  • Make the main menu file the custom.cuix which is found buried in the same windows profile spot listed above.
  • Go back to the Profiles window, and export your current profile to an ARG file.
  • Put that ARG file in your network share deployment folder.

Now on the desktop, make a copy of the AutoCAD Map 3D 2011 shortcut, and make the target look like this:

"C:\Program Files\Autodesk\AutoCAD Map 3D 2011\acad.exe" /p "\\Server\Deployment\template-Standard-acad2011.arg"

Put that shortcut in your network share deployment folder too.

Now you can instruct your users to use that shortcut which will automatically load your standardized profile. The changes you made to the CUIX will be read only (by nature of the Enterpise CUIX) however the users can make their own customizations because of the CUSTOM.cuix.

Wake-On-Lan

If you have Wake-On-LAN enabled on your computers, you can add this to your scheduled task batch file to turn on your computers in the middle of the night:

http://www.matcode.com/wol.htm

mc-wol mac_address
timeout 120

Change Folder Target of DFSR Member

About to run out of space on the volume hosting a DFS folder target? I just about did, and had to take quick steps to move to a bigger volume. This page describes the process and commands used.

Note: This process will perform an initial replication within your replication group. As far as I’ve found, there is no way around it, so make sure you’re scheduling enough time for this to complete.

Note #2: A lot of this information was provided by Ned Pyle with Microsoft, through correspondence and the Ask DS blog. See this blog post for more information: http://blogs.technet.com/b/askds/archive/2010/09/07/replacing-dfsr-member-hardware-or-os-part-2-pre-seeding.aspx#comments

One of our replication groups is approaching 800 GB and almost 1 million files, and growing; and we were down to 2 GB free space remaining on the volume. Our environment at the time was fully Server 2008 x64.

Pre-Seed

After creating a larger volume for the files to move to, you will begin with Pre-Seeding your data. As recommended in the Ask DS post above, this should be a one-time operation. It was difficult for us to schedule this copy along with a time window for the initial sync, but we managed.

If you can, disable the folder targets so changes aren’t made during your file copy:

dfsutil property state offline \\domain.ca\files\jobs \\server\jobs$

The last two values of that command is the DFS path, and the folder target. Do this for each folder target.

Our pre-seed command was:

Robocopy.exe d:\jobs e:\jobs /b /e /copyall /r:6 /NFL /NDL /MT /xd dfsrprivate /log:robo.log /tee

It is VERY important that your destination folder does not exist before you pre-seed. Let the robocopy command create it for you. You can also use other pre-seed options mentioned in the Ask DS post above.

File Check

After the pre-seed, you’ll want to confirm DFSR recognizes the files as identical. If you don’t do this, you will get a ridiculous amount of conflicts in the event log during the inital sync. Trust me, I know this through experience.

To check the files you’ll need Server 2008 R2 or Windows 7 RSAT, and this command:

dfsrdiag.exe filehash /FilePath:"\\server\f$\Jobs\file1.txt"
dfsrdiag.exe filehash /FilePath:"\\server\e$\Jobs\file1.txt"

The same CRC value should be returned for each command. If not, then you’ve got a problem somewhere in your pre-seeding.

Change Share Path

Now you need to change the share target, so that the folder target will still be \\server\jobs$ (or whatever you’re using).

Open Regedit and navigate to: HKEY_LOCAL_MACHINE\System\CurrentControlSet\Services\LanManServer\Shares

Find the REG_MULTI_SZ entry that corresponds to the DFS share and modify only the “Path” line to refer to the new path.
In my case, I changed Jobs$ share from F:\ to E:\. A restart is required before this takes effect, but we waited until after the next command.

Transfer DFSR Membership Settings

Now you need to tell DFSR that the location has changed. This is the command that starts the initial replication. Make sure this command is all one line.

dfsradmin membership set /rgname:domain.ca\files\jobs /rfname:Jobs /memname:domain\sw3010 /localpath:E:\Jobs /membershipenabled:true /stagingpath:E:\Jobs\DfsrPrivate\Staging /stagingsize:24000 /cdsize:660 /membershipdfsfolder:\\server\jobs$ /isprimary:false /force

Now restart the server. Once Windows comes back up, it will begin initial replication. You can check the progress by checking the backlog:

dfsrdiag Backlog /receivingmember:server1 /sendingmember:server2 /rgname:domain.ca\files\jobs /rfname:Jobs

In my environment, initial replication of ~800 GB and 1 million files takes approximately 8 hours.

Once initial replication is complete, make sure you re-enable the folder targets:

dfsutil property state online \\domain.ca\files\jobs \\server\jobs$


Now you’re done! Do a full backup after this is complete, and then delete the original source folder.

MD3220i MPIO driver install on Hyper-V

We just finished setting up our Hyper-V failover cluster with a Dell MD3220i, and in the process I had a hard time finding information about the specific MPIO driver to use from Dell. Its actually very simple.

Here’s what you need to do:

  1. Install the MD Storage Manager software somewhere if you haven’t already
  2. On the server you installed it on, look in C:\Program Files (x86)\DSMDrivers. Copy the md3dsm folder to your Hyper-V host.
  3. On the Hyper-V host, enter the mpio control panel by typing mpiocpl:
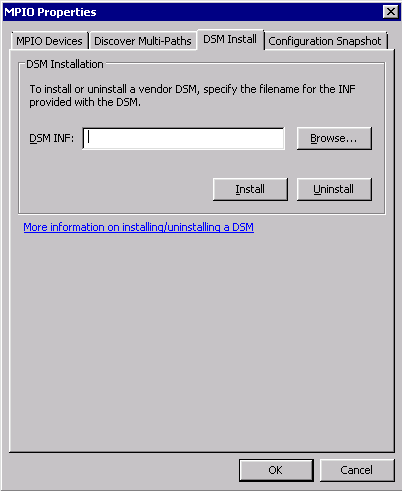
  4. Click on the “DSM Install” tab, and then browse to the md3dsm folder.
    MPIO control panel
  5. Use the md3dsm.inf file, and then click “install”.
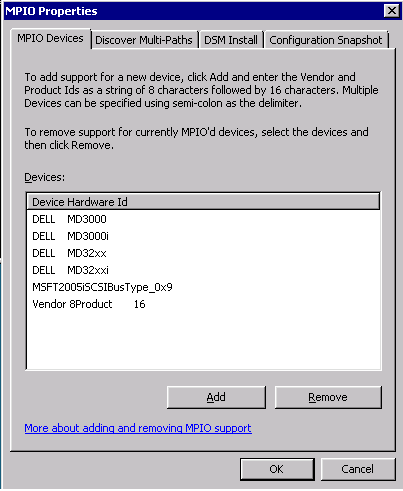
  6. Restart your Hyper-V host, and after going back into the mpiocpl, you should see additional providers listed:
    MPIO devices