I encountered an issue with a Hyper-V virtual machine recently that had me very confused. I still don’t have a great resolution to it but at least a functional workaround.
At a site I have a Server 2012 R2 Hyper-V host (Host), a Server 2012 R2 file server guest (FileServer) and a Server 2012 R2 domain controller (DC).
The Host has two NICs in a single switch-independent address hash team. This Team is set as the source of the vSwitch which has management capabilities enabled. We wanted to use a NIC team to provide network redundancy in case a cable was disconnected as this network is being provided by the site owner rather than my company.
Host and FileServer could reach DC, but nothing else could. DC could reach Host and FileServer, but not even it’s own default gateway.
This immediately sounded like a mis-configured virtual switch on Host, as it appeared DC could only access internal traffic. But I confirmed the vswitch was set to “External” and if this were the case the FileServer would have presumably been affected by this issue as well, but it was not.
I tried disabling VMQ on the Host NICs, as well as Large Send Offload, since both those features have been known to cause problems, but that did not resolve the issue either.
I tried changing the teaming algorithm to Hyper-V Port and Dynamic, but that didn’t resolve the issue either.
Then I decided to put one of the NICs into a Standby state in the team. This caused the accessibility to switch between the VMs; all of a sudden nothing external could reach my file server, but the DC came online to external traffic.
I tried changing which NIC was in standby but that still left me with one VM that had no connectivity.
My assumption at this point is that this issue is being caused by Port Security on the network switches; something that we are aware the site owner is doing. I suppose that the Team presents a single MAC address across multiple ports, which the port security doesn’t like and so it blocks traffic from one side of that team. Because of how traffic is balanced across the team it leaves one of the VMs in an inaccessible state.
Unfortunately we do not have control over this network or the ability to implement LACP, and so I’ve had to remove the NIC teaming and go back to segregated NICs for management and VM access.
I use Microsoft Skype for Business (formerly Lync) extensively at work and utilize a headset while doing so. This combined with the fact that I recently moved into an office at work as opposed to a cubicle led me to wanting a physical indicator of my Skype presence so that people walking in could know my status.
I briefly investigated pre-packed indicator devices such as the Embrava Blynclight and BusyLight but decided that shipping costs were too much and it would be fun to make my own.
Shortly after I stumbled upon a post by Jon Gallant where he built his own using a Particle Photon and called it Beakn. This sounded like it would be exactly what I wanted, and so I set about building one.
Estimating the placement of the built-in LED
Step 1 – what will it look like?
I thought about building it out of Lego, but my wife persuaded me that it wouldn’t be professional enough. I had seen a forum post where someone took the Embrava Blynclight and stuck it in a picture frame, and this really appealed to me.
I bought a Photon, scrounged up a decent looking frame, and got ready.
Step 2 – Build the prototype
I used sandpaper to thin out the mat so that the LED would shine through. I wasn’t very circular which may have had an impact on how unsatisfied I was with this design.
I had a small USB device charger that I used for my proto-type. A little bit of duct tape and I was ready to go.
Step 2a – Get the Photon on the network
I had a lot of trouble getting the Photon connected to my Wifi. It worked at home no problem, but when I brought it to work I couldn’t get it to connect. And then all of a sudden something happened where it wouldn’t boot at all but instead gave me SOS codes.
Through a support ticket with Particle I was finally able to get the device back online by flashing a new firmware. Then I discovered that the Photon uses non-standard ports for cloud communication rather than HTTP or HTTPs. Outbound traffic is restricted in my work network and so that was the source of connectivity issues.
Once all that was sorted, getting the code as documented by Jon Gallant was very easy and worked like a charm.
It’s alive! And apparently away from the keyboard.
Step 3 – Better batteries
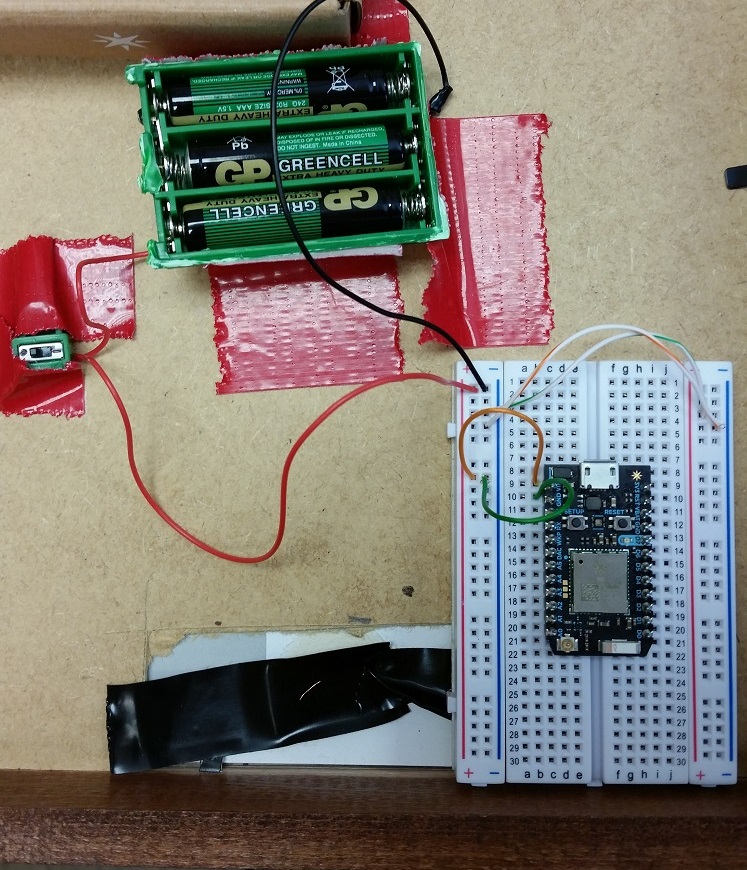
I shameless tore apart an old broken toy from the basement to make use of a battery pack. Unfortunately the best I could find was a 3xAAA pack with a power switch. More duct tape ensued and I wired positive (red) to the VIN pin and black to GND pin on the Photon.
This worked well at first, but when I took it to work and attempted to use it for real, the Photon would die after 10 minutes or so. I knew the batteries were brand new and not dead yet, so I posted a question to the Particle forums.
It turns out that 3xAAA is likely not providing enough voltage for the Photon when it’s constantly running it’s Wifi. I needed more power!
Step 4 – New batteries and changing LEDs
Through my prototype and AAA testing I had determined that the indicator light at the bottom of the frame just wasn’t going to do. It wasn’t bright enough, and didn’t match up well with the “Legend” that I planned to put in the actual frame.
This change let me use the breadboard that came with the Photon, and so I spent some time learning how to use it and the power rails. I highly recommend reading this Sparkfun tutorial.
Next I went back through some of Jon Gallant’s older posts and found his designs for individual LEDs. I decided I was going to put individual LEDs right in the middle of my legend, and again used a Sparkfun tutorial to learn about that.
Back into the basement to break more toys! I managed to find a good green and red LED but a poor quality yellow was all I could produce.
I went to Value Village and found a cheap toy that took 4xAA batteries and tore that apart for this project too.
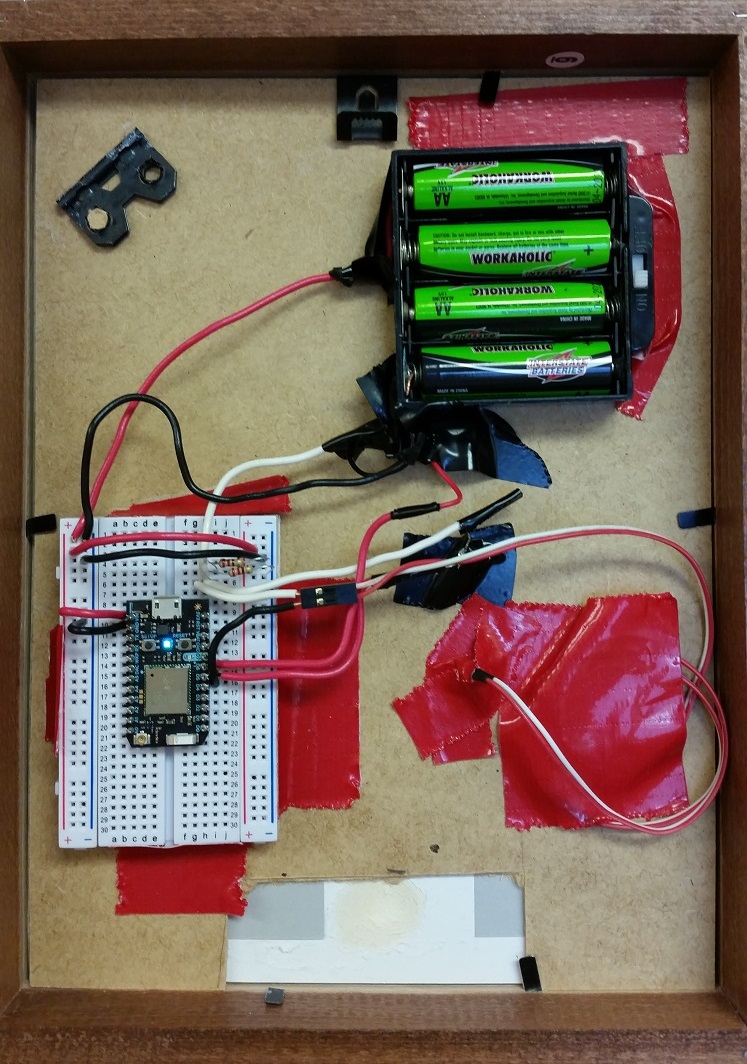
I didn’t take good pictures of the final build process unfortunately, but it is fairly clear from this photo which I’ll walk through for those just learning like I am.
Power comes in from the batteries on the red wire to the positive rail on the breadboard. I have wires connecting the right-hand rail to ensure the circuit is complete there.
The next red wire on the left side goes from the power rail to the row with the VIN pin on the Photon. A black wire in the next row down takes GND pin from the Photon to the negative rail, completing the circuit.
On the other side, I sort of lost my color coordination because I got tired of stripping wires (I was using leftover 3 strand thermostat wire so all 3 colors were bundled together).
Pins 4, 5, and 6 on the Photon are wired to the positive ‘anode’ side of each LED. The negative cathode side is wired with the white cables, each going to a row with a resistor before completing on the negative power rail.
Looking at this photo now it almost seems like I have the resistor in the wrong place, as I thought it should be in between the positive source of the Photon pin, and the anode on the LED. But according to this it doesn’t really matter.
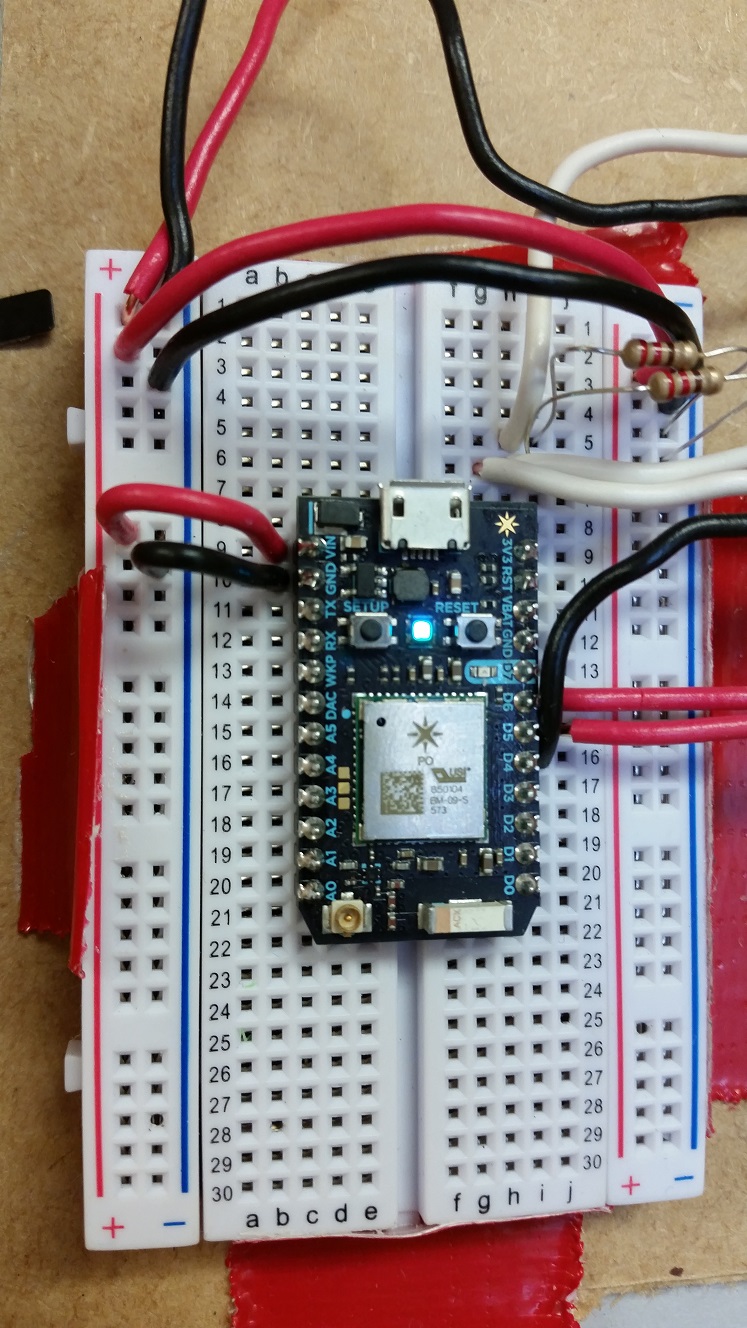
Here’s a close-up of the breadboard:
To get this setup to work, I had to modify the Beakn code because of the pins on the Photon I decided to use, and it didn’t have a status for “FreeIdle” when I locked my PC. The code I used in the cloud IDE is reproduced at the bottom of this post.
Once I had this all wired up, I used hooks and fishing wire, and hung it in my office window:
Overall I’m very happy with the results, but there’s room for improvement.
Step 5 – What’s next
Once I got this running, it only lasted 2 1/2 work days before the batteries died. Based on feedback from my particle forum post, I need a capacitor to smooth out the power draw and ideally a way to turn off the Wifi on the Photon and only check for status changes at intervals.
Neither of those are easily accomplished (because it’s hard to source a single capacitor and I have no soldering iron to break more toys with), so instead I’m going to use rechargeable batteries and attempt to build myself a solar charge mechanism using lawn lights. A future post will address that addition if I can ever get it to work.
Code:
int red = 5;
int yellow = 4;
int green = 6;
void setup()
{
  Spark.function("setStatus", setStatus);
  pinMode(red, OUTPUT);
  pinMode(yellow, OUTPUT);
  pinMode(green, OUTPUT);
  for(int i = 5; i <= 7; i++)
  {
      digitalWrite(i, HIGH);
      delay(250);
      digitalWrite(i, LOW);
      delay(250);
  }
  reset();
}
void loop()
{}
void reset()
{
  digitalWrite(red, LOW);
  digitalWrite(yellow, LOW);
  digitalWrite(green, LOW);
}
int setStatus(String status)
{
  reset();
  if(status == "Busy" || status == "DoNotDisturb"){
    digitalWrite(red, HIGH);
  }else if(status == "Away" || status == "TemporarilyAway" || status == "FreeIdle"){
    digitalWrite(yellow, HIGH);
  }else if (status == "Free"){
    digitalWrite(green, HIGH);
  }
  return 1;
}
The scenario is a pre-existing VHDX file that is mounted within a Debian virtual machine, which has used LVM to create volumes.
Now we want to expand that VHDX file, and then extend the pre-existing volumes without spanning new partitions.
Expand the disk in the Hypervisor
Reboot the VM to recognize the change (there’s specific commands to do this as well)
Run parted on your disk: parted /dev/sdb
Change display unit to sectors: unit s
Print current partition table and note the start sector for your partition: p
Delete your partition (won’t delete the data or filesystem): rm <number>
Recreate the partition with the starting sector from step 5 above: mkpart primary <start> -1
Exit parted: quit
Reboot the VM to recognize the new partition size
Type the following to resize the physical volume: pvresize /dev/sdb1
Now you can re-allocate size to a logical volume by using the following (this adds 20G to existing size): lvextend -L+20G /dev/volumegroup1/mylogicalvolume
For any logical volume that you resized, you need to extend the ext4 partition: resize2fs /dev/volumegroup1/mylogicalvolume
I’ve been having an issue with Excel 2013 (from the Office 365 Click to Run installer) for a while now that I finally decided to dig a little deeper on.
I found that when I was double clicking on a file from Windows Explorer to open in Excel, it would take 15-30 seconds before the application would appear.
However, if I opened Excel from the start menu, or through a “Run” command, it would appear instantly.
I tried many different things to isolate this issue such as checking conflicting processes, watching processmon, and eliminating the network as a source of problems.
Eventually I hit the right combination of google keywords and came across this post.
Based on that recommendation I disabled Cortana and immediately saw improved response times from Excel. Hopefully Microsoft fixes this bug in time for Office 365 integration with Cortana!
I had someone email me about DFSR and file locking based on some old comments on a Ned Pyle post from the Ask DS blog on technet.
I wrote up a detailed response of how I’ve handled this issue in my environment, and decided that response would make a good post to share, so here it is:
It’s a long story actually. Not sure if you read my post from April 2013, but I effectively gave up on DFSR due to the instability we were experiencing. Still not sure if it was underlying storage causing it, or just the scale at which we were operating. PeerSync couldn’t keep up with the rate of change on our file servers when we piloted it, and neither could PeerLock when we tried to integrate it with DFSR.
So stuff crashed in April 2013, I gave up on DFSR and we intended on using Silver Peak WAN acceleration across our site-to-site VPNs, combined with RDS or Citrix XenApp.
Then my company was acquired by a much bigger engineering firm, and all my plans were interrupted. We basically left our users to suffer (since we had already used DFSR to create a single namespace, when we quit DFSR we just kept a ‘single source of truth’) for months because the parent company was going to roll out a global WAN.
That did eventually happen in late 2014, so at that point we had Riverbed Steelheads providing 80% data reduction across the WAN and a 7ms link between our biggest branch and head office (where the most pain was for ACAD production).
We occasionally heard rumbling from staff that it wasn’t good enough, and so we pressed on-wards with purchase of a 30-seat Citrix XenApp environment with a dedicated nVidia GRID K2 card for GPU acceleration. However we really screwed up the user communication and training and failed to get adequate buy-in from CAD management to enforce it’s use.
XenApp works fantastic for apps like ArcGIS Desktop and GlobalMapper, but
we really struggled with mouse lag in all AutoCAD streams (except Revit which we don’t use). We went as far as a specialized consultant out of the UK and they couldn’t figure it out either.
I had begun the process of looking at Panzura, which I raved about here. It still looks like the best overall solution to a centralized file server with geographic collaboration on AutoCAD files. But the price tag for two offices was close to $60k not counting cloud storage costs, and I had just purchased a whole bunch of new storage so i didn’t want new Panzura hardware, and they don’t support Hyper-V for their virtual instance (which still blows my mind).
Ultimately, a couple months ago we had a big meeting with all our CAD managers and consensus was that:
– The majority of work performed in branch offices is acceptable due to the Riverbed Steelheads and low latency provided by the global WAN
– The work that doesn’t perform well due to huge file sizes would be done with XenApp and the mouse lag would just be accepted. But I don’t think the CAD managers are actively encouraging this.
And that’s where we’re at right now; not really solving the issue but trying to find improvements as best we can.